All blogs
.avif "Seamless Headless Drupal integration with Next.js 15 (App Router)")
Seamless Headless Drupal integration with Next.js 15 (App Router)
Drupal is a mature and flexible content management system (CMS) trusted for building structured content models and managing complex workflows.
On the front end, Next.js is a widely adopted React framework known for its speed, developer experience, and production-grade features. With the release of Next.js 15, the new App Router brings powerful updates, including built-in support for async/streaming, granular caching, and improved routing patterns.
When connecting a decoupled Drupal backend to a Next.js 15 frontend, handling authentication becomes a key step, especially for gated content, personalisation, or editorial workflows.
This blog covers how to implement authentication in a headless Drupal + Next.js 15 setup using the latest App Router features and best practices around API routes, sessions, and token handling.
Why integrate Drupal with Next.js?
- Decoupled Architecture: Separates the back-end (Drupal) and front-end (Next.js) for increased flexibility.
- Improved Performance: Next.js 15 introduces automatic caching and async rendering for faster load times.
- Better User Experience: Provides a modern React-powered front-end for improved interactivity.
- Scalability: Using Drupal as a headless CMS makes it easier to scale and manage content across platforms.
Setting up Next.js 15 with App Router
Create a Next.js application
Before starting, ensure you have Node.js installed. Then, run the following command to create a new Next.js 15 project:
npx create-next-app@latest my-nextjs-app --ts --experimental-app
cd my-nextjs-app
npm install
To start the development server:
npm run dev
Your Next.js app should now be running at http://localhost:3000.
Basic Project Structure
my-nextjs-app/
├── app/                 # App Router directory
│   ├── layout.tsx       # Root layout (applies to all pages)
│   ├── page.tsx         # Home page (/)
│   ├── about/           # Example route: /about
│   │   └── page.tsx
│   └── api/             # API routes
│       └── user/route.ts
│
├── components/          # Reusable components (e.g., Header, Button)
│   └── Header.tsx
│
├── styles/              # Global and module CSS files
│   ├── globals.css
│   └── Home.module.css
│
├── public/              # Static assets (images, favicon, etc.)
│   └── favicon.ico
│
├── next.config.js       # Next.js configuration
├── tsconfig.json        # TypeScript configuration (if using TS)
└── package.json         # Project metadata and dependencies
Setting Up Drupal as a Headless CMS
Install Drupal new setup
Install and configure Drupal JSON: API
To enable API-based communication between Next.js and Drupal, install the JSON: API module:
ddev composer require drupal/jsonapi
ddev drush en jsonapi -y
Enable CORS for API requests
To allow Next.js to access Drupal’s API, update services.yml:
cors.config:
  enabled: true
  allowedOrigins: ['*']
  allowedHeaders: ['Content-Type', 'Authorisation']
  allowedMethods: ['GET', 'POST', 'OPTIONS', 'PATCH', 'DELETE']

Clear the cache:
ddev drush cr
Fetching Drupal data in Next.js 15 (Using Async and Cache)
Next.js 15 introduces improved async handling and caching. To fetch content from Drupal, install the required packages:
npm install next-drupal drupal-jsonapi-params
Set the variables
# Required
NEXT_PUBLIC_DRUPAL_BASE_URL=https://my-site.ddev.site/
NEXT_IMAGE_DOMAIN=my-site.ddev.site


NEXT_PUBLIC_BASE_URL=http://localhost:3000
Update the image dome in next.config.ts file
Import type { NextConfig } from “next”;
const nextConfig: NextConfig = {
 images: {
   domains: ["my-site.ddev.site"], // Allow images from this domain
   remotePatterns: [
     {
       protocol: "https",
       hostname: "my-site.ddev.site",
       pathname: "/sites/default/files/**",
     },
   ],
 },
};


export default nextConfig;
Then, create a client to fetch data using the new fetch API with caching:
import { NextDrupal } from "next-drupal"
import { DrupalJsonApiParams } from "drupal-jsonapi-params";


const drupal = new NextDrupal(process.env.NEXT_PUBLIC_DRUPAL_BASE_URL);


process.env.NODE_TLS_REJECT_UNAUTHORIZED = "0"; // To fix the development fetch error


export async function fetchArticles() {
 const params = new DrupalJsonApiParams()
   .addFields("node--article", ["title", "id", "body", "field_image", "field_tags"])
   .addInclude(["field_image", "field_tags"])
   .addSort("created", "DESC");


 const response = await drupal.getResourceCollection("node--article", {
   params: params.getQueryObject(),
   cache: "force-cache" // Ensures fast loading
 });
 return response;
}
Rendering the fetched content in Next.js 15:
import { fetchArticles } from "../lib/drupal";
import Image from "next/image";


export default async function Page() {
 const data = await fetchArticles();
 console.log(data);
  return (
   <div className="">
     {data.map((article) => (
       <div key={article.id || article.title}> {/* ✅ Add key to top-level item */}
         <h2 className="article-title">{article.title}</h2>

         {article.field_image?.uri?.url && (
           <Image
             src={`${process.env.NEXT_PUBLIC_DRUPAL_BASE_URL}${article.field_image.uri.url}`}
             alt={article.title}
             width={400}
             height={250}
             className="image"
           />
         )}

         {article.body?.value ? <p>{article.body.value}</p> : <p></p>}

         {article.field_tags?.length > 0 && (
           <ul>
             {article.field_tags.map((tag, index) => (
               <li key={tag.id || `${tag.name}-${index}`}>{tag.name}</li>
             ))}
           </ul>
         )}
       </div>
     ))}
   </div>
 );
}
Conclusion
By integrating Drupal’s headless capabilities with Next.js 15 and its modern App Router, teams gain a powerful architecture that combines content flexibility with frontend performance.
Drupal continues to provide a structured, API-first backend for complex content models and editorial workflows, while Next.js 15 brings faster rendering through granular caching, improved async handling, and enhanced developer ergonomics.
This setup creates a future-ready foundation for scaling digital experiences. You can introduce personalisation, real-time updates, static generation for anonymous content, and even edge rendering with Next.js middleware, which also aligns well with the growing demand for composable architectures, enabling easy integration with third-party services like analytics, commerce, or AI-based recommendations.
As headless adoption grows, pairing Drupal with Next.js 15 offers a stable yet forward-looking path, supporting editorial flexibility, high performance, and extensibility for evolving digital products.

How Drupal’s Experience builder is changing site creation
Drupal’s new Experience Builder (XB) is changing how teams create and manage content. It gives editors and developers a shared, visual interface to design pages quickly, without writing code.
In this blog, we’ll explain what Drupal’s Experience Builder is, how it’s different from Layout Builder, and why its Code Components are becoming a key part of modern Drupal development.
What is the Drupal Experience Builder?
Experience Builder is Drupal’s next-generation visual page builder. It helps non-technical users create, edit, and manage pages using a simple drag-and-drop interface.
It’s built around a component-based system, so every part of a page — a banner, a card, or a section — can be reused and customised visually.
This tool is part of Drupal’s Starshot Initiative, which focuses on making site building faster, easier, and more consistent for teams.
Essential features of a modern Experience Builder
- Visual drag-and-drop editing for real-time page building
- Reusable component libraries to maintain design consistency
- Style control for layout, spacing, and typography
- Support for React and Tailwind CSS for modern UI development
- Integrated workflow between developers and editors.
Drupal Experience Builder vs. Layout Builder: what’s the difference?
While both tools help shape page layouts in Drupal, Layout Builder and Experience Builder serve different goals.
Layout Builder focuses on structuring content types. It’s built for developers and site builders who define layouts that apply across similar pages, such as all blog posts or articles. It’s backend-focused and block-based, which gives it precision but limits flexibility for non-technical users.
Experience Builder, on the other hand, is designed for editors and marketers who want more visual control. It lets users build full pages through a drag-and-drop interface and see updates instantly. Instead of relying on Twig templates and PHP blocks, it uses modern React-based Code Components that can be customised and reused across pages.
In short, Layout Builder defines the structure; Experience Builder defines the experience. It takes Drupal’s structured approach and adds a modern, component-driven workflow that feels faster, more visual, and more flexible.
Experience Builder (XB)
Experience Builder allows content editors to visually build and manage pages using a drag-and-drop interface. This means editors don’t need to write code to create or change page layouts — they can do it all visually and easily.
Code components in XB: build UI with React & Tailwind
Code Components are fully customizable building blocks in Experience Builder (XB) that allow developers to create reusable UI elements using React, JSX, and Tailwind CSS.
They are built using Drupal’s Single Directory Components structure, which keeps markup, logic, and styles together for better maintainability.
While these components are coded by developers, they are designed to be user-friendly for content editors, who can drag and drop them into pages, configure props, and manage layout without writing any code.
Why use Code components?
They enable developers to define the structure, style, and configurable options (props and slots), making UI elements reusable and consistent. Content editors can visually manage and customise these components without needing to write code, speeding up page creation and ensuring design consistency across the site.
Common use cases include:
- Editable text blocks and banners
- Dynamic cards with images and content
- Reusable layout sections
- Interactive components configured via UI
Note: Before creating Code Components, make sure Experience Builder (XB) is set up and ready to use on your Drupal site. Once everything is ready, you can start building components easily inside the builder.
Currently, XB supports only the Article content type.
Key benefits of adopting the Experience Builder
For Content editors
- Build and edit pages visually
- Preview updates instantly
- Reduce dependency on developers
For developers
- Create reusable UI components once and use them anywhere
- Simplify front-end handoffs
- Maintain consistency across projects
For businesses
- Faster launch cycles
- Lower maintenance costs
- Consistent brand experience across websites
A developer’s deep dive: how to create reusable code components in Experience Builder
1. Create an article node
- Navigate to Content → Add content → Article

- Fill in the title and save the node
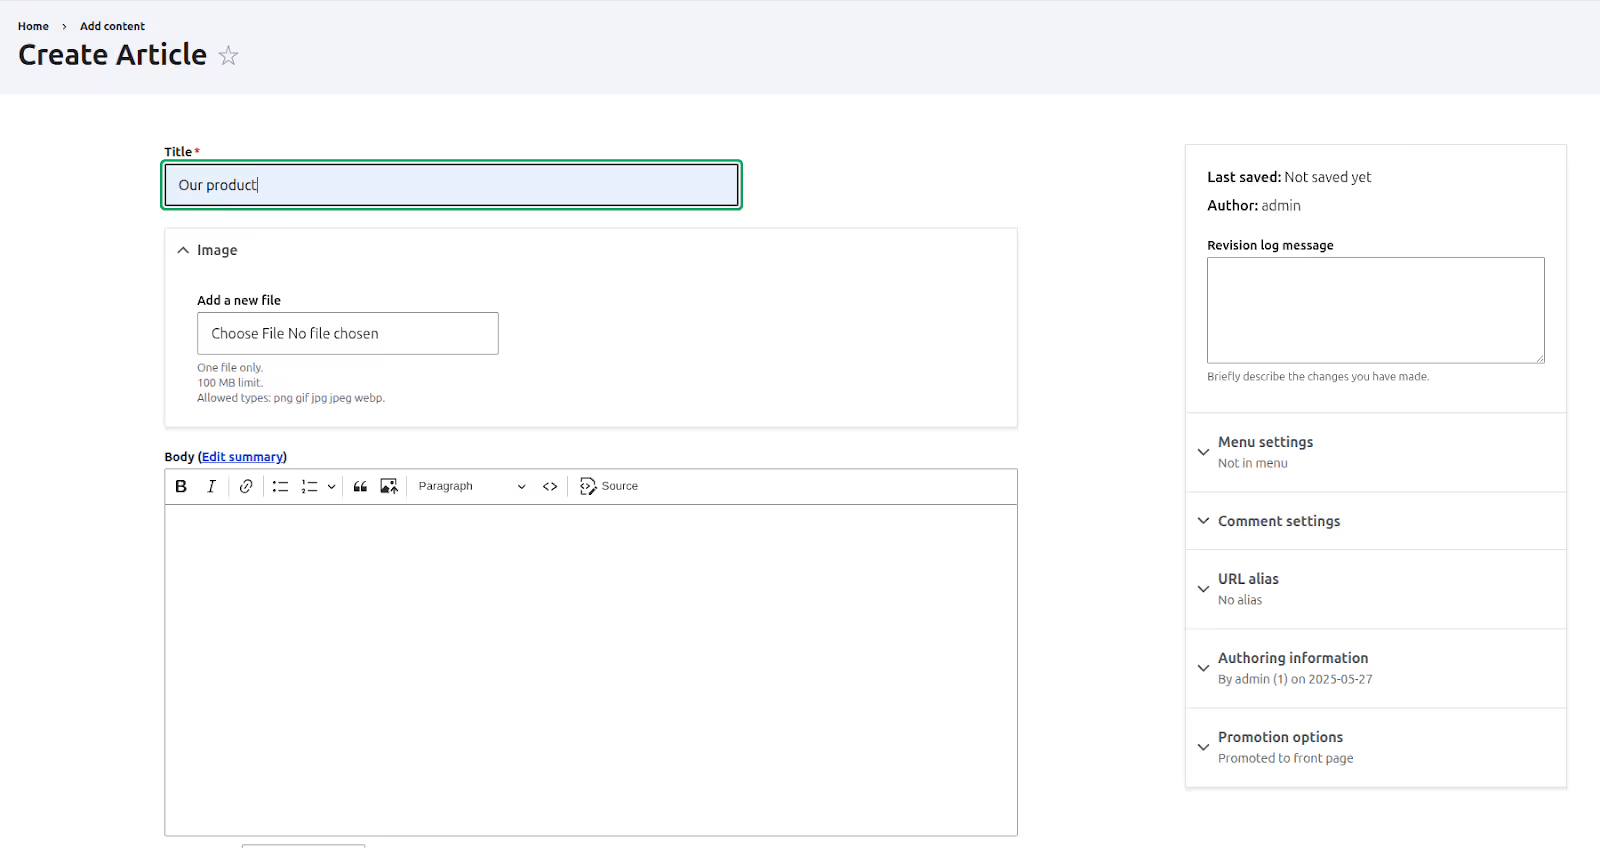
2. Access the Experience Builder editor
- After saving, go to the node view page
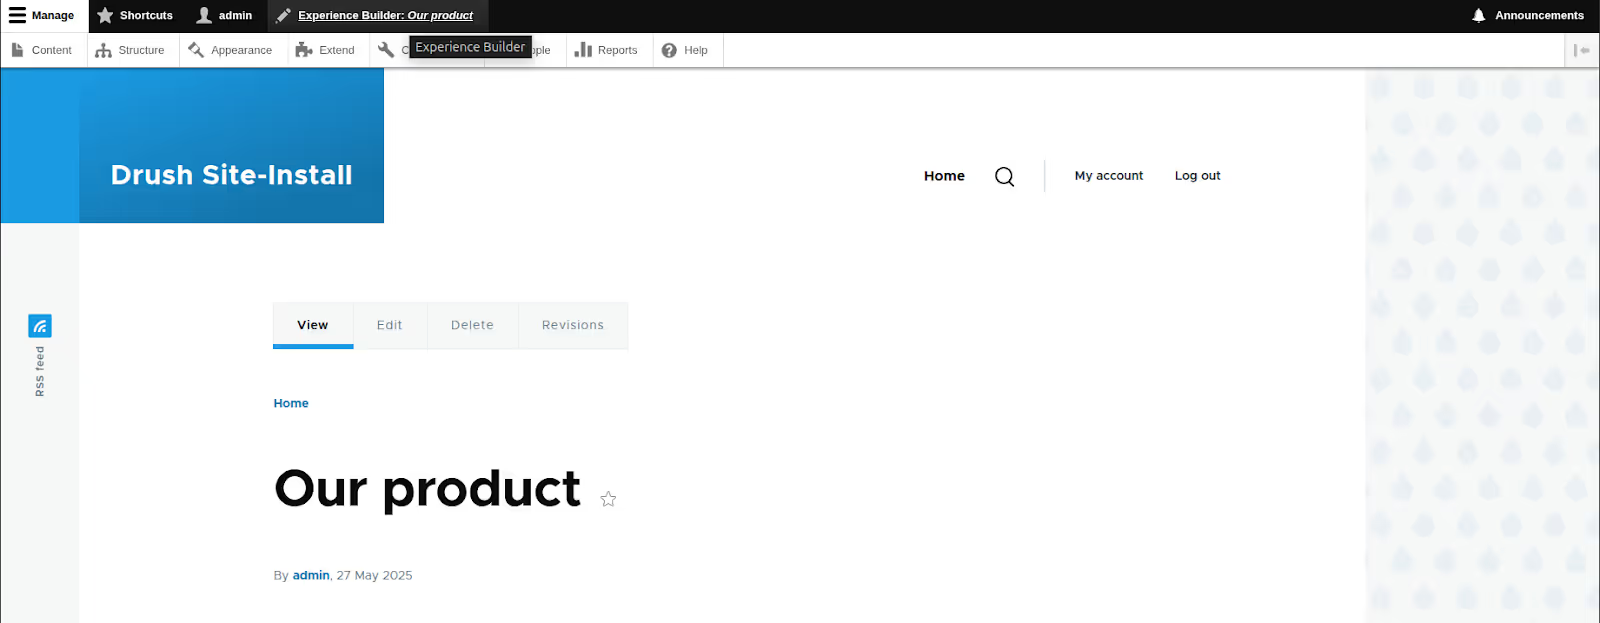
- In the admin toolbar, click on the Experience Builder Editor link to start designing your article page using XB

3. Create a “Text” Code component
Now, we will create a new Code Component called “Text”. This component will display text on the page. Later, we’ll make it editable so content editors can change the text directly in the Experience Builder without writing any code.
- Click the “+” icon in the left-side icon bar to open the component library

- Click the “+ Add new” button to create a new code component

- Enter a component name (e.g., Text) and click Add
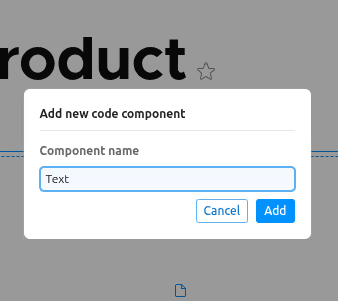
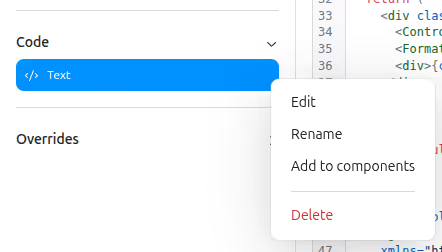
- You will now see your created “Text” component under the Code section in the left sidebar of the component library.

- Once the component is created, you can edit it, rename it, and delete it.
4. Component implementation
- Click on your “Text” component under the Code section.
- When a new code component is created, default JavaScript code is generated in the JS tab. You can see the preview of your component on the right side.
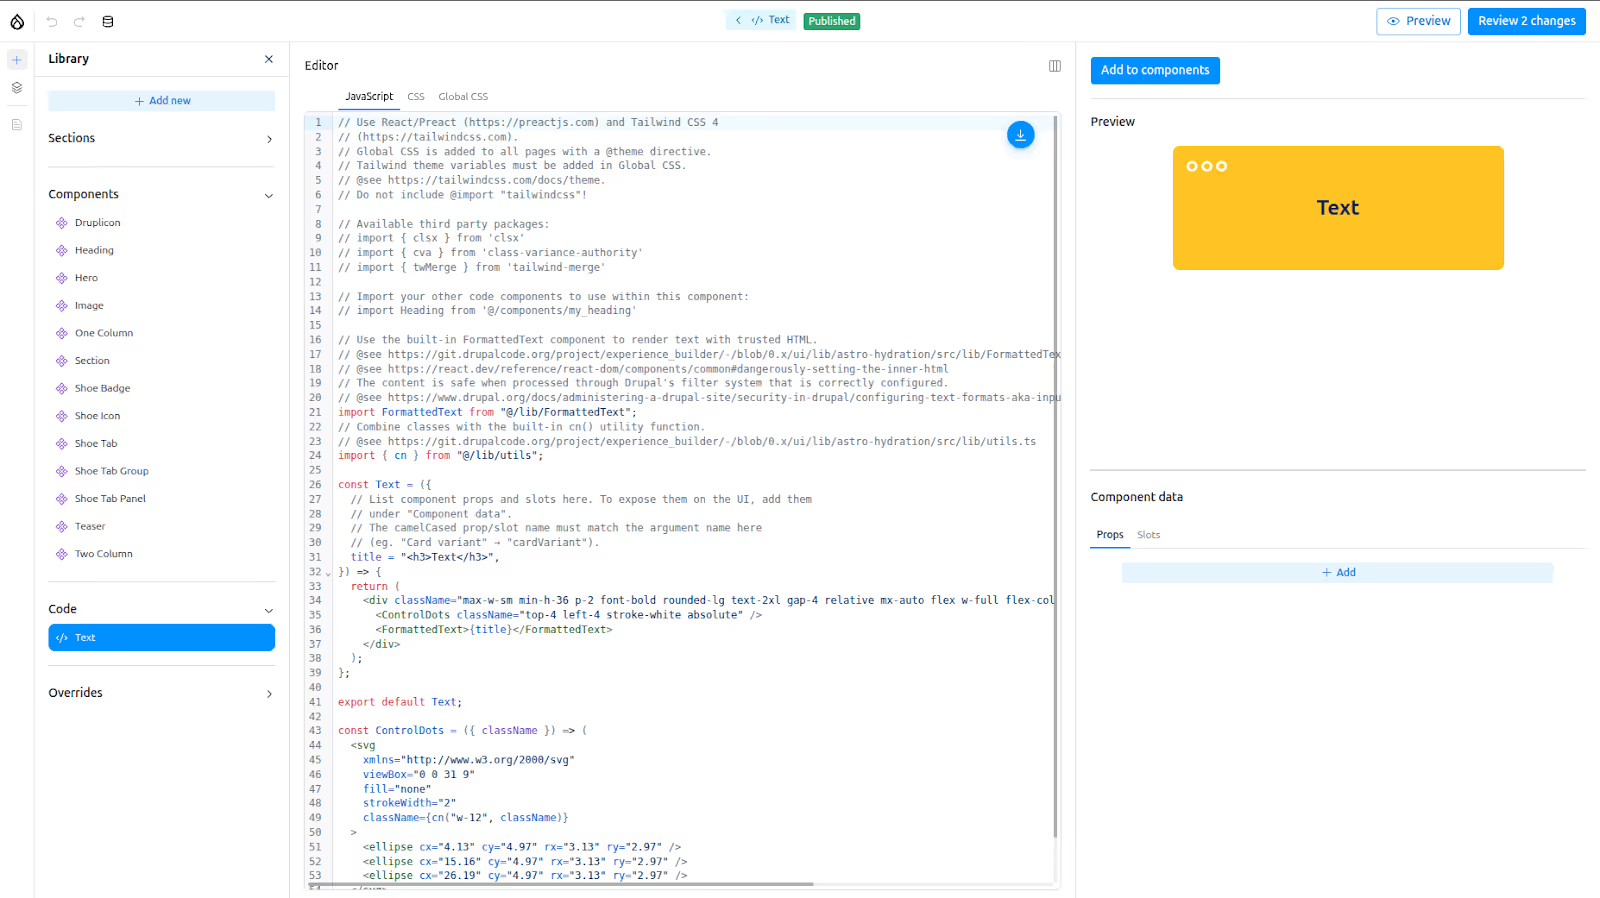
It uses React with Tailwind CSS. Currently, React version 18.3.1 and Tailwind CSS v4 are included.
You don’t need to import Tailwind manually — it’s already included globally.
Some helpful packages are pre-installed — 2 built-in and 3 third-party packages. Currently, only these packages are available for use.
Built-in packages:
- FormattedText: Use this to render text with trusted HTML content.
- cn(): A utility function to combine CSS class names easily.
Third-party packages: clsx, class-variance-authority (cva), tailwind-merge (twMerge)
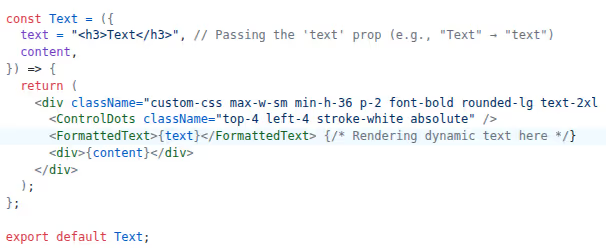
Understanding the default code:
- A basic Text component built with React and styled using Tailwind CSS.
- A default title prop, which contains the static HTML: <h3>Text</h3>.
- The FormattedText component is used to safely render this HTML.
- A custom SVG component (ControlDots) is added for styling, and class names are combined using the built-in cn() utility.
At this point, your component is static — it always shows the same text, and there's no way to customise it from the UI.
Making the component dynamic with props
Now, let’s make this component dynamic!
To do that, we’ll use props — dynamic inputs that allow you to customise the component’s content and behaviour from the UI.
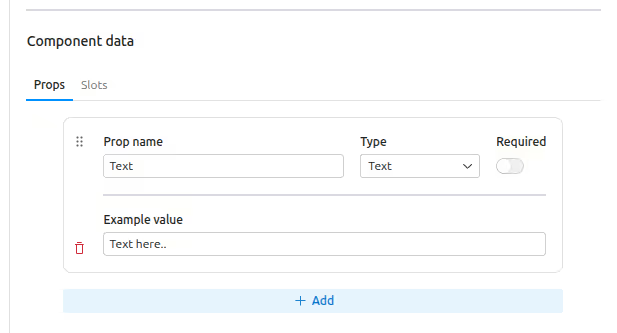
By adding props to your component and defining them under "Component data", these inputs will appear as editable fields for your component in the Experience Builder interface.
For example, if you expose a text prop, editors will be able to enter custom text directly from the UI while placing the Text component.
We can add any type of prop as needed — text, image, boolean, and more — based on the kind of content we want editors to customize. For our example, I’ll add a text-type prop to make the Text component dynamic and editable.
For our Text component, we will:
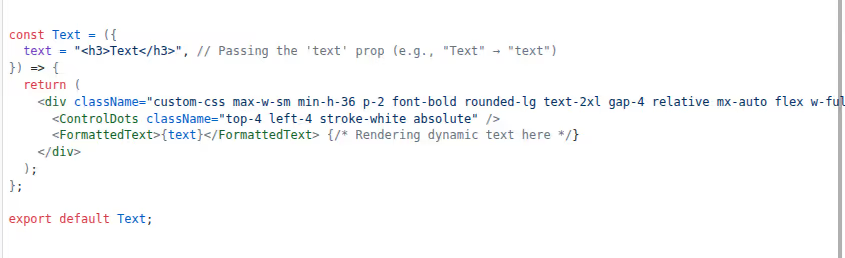
- Create a text prop.
- Accept it as input in our React component.
Note: The camelCased prop name must match the argument name in the component. (e.g., "Card variant" → cardVariant)

Using slots to add more content
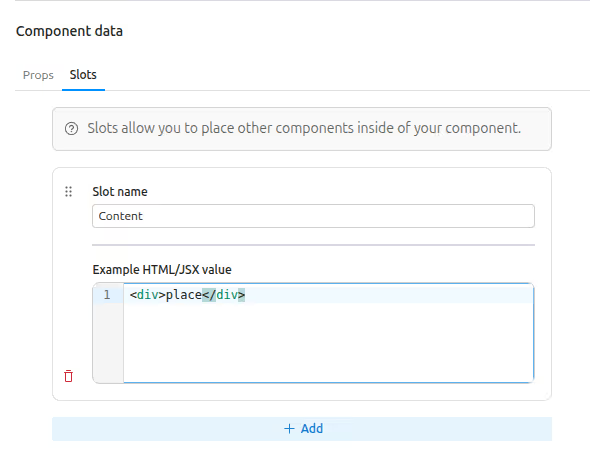
Besides props, Code Components also support slots. Slots are special placeholders inside a component where editors can add other components or content.
For example, a "Card" component can have slots for the header, body, and footer. Editors can easily drag and drop content or other components into those areas.
We take slots as inputs just like props, and render them inside the component to allow placing other components.

Styling and CSS tabs
Some Tailwind classes are added inline in the component markup. You can directly apply Tailwind v4 classes this way.
There are also two CSS-related tabs available:
- CSS Tab: You can write external styles specific to your component.
- Global CSS Tab: Styles written here will apply globally to all code components.
Important notes:
- Styles from the Global CSS tab can override component CSS, even if the selectors have the same specificity.
- Tailwind classes should be added directly in the markup; @apply is not supported in the CSS tab.
- If your component styles are getting overridden, increase specificity using an extra parent class (e.g., .my-component .my-class) to ensure they take effect.



Adding the created Code components to the component list
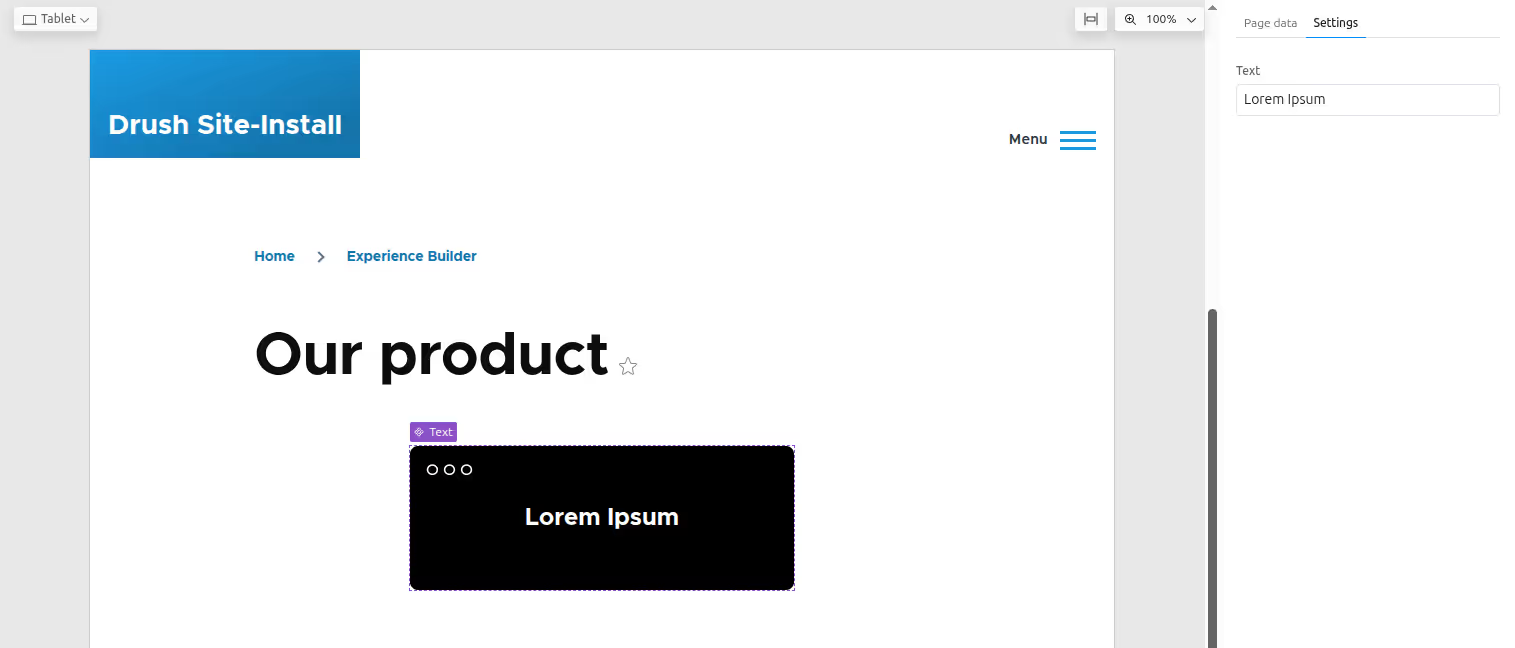
- Click the “Add to components” button above the preview to add your component to the component list in the left sidebar of the component library.
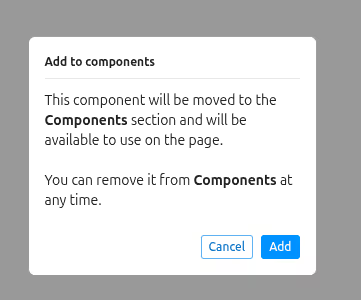
- You can see your component in the component list. The other component shown is developed using SDC and is one of the default SDC components.
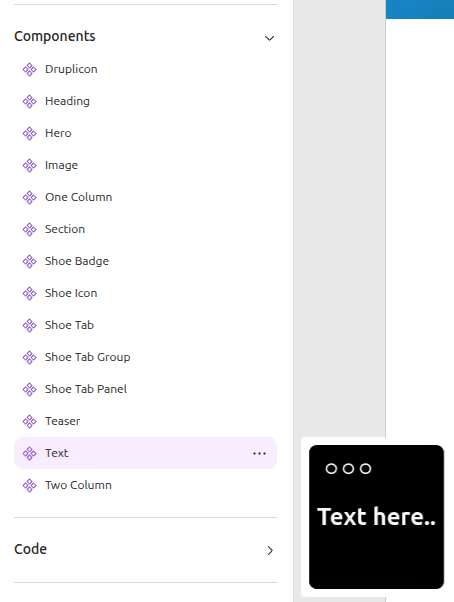
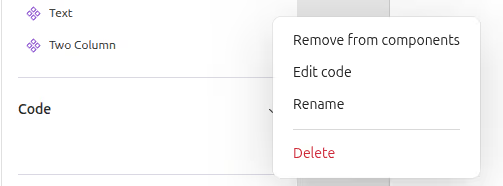
- Once the component is added to the component list, you can remove it from the component list, rename it, delete it, and edit it as well.
- Drag the component and see the input field and component.
5. Code components: save, export & import
- Code Components are saved in Drupal configuration, so they can be exported using drush cex and imported using drush cim.
- Code components are permanent; they are not lost when you refresh or close the browser.
6. What makes Code components different?
Code components
- Developed through the UI; no need to create files manually
- Code is written directly in the browser (JS, CSS, Global CSS tabs)
Normal components (Drupal way)
- Requires creating files (Twig, CSS, etc.)
- Part of the local codebase and custom theme
Wrapping up
Code Components are just one part of how Experience Builder is changing how teams build in Drupal. What used to require multiple files, overrides, and backend coordination can now be done directly in the browser. It's faster, cleaner, and creates less back-and-forth between developers and editors.
But this is just the beginning.
Some of us at QED42 are already exploring what happens when AI enters the mix. The xb_ai_assistant module, now available on Drupal.org, generates page templates by intelligently placing available Single Directory Components (SDCs) based on simple prompts. While it works seamlessly with the Starshot demo theme (try it out instantly!), It’s also compatible with any theme. Just ensure your SDCs include proper descriptions for AI-assisted placement.
The module assembles layouts in real time and supports contextual editing, letting you tweak individual components directly on the page. See it in action here: Taking GenAI in Drupal to the Next Level, where we showcase prompt-based layout generation in Experience Builder.
But it’s not just about layouts. We’re also rethinking design workflows. In this LinkedIn post, we explore how AI can generate Code components directly from Figma designs. By leveraging Figma’s MCP, developers can share a Figma link and automatically generate code-ready components, skipping manual handoffs entirely.
The direction is clear: faster workflows, tighter collaboration, and more intelligent building blocks. As Experience Builder grows, it’s not hard to imagine a future where building with Drupal feels more like shaping ideas in real time with code, content, and design all connected.
Start small. Try a Code Component. Or test what’s possible with AI. Either way, this is a good moment to rethink how you build.
FAQ's
Q: Is the Experience Builder part of Drupal core?
Not yet. It’s an evolving community project under the Starshot initiative.
Q: Does it replace the Layout Builder?
No. It builds upon it with a more visual, component-driven experience.
Q: Can I use it with my existing theme?
Yes. It works with themes that support modern component structures.

Setting up AI-powered semantic search in Drupal
The Drupal community is finding new momentum with AI as a practical extension of what Drupal does best: structured content, flexible architecture, and community-driven innovation.
In this blog, we focus on one of the most promising developments: AI-powered search.
Search has always been central to user experience. But traditional keyword matching falls short when users ask nuanced questions or use everyday language.
AI Search changes that by combining vector-based retrieval with large language models. It brings context, intent, and semantic understanding into the equation - helping users find what they mean, not just what they type.
We’ll cover how to integrate this capability into a Drupal site step by step. This includes setting up a vector database for storing semantic embeddings, connecting it with your Drupal content, and building a conversational assistant that can guide users through your site. We’ll also explore how prompt engineering allows you to shape the tone, accuracy, and depth of responses, giving you more control over how AI interacts with your content.
Whether you're running a public knowledge base, an internal documentation hub, or a highly structured content repository, this blog is meant to help you bring meaningful AI experiences into Drupal- thoughtfully and practically.
What is AI search?
AI Search is a submodule of the AI module that extends the functionality of the contributed Search API AI module, offering seamless integration with Drupal’s Search API. It utilises vector databases and large language models (LLMs) to enable intelligent, semantic search capabilities.
By building on the popular Search API module, AI Search allows you to create and manage vector databases, enabling highly relevant and accurate retrieval of content based on terms, phrases, or even entire content pieces.
It uses Retrieval-Augmented Generation (RAG), where information is first looked up, usually from a vector database, and then sent to a large language model (LLM) along with a user's question or request. This helps the model provide much more accurate answers, especially about specific topics or content it may not already know or was not trained on.
How it works
The system works by breaking large pieces of content into smaller chunks and saving them in a vector database. Each chunk is also saved with extra metadata (such as title or other settings) to preserve its original meaning and context.
These chunks are converted into vectors — complex numerical representations of the content’s meaning. You can think of these numbers like advanced tags, each with varying strengths. For example, one number might indicate a slight relationship to transportation, while another might strongly relate to education.
When someone submits a query, the question is also converted into a vector. The system compares it to stored vectors to find the most relevant matches. This method is significantly more accurate than traditional keyword-based systems like regular databases or the SOLR Search API.
Setting up your environment
Install the following modules:
- AI Core
- AI Search
- Search API
- Key
- AI Chatbot
- AI Assistant
- AI Agents
- AI API Explorer
- AI Provider (e.g., OpenAI Provider)
- Vector Database Provider (e.g., Milvus or Zilliz VDB Provider)
When choosing a vector database:
- Milvus is recommended for open-source/self-hosted setups.
- Zilliz is the managed SaaS version of Milvus. If using Zilliz, provide your cluster endpoint and API key.
Vector database configuration
For Milvus configuration in Drupal
- In your IDE, navigate to: ai_vdb_provider_milvus/docs/docker-compose-examples
- Copy ddev-example.docker-compose.milvus.yaml
- Paste into your .ddev folder and rename it to docker-compose.milvus.yaml
- Restart DDEV: ddev restart
- Run ddev describe to view configurations
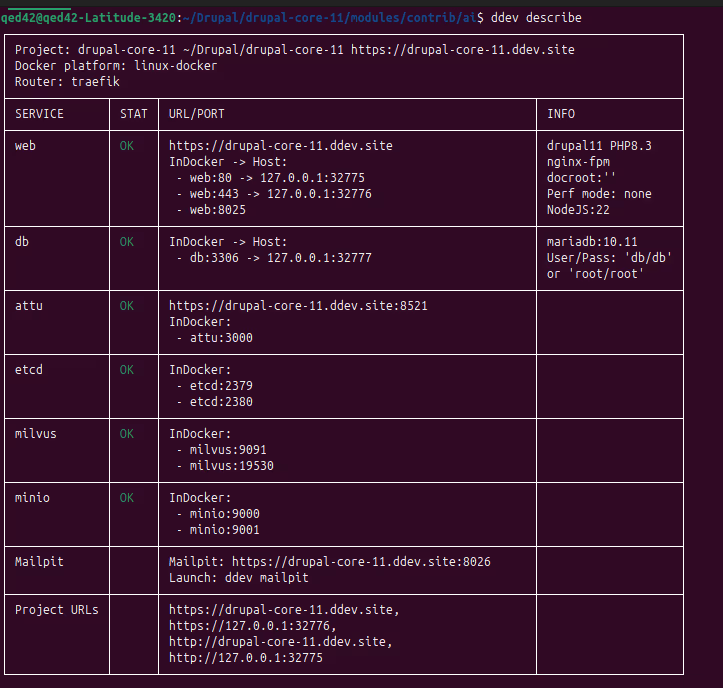
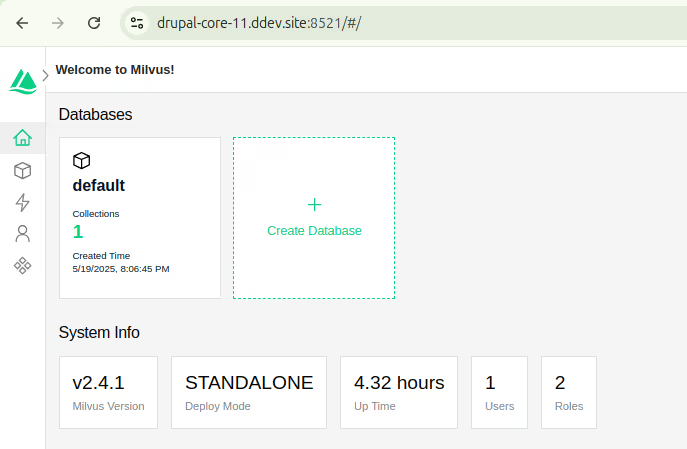
- Locate and open the Attu link
- Click Connect to view the Milvus configuration dashboard
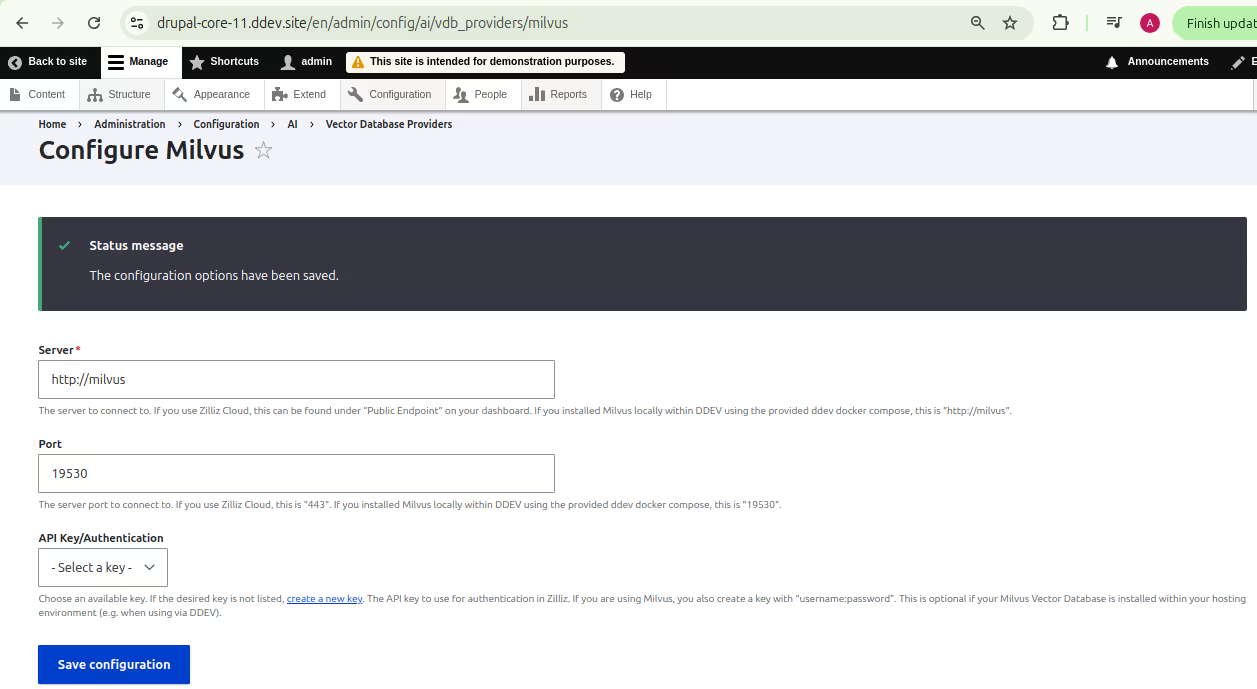
- Now navigate to: admin/config/ai/vdb_providers/milvus
- Server: http://milvus
- Port: 19530
- Click Save Configuration
- Confirmation message: "The configuration options have been saved." Which indicates milvus connection is properly configured.
For Zilliz configuration in Drupal
- Create an account at https://cloud.zilliz.com
- In the dashboard, click +Cluster to create a cluster
- Go to: admin/config/system/keys
- Add a new key and paste the token into Key Value
- Save the key
- In the Zilliz Cluster Details tab, find the Public Endpoint
- Use this in admin/config/ai/vdb_providers/milvus
- Port: 443
- Select the API key created in Step 3
- Save Configuration
- Confirmation message: "The configuration options have been saved."
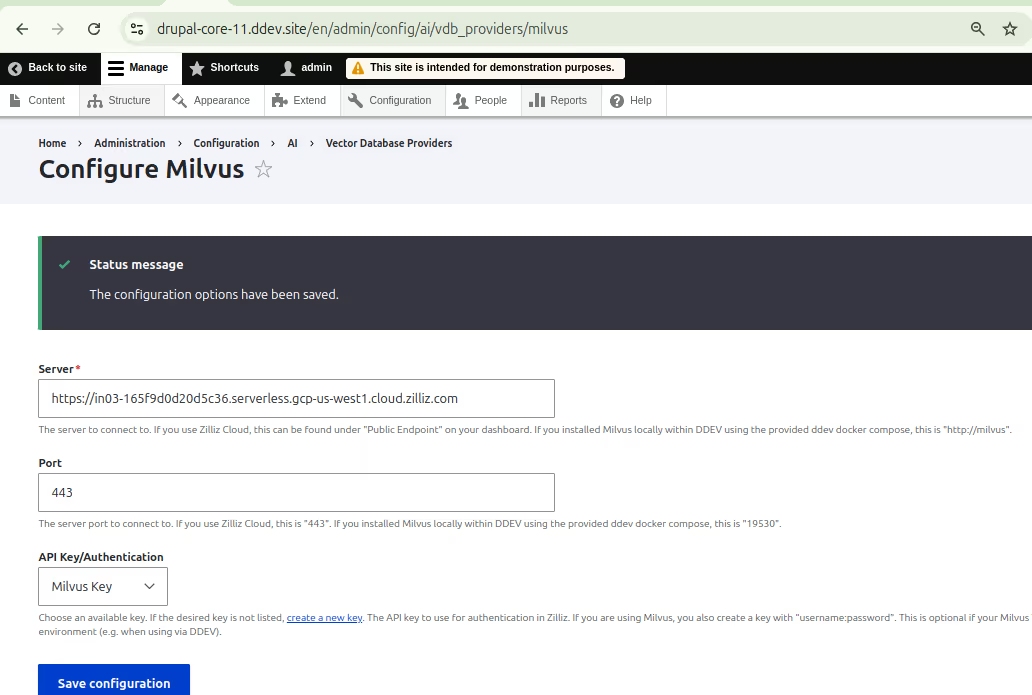
Configuring search API with AI
- Navigate to: admin/config/search/search-api
- Click Add Server
- Give a proper name for the server.
- Enable the server
- Provide a description
- Backend as AI Search
- AI Search Backend Configuration
- Embeddings Engine: OpenAI | text-embedding-3-small
- Tokenizer chat counting model: (select appropriately)
- Vector Database: Milvus DB
- Database Name: (use default or specify)
- Collection Name: (enter desired name)
- Similarity Metric: Cosine Similarity - (When setting up the server, the similarity metric interacts with the VDB. Its purpose is to measure how similar different pieces of content are based on their meaning. The most commonly used and recommended similarity metric is cosine similarity.)
- Click Save to create the server.
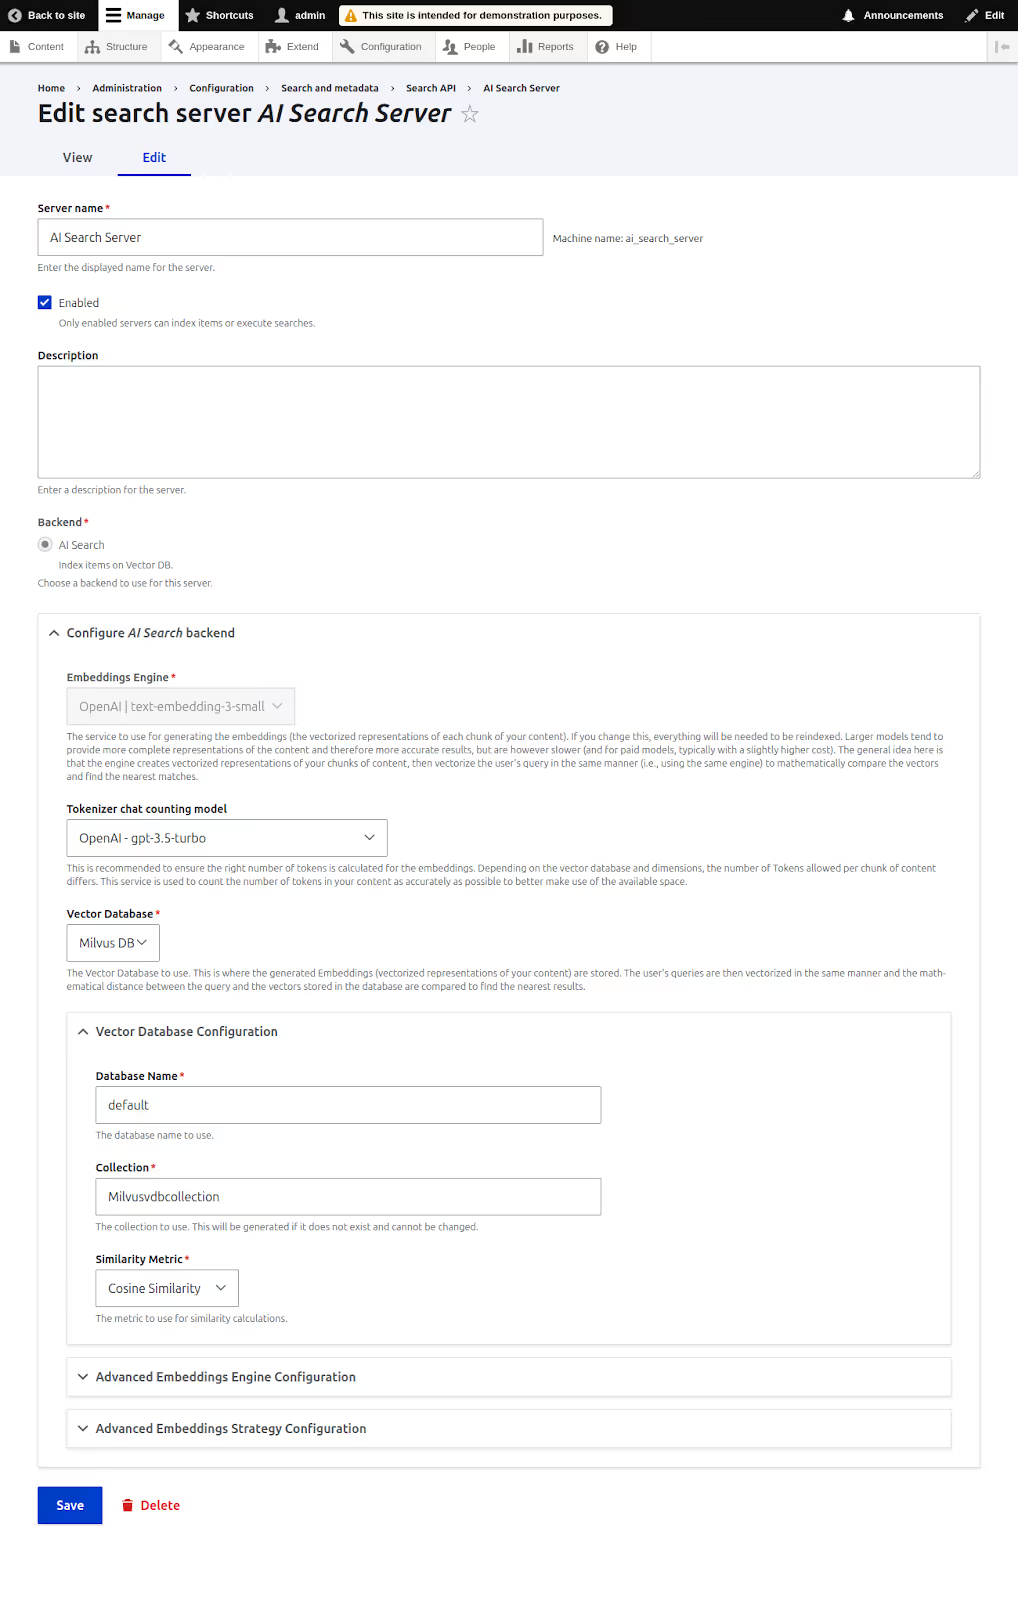
Creating a search index for recipes
Use the Recipes content type (For this blog, we are using the Recipes content type for search as an example)
- Add a search index
- Click Add Index
- Name the index
- Datasources: Content
- Bundle and Languages: (select appropriately, in this example, Recipe)
- Server: AI Search Server
- Click Save

- Add fields to the index
- Go to the Fields tab
- Click Add Fields
- Add: Rendered HTML output, URL, Title
- Configure field settings
- Rendered HTML output: Type: Full text, Index option: Main Content
- URL, Title: Type: String, Index option: Contextual Content
Click Save to finalize the index.

Index options explained
- Main content: Main body of content, broken into chunks. One field recommended.
- Context content: Adds helpful context (title, summary, author) to chunks.
- Filterable attributes: Enables pre-search filtering (e.g., by category/date).
- Ignore: Excludes field from indexing.
Go to the Views tab:
- Set batch indexing to 5
- Click Index Now
After indexing, view the data in Milvus or Zilliz Cloud to find your content being indexed.
Milvus Cloud:
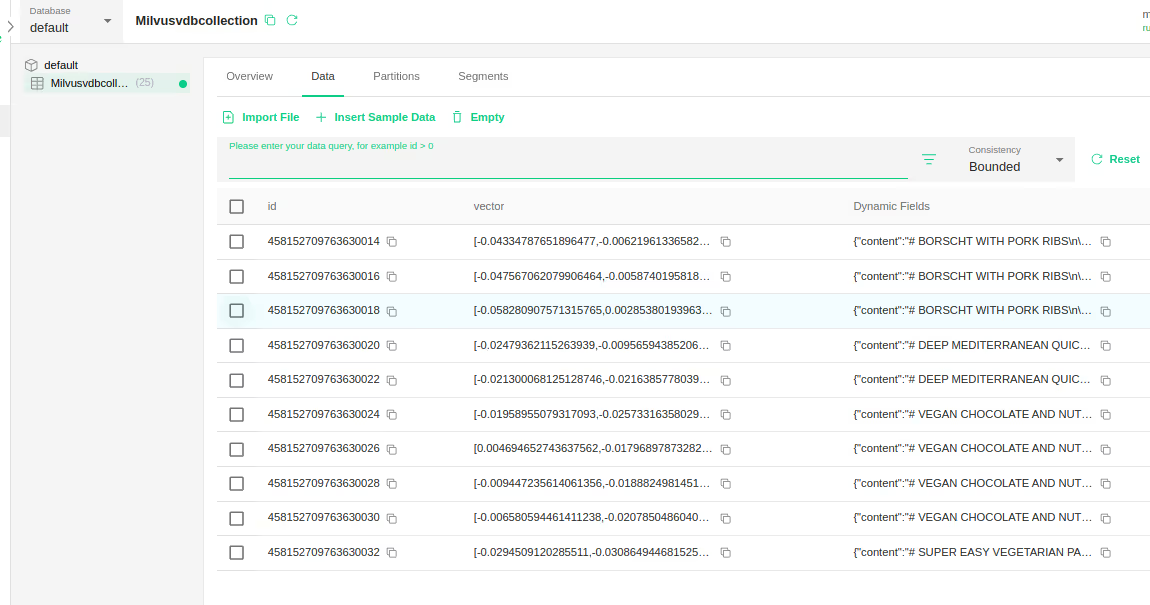
In Zillis Cloud:
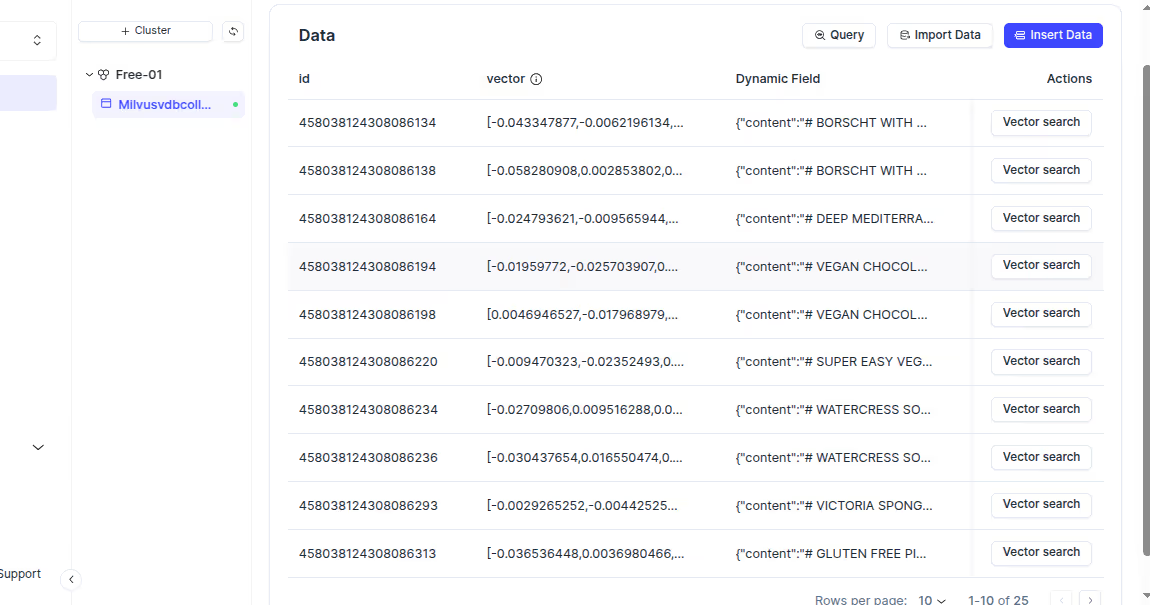
Testing the search API index with AI API explorer
- Go to: admin/config/ai/explorers/vector_db_generator
- Enter a prompt in the Prompt field
- Select the Search API index
- Click Run DB Query
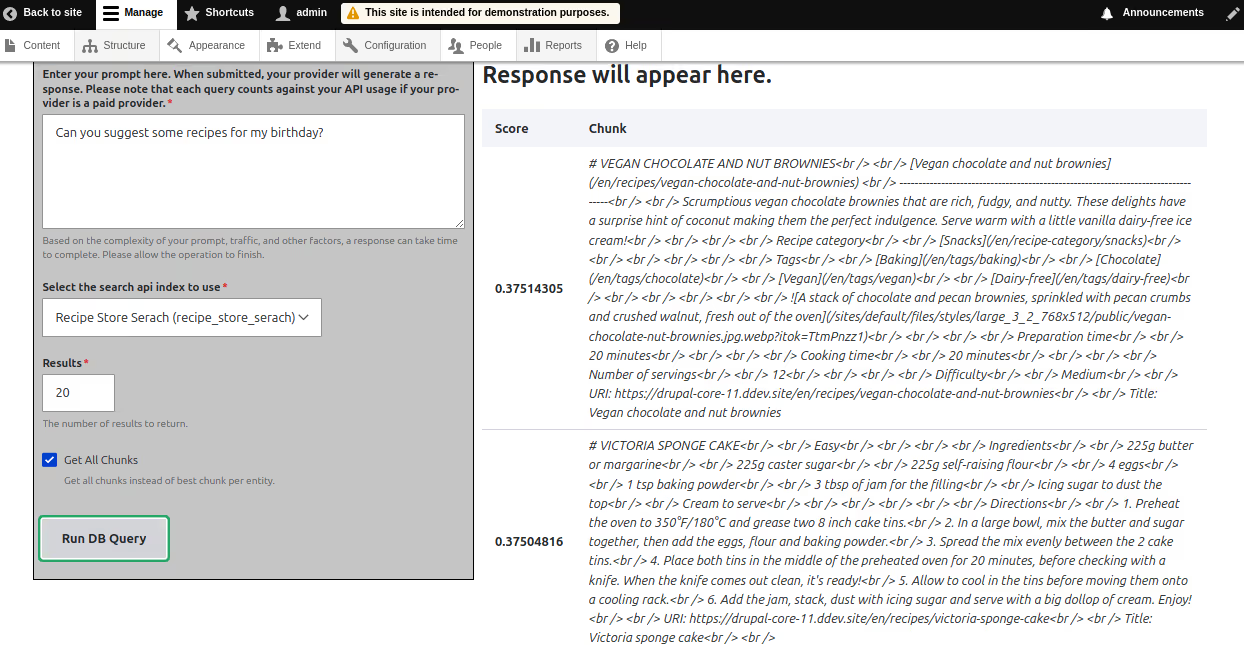
If results appear with similarity scores, the index is working correctly.
AI Agents and AI Assistants make AI Search more powerful and user-friendly. The AI Agent handles behind-the-scenes tasks like querying the vector database, filtering results, and managing tools like Retrieval-Augmented Generation(RAG). The AI Assistant acts as the front-end guide—chatting with users, interpreting their questions, and passing them to the agent. Together, they create a seamless, conversational search experience that understands user intent and delivers smarter, more relevant results. Hence we need to create and configure AI agent and AI assistant for AI search to work in AI chatbot.
Create an AI agent
- Navigate to: admin/config/ai/agents
- Click Add AI Agent
- Fill in:
- Label and Description
- Enable Swarm orchestration agent (Check this box if the AI agent manages other agents, gathers info, assigns tasks, and uses at least one tool.)
- Enable the Project Manager agent if needed

- Provide detailed instructions
- Tools: Select RAG/Vector Search Tool
- Test the tool using Test Tool
- Enter:
- Index machine name
- Search string
- Min score (e.g., 0.3 in this case as the api explorer returned scores from .3)
- Enter:
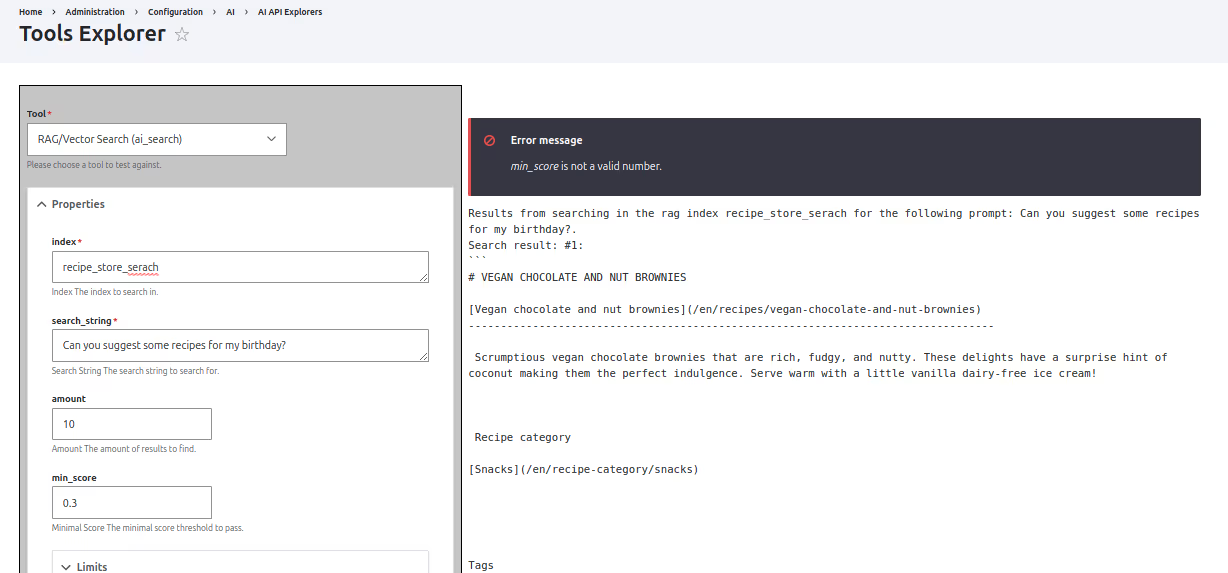
- In the Detailed Tool Usage for the Rag/Vector Search Tool > Property Restrictions
- Restrictions for property index: Select Force Value: (index machine name)
- Restrictions for property amount: Select Force Value: 5
- Restrictions for property min_score: Select Force Value: (e.g., 0.3)
Click Save

Configure AI Assistant
- Navigate to: admin/config/ai/ai-assistant
- Click Add AI Assistant
- Basic Settings:
- Use agent as assistant: (Recipe Agent)
- Provide Label, Description, and Instructions
- RAG Actions Configuration
- Enable RAG Action
- Select RAG Database (Search API index)
- Set Threshold: 0.3
- Set Max Results
- Final Steps
- Select AI Provider
- Click Save


Enable AI DeepChatbot block
- Go to: admin/structure/block
- Place the AI Deepchatbot block in required region
- Configure block to use the assistant created.
- Click Save Configuration
The chatbot will now appear on the homepage and support AI-powered searches.

Conclusion
Drupal’s AI Search brings meaning to the center of search. It uses vector-based retrieval and large language models to understand intent, context, and relationships between words , not just match keywords.
This makes discovery smoother and more relevant. From recipe suggestions that adjust to user preferences, to module searches that surface the most useful tools, AI Search helps your site respond in smarter, more human ways.
It’s a shift toward more intuitive, helpful digital experiences, and just one of the ways AI is shaping what’s next for Drupal.
More updates coming soon in this series on AI and Drupal.

NVIDIA Parakeet-TDT-0.6B-V2: a deep dive into state-of-the-art speech recognition architecture
Parakeet-TDT-0.6B-v2 is a 600-million-parameter automatic speech recognition model designed for high-quality English transcription. Despite its relatively modest size compared to multi-billion parameter alternatives, this model delivers exceptional performance across a wide range of benchmarks.

The name “Parakeet” represents NVIDIA’s family of ASR models, while “TDT” refers to the innovative Token-and-Duration Transducer architecture that powers it. The “0.6B” indicates its parameter count (600 million), and “v2” signifies this is an improved second version of the model.
Key features of Parakeet-TDT-0.6B-v2 include:
- Accurate word-level timestamp predictions
- Automatic punctuation and capitalisation
- Robust performance on spoken numbers and song lyrics transcription
- Support for processing audio segments up to 24 minutes in a single pass
- Impressive processing speed, transcribing up to 60 minutes of audio in just one second under optimal conditions
Key features and capabilities
Parakeet-TDT-0.6B-V2 is a 600-million-parameter ASR model designed specifically for high-quality English transcription. The model offers several standout features:
- Accurate word-level timestamp predictions: Precise timing information for each word in the transcript
- Automatic punctuation and capitalisation: Naturally formatted text output without additional post-processing
- Long-form audio processing: Efficient transcription of audio segments up to 24 minutes in a single pass
- Impressive processing speed: Achieves an RTF (Real-Time Factor) of 3380 on the HF-Open-ASR leaderboard with a batch size of 128
- Robust performance on challenging content: Handles spoken numbers and song lyrics with high accuracy
The model is based on NVIDIA’s FastConformer architecture with the Token Duration Transducer (TDT) decoder, combining cutting-edge design elements to achieve state-of-the-art results.
Model architecture: FastConformer meets TDT
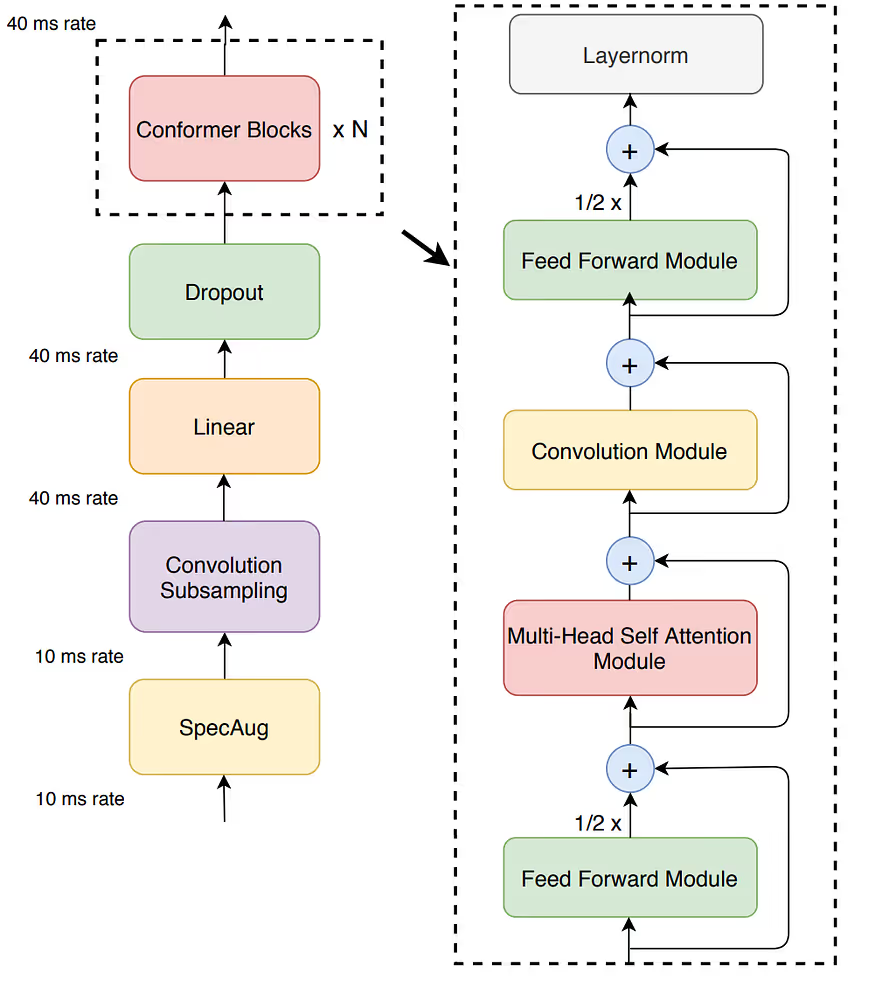
FastConformer: Optimised encoder architecture
The Parakeet-TDT-0.6B-v2 model is built on the FastConformer encoder architecture, a highly optimised version of the standard Conformer model that has dominated speech recognition tasks in recent years. FastConformer introduces several key innovations that significantly enhance performance:
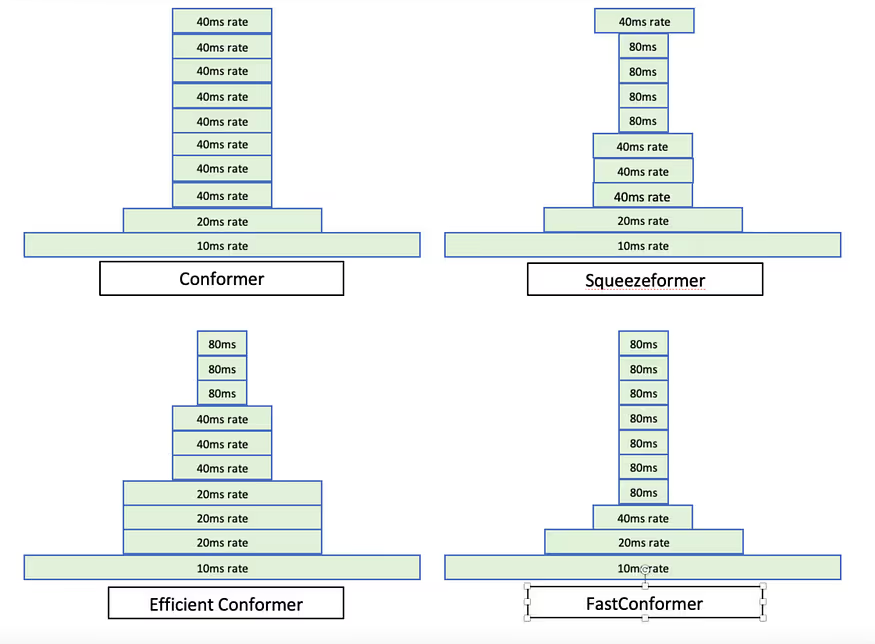
- Enhanced downsampling: FastConformer implements an 8x depthwise convolutional subsampling with 256 channels, which efficiently reduces the input sequence length early in the model pipeline, thereby decreasing the computational load for subsequent layers.
- Depthwise separable convolutions: Instead of using standard convolutions, FastConformer utilises depthwise separable convolutions, which factorise the convolution operation into two separate steps - a depthwise convolution followed by a pointwise convolution. This reduces both the parameter count and computational complexity.
- Channel reduction: The architecture employs a reduced channel count in the downsampling module (256 channels), which helps minimize the model’s parameter footprint without significantly impacting performance.
- Reduced kernel size: FastConformer uses a convolutional kernel size of 9 (down from 31 in the original Conformer), which maintains accuracy while decreasing computation time.
These modifications result in an encoder that is approximately 2.4–2.8 times faster than the regular Conformer encoder without significant quality degradation. Additionally, FastConformer supports efficient processing of long audio sequences through a linearly scalable attention mechanism inspired by the Longformer approach, which combines local attention with global tokens to maintain performance while reducing computational overhead.
Token Duration Transducer (TDT): The secret weapon
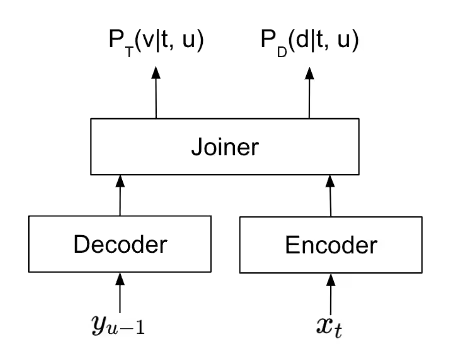
A key innovation in the Parakeet-TDT-0.6B-V2 model is the Token Duration Transducer (TDT) decoder, which extends conventional RNN-Transducer architectures by jointly predicting:
- The token to be emitted
- The duration of that token (number of input frames it covers)
This dual prediction system uses a joint network with two independently normalised outputs that generate distributions for tokens and their durations. During inference, the TDT can skip input frames based on predicted durations, making it significantly faster than conventional Transducers that process encoder output frame by frame.
The TDT approach offers several critical advantages:
- Faster inference: By skipping frames rather than processing each one individually
- Accurate timestamps: By inherently tracking the duration of each token
- Efficient processing: By reducing computational overhead in the decoding phase
Performance benchmarks: setting new standards
The Parakeet-TDT-0.6B-V2 model demonstrates impressive performance across a variety of benchmarks, making it a top contender in the ASR space.
Word Error Rate (WER) performance
The model achieves remarkable accuracy across multiple datasets, as shown in the following table:
Dataset-specific WER scores include:
- AMI: 11.16%
- Earnings-22: 6.52%
- GigaSpeech test: 8.08%
- LibriSpeech test-clean: 1.69%
- LibriSpeech test-other: 3.70%
Noise robustness
Parakeet-TDT-0.6B-v2 maintains strong performance even in noisy environments:
- Clean audio: 6.05% WER
- SNR 50: 6.04% WER (relative +0.25%)
- SNR 25: 6.50% WER
- SNR 5: 8.39% WER
This robust performance across varying noise levels makes the model suitable for real-world applications where perfect acoustic conditions cannot be guaranteed.
Processing speed
One of the most remarkable aspects of Parakeet-TDT-0.6B-v2 is its processing speed. The model demonstrates an impressive real-time factor (RTF) of 3380 with a batch size of 128, meaning it can transcribe approximately 56 minutes of audio in just one second under optimal conditions.
Even with smaller batch sizes or on less powerful hardware, the model maintains strong performance, making it suitable for both real-time applications and batch processing scenarios.
Comparison with competitor models
When comparing Parakeet-TDT-0.6B-V2 with other state-of-the-art ASR models, several key advantages become apparent:
vs. OpenAI’s Whisper model
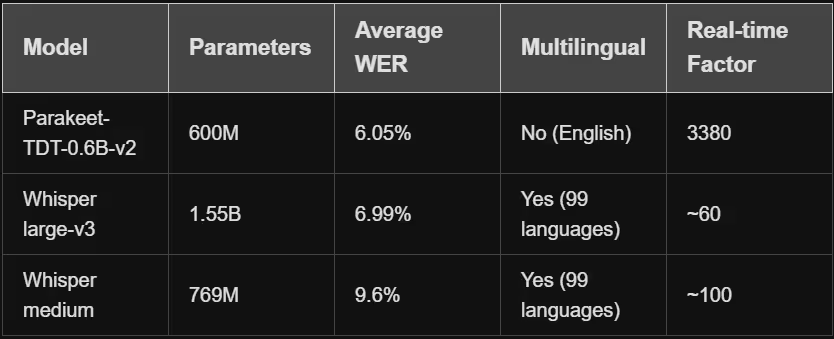
- Parameter efficiency: At just 0.6B parameters, Parakeet-TDT-0.6B-V2 is significantly smaller than Whisper Large V3 (1.55B parameters), making it more resource-efficient.
- Inference speed: Parakeet-TDT-0.6B-V2 processes audio significantly faster than Whisper models, with an RTF of 3380 compared to Whisper’s lower throughput.
- Timestamp accuracy: While both models support timestamps, the TDT architecture’s native duration prediction offers more precise word-level timestamps.
- Long-form audio: Parakeet can handle up to 24 minutes of audio in a single pass, whereas Whisper models typically process shorter segments.
vs. Meta’s MMS and wav2vec 2.0
- End-to-end capabilities: Unlike wav2vec 2.0, which requires additional components for full ASR, Parakeet is an end-to-end solution.
- Punctuation and capitalisation: Parakeet natively includes punctuation and capitalisation, which many other models require post-processing to achieve.
- Optimised architecture: The FastConformer-TDT combination offers a more efficient architecture than many competing models, resulting in faster inference without sacrificing accuracy.
vs. Other NVIDIA ASR models
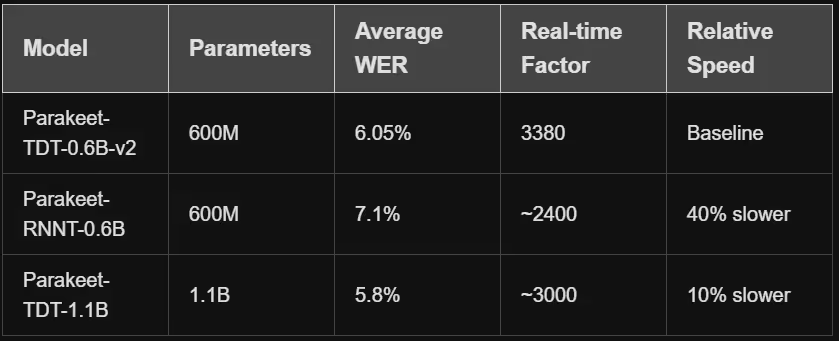
- Size vs. performance: Compared to its larger sibling, Parakeet-TDT-1.1B, the 0.6B version offers comparable performance with fewer resources.
- Decoder improvements: The TDT decoder offers advantages over previous CTC and RNNT decoders used in other NVIDIA models, particularly in terms of speed and timestamp accuracy.
Other commercial solutions
When compared to commercial ASR solutions like Google Speech-to-Text, Amazon Transcribe, and Microsoft Azure Speech, Parakeet-TDT-0.6B-v2 offers several advantages:
- Local deployment: Unlike cloud-based services, Parakeet can be deployed locally, eliminating privacy concerns and internet dependency.
- One-time cost: There are no ongoing usage fees or API call charges.
- Customisation potential: As an open model, Parakeet can be fine-tuned for specific domains or use cases.
However, commercial solutions may offer additional features like speaker diarization, enhanced multilingual support, or tighter integration with their respective cloud ecosystems.
How to use Parakeet-TDT-0.6B-V2
The model is available through NVIDIA’s NeMo toolkit and can be easily integrated into applications for inference or fine-tuning. Here’s a simple guide to get started:
Installation and setup
First, you’ll need to install the NeMo toolkit and its ASR components:
pip install -U nemo_toolkit['asr']
Basic transcription
To transcribe an audio file, you can use the following Python code:
import nemo.collections.asr as nemo_asr


# Load the model
asr_model = nemo_asr.models.ASRModel.from_pretrained(model_name="nvidia/parakeet-tdt-0.6b-v2")
# Download a sample audio file
# wget https://dldata-public.s3.us-east-2.amazonaws.com/2086-149220-0033.wav
# Transcribe the audio
output = asr_model.transcribe(['2086-149220-0033.wav'])
print(output[0].text)
Transcription with timestamps
If you need timestamp information along with the transcription:
output = asr_model.transcribe(['2086-149220-0033.wav'], timestamps=True)
# Access word-level timestamps
word_timestamps = output[0].timestamp['word']
# Access segment-level timestamps
segment_timestamps = output[0].timestamp['segment']
# Access character-level timestamps
char_timestamps = output[0].timestamp['char']
# Print segment timestamps
for stamp in segment_timestamps:
   print(f"{stamp['start']}s - {stamp['end']}s : {stamp['segment']}")
Building a web UI with Gradio
You can also create a simple web interface for transcription using Gradio:
import gradio as gr
import nemo.collections.asr as nemo_asr


# Load model once
asr_model = nemo_asr.models.ASRModel.from_pretrained(model_name="nvidia/parakeet-tdt-0.6b-v2")
def transcribe_audio(audio, timestamps=False):
   if audio is None:
       return "Please upload a valid audio file."
   output = asr_model.transcribe([audio], timestamps=timestamps)
   if timestamps:
       segments = output[0].timestamp['segment']
       result = ""
       for seg in segments:
           result += f"{seg['start']}s - {seg['end']}s: {seg['segment']}\n"
       return result
   else:
       return output[0].text
# Build the UI
with gr.Blocks() as demo:
   gr.Markdown("#  Parakeet-TDT-0.6B Speech to Text Demo")
   with gr.Row():
       audio_input = gr.Audio(type="filepath", label="Upload Audio (16kHz .wav preferred)")
   with gr.Row():
       timestamp_checkbox = gr.Checkbox(label="Enable Timestamps", value=False)
   with gr.Row():
       output_text = gr.Textbox(label="Transcription Output", lines=10)
   submit_btn = gr.Button("Transcribe")
   submit_btn.click(fn=transcribe_audio, inputs=[audio_input, timestamp_checkbox], outputs=output_text)
# Launch the UI
demo.launch(server_name="0.0.0.0", server_port=7860)
Setting Up a local environment
For those who want to run the model locally, here are the key requirements:
Minimum hardware requirements
- GPU: NVIDIA T4 (16 GB VRAM) or better
- vCPUs: 8+
- RAM: 16 GB
- Disk: 30–40 GB
- Works for shorter audio (<10 mins) and lower concurrency
Recommended hardware
- GPU: NVIDIA A6000, A100, or H100 for optimal performance
- RAM: 32+ GB for handling longer audio and larger batch sizes
Step-by-step installation (Ubuntu/Linux)
Install Python and dependencies:
sudo apt update

sudo apt install -y build-essential git wget curl ffmpeg

sudo apt install -y python3-pip
- Set up a virtual environment (optional but recommended):
python3 -m venv nemo_env

source nemo_env/bin/activate
- Install PyTorch with CUDA support:
pip install torch torchvision torchaudio --index-url https://download.pytorch.org/whl/cu11
Install NeMo toolkit with ASR support:
pip install -U nemo_toolkit['asr']
Test the installation with a basic transcription:
import nemo.collections.asr as nemo_asr asr_model = nemo_asr.models.ASRModel.from_pretrained(model_name="nvidia/parakeet-tdt-0.6b-v2")
 # Now you're ready to use the modCopyimport nemo.collections.asr as nemo_asr asr_model = nemo_asr.models.ASRModel.from_pretrained(model_name="nvidia/parakeet-tdt-0.6b-v2")
 # Now you're ready to use the model
Technical deep dive: training details
The Parakeet-TDT-0.6B-V2 model was trained using a sophisticated approach to achieve its high performance:
Training process
- Initial checkpoint: Started with a wav2vec SSL checkpoint pretrained on the LibriLight dataset
- Training scale: Trained for 150,000 steps on 128 A100 GPUs
- Dataset balancing: Used temperature sampling with a value of 0.5 across multiple corpora
- Fine-tuning: Stage 2 fine-tuning was performed for 2,500 steps on 4 A100 GPUs using approximately 500 hours of high-quality, human-transcribed data
Training dataset
The model was trained on the Granary dataset, comprising approximately 120,000 hours of English speech data:
- 10,000 hours from human-transcribed NeMo ASR Set 3.0
- 110,000 hours of pseudo-labelled data from the YTC (YouTube-Commons) dataset, the YODAS dataset, and the Librilight
This diverse dataset ensures robust performance across various domains, accents, and recording conditions.
Best practices and optimisation tips
To get the most out of Parakeet-TDT-0.6B-v2, consider these optimisation strategies:
- Batch processing: For transcribing multiple audio files, use batching to leverage the model’s excellent batch processing capabilities.
- Audio preprocessing:
- Ensure audio is sampled at 16kHz (mono-channel)
- For optimal results, normalize audio levels
- Consider applying noise reduction for recordings in noisy environments
- GPU optimisation:
- Use mixed precision (FP16) for faster inference
- Consider a GPU with Tensor Cores for optimal performance
- Monitor VRAM usage to optimise batch sizes
2. Long audio handling:
- For files longer than 24 minutes, split into chunks with small overlaps
- Process chunks in parallel when possible
- Merge the resulting transcriptions with timestamp alignment
Applications and use cases
The exceptional performance and efficiency of Parakeet-TDT-0.6B-v2 make it suitable for a wide range of applications:
Content creation and media
- Video subtitling: Generate accurate captions for videos with precise word-level timestamps
- Podcast transcription: Convert audio podcasts to searchable text
- Media archives: Enable search and discovery in large audio/video repositories
Business and enterprise
- Meeting transcription: Capture discussions with accurate speaker attribution
- Customer service: Analyse call centre interactions for quality assurance
- Sales intelligence: Extract insights from sales calls and demos
Accessibility
- Closed captioning: Provide real-time captions for live events
- Assistive technology: Support individuals with hearing impairments
- Educational tools: Create text versions of lectures and presentations
Research and development
- Speech data analysis: Process large speech corpora efficiently
- Foundation for NLP: Provide accurate transcripts for subsequent natural language processing
- Custom ASR development: Use as a base model for fine-tuning to specific domains
Limitations and considerations
While Parakeet-TDT-0.6B-v2 offers impressive capabilities, it’s important to be aware of its limitations:
- English-only support: The model is trained specifically for English and doesn’t support other languages.
- Accuracy variations: Performance may vary based on factors such as:
- Accents and dialectal variations
- Domain-specific terminology
- Background noise and recording quality
- Speaker clarity and speech patterns
3. GPU dependency: The model is optimized for NVIDIA GPUs and requires appropriate hardware for optimal performance.
- Licensing: Usage is governed by the CC-BY-4.0 license, which has certain requirements for attribution and sharing.
Future directions
The innovations demonstrated in Parakeet-TDT-0.6B-v2 point to several exciting future directions for speech recognition technology:
- Multilingual support: Extending the TDT architecture to support multiple languages while maintaining efficiency.
- Model distillation: Further reducing model size while preserving performance through knowledge distillation techniques.
- Multimodal integration: Combining audio and visual cues for enhanced recognition in challenging environments.
- Domain adaptation: Simplified fine-tuning processes for specialised domains like medical, legal, or technical fields.
- Enhanced contextual understanding: Improved handling of contextual cues for better disambiguation and semantic interpretation.
Hugging face space: try the space here
Conclusion
NVIDIA’s Parakeet-TDT-0.6B-v2 sets a new standard in speech recognition by proving that smart architecture can outperform sheer model size. With its FastConformer encoder and Token-and-Duration Transducer decoder, it delivers exceptional accuracy, speed, and efficiency-all in a compact 600-million-parameter model.
For teams building real-world applications, it offers the best of both worlds: cutting-edge transcription quality and practical deployment, without the heavy hardware demands of larger models. Backed by the open-source NeMo toolkit, it’s easy to integrate, fine-tune, and scale across use cases ranging from media and accessibility to research and enterprise tools.
As the field moves forward, Parakeet-TDT-0.6B-v2 illustrates the future of speech recognition: purpose-built models that prioritize performance, precision, and usability over size alone.
References
- NVIDIA Parakeet-TDT-0.6B-V2 Model Card
- Fast Conformer with Linearly Scalable Attention for Efficient Speech Recognition
- Efficient Sequence Transduction by Jointly Predicting Tokens and Durations
- NVIDIA NeMo Framework Documentation
- How to Install NVIDIA Parakeet-TDT-0.6B-V2 Locally
- https://www.youtube.com/live/S19cWj6dkEI
- https://www.youtube.com/watch?time_continue=1&v=r2CrZQVtQpI&source_ve_path=Mjg2NjY
By combining the efficiency of the FastConformer architecture with the speed and accuracy benefits of the Token Duration Transducer, NVIDIA has created a truly exceptional ASR model that sets new standards for the industry while remaining accessible and practical for real-world applications.
For reference you can visit this : https://medium.com/@akshaychame2/nvidia-parakeet-tdt-0-6b-v2-a-deep-dive-into-state-of-the-art-speech-recognition-architecture-d1f0b8e61e4b

Beyond keywords: delivering meaningful search experiences in Drupal
Traditional keyword search stops at words. Semantic search understands meaning.
On most Drupal sites today, a user searching for “child education rights” might only get results that contain those exact words. But what if the best article uses the phrase “legal protections for minors”? That’s where Semantic Search comes in.
Semantic Search goes beyond literal matches. It uses language models and vector databases like Milvus or Pinecone to understand context and intent, delivering results that make sense to the user. Think of how Google now understands that a search for “best laptop for travel” might prioritise battery life and weight, not just articles with the word “travel.”
By connecting Semantic Search with Drupal’s Search API module, site builders can offer smarter search experiences across government portals, large publishing sites, nonprofit knowledge hubs, or healthcare platforms—anywhere users need quick, intelligent access to information.
Drupal AI ecosystem's AI search module
The Drupal AI Ecosystem's AI Search module makes this powerful Semantic Search functionality possible. As part of Drupal’s growing AI ecosystem, this module integrates seamlessly with Drupal’s existing architecture, enabling developers and site builders to harness the full potential of AI-powered search without needing to build complex solutions from scratch.
By leveraging tools like vector databases (e.g., Milvus or Pinecone) and the Search API module, the AI Search module provides an intuitive way to implement Semantic Search on your Drupal site. Whether you’re running a small website or a large enterprise platform, this module ensures that your users enjoy smarter, faster, and more relevant search experiences.
What is Semantic search?
Semantic Search goes beyond simple keyword matching. It understands the meaning behind user queries and matches them with content that aligns with their intent.
For example, if a user searches for "How to bake a cake," Semantic Search doesn’t just look for pages containing those exact words; it also considers related concepts like "dessert recipes," "baking tips," or "cake ingredients."
In Drupal, Semantic Search is powered by vector embeddings, which represent content as numerical vectors in a multi-dimensional space. These embeddings are stored in vector databases like Milvus or Pinecone, enabling fast and accurate similarity searches.
How Semantic search works in Drupal
To implement Semantic Search in Drupal, you can use the Search API module to connect to a vector database and index your content. Here’s how it works:
- Add a New Server: Configure a new server in the Search API module to connect to your chosen vector database (e.g., Milvus or Pinecone).
- Index Your Data: Select the fields you want to index, categorising them into different types:
- Main content: The primary body of your content, broken into chunks for efficient processing.
- Contextual content: Additional details like titles, summaries, or authors that provide context to each chunk.
- Filterable attributes: Metadata like dates or taxonomy terms used to pre-filter results before performing a vector search.
- Ignore: Fields you don’t want to include in the index.
Once indexed, the vector database processes the data and creates embeddings, enabling semantic matching during user queries.
To get started with Semantic Search in Drupal, you can explore these community-driven projects:
- AI Module: Drupal AI Project
- Vector Database Integration: AI Vector DB Provider for Milvus
These modules make it easier to integrate advanced AI capabilities into your Drupal site.
Benefits of Semantic search over traditional search
While traditional search engines like Apache Solr or database searches rely on keyword matching and ranking algorithms, Semantic Search offers several advantages:
1. Understanding user intent
- Traditional search often struggles with ambiguous queries or synonyms. For example, searching for "Apple" might return results about the fruit instead of the tech company.
- Semantic Search uses natural language understanding (NLU) to interpret the meaning behind queries, ensuring accurate results regardless of phrasing.
2. Context-aware results
- By incorporating contextual content (e.g., titles, summaries, authors), Semantic Search provides richer and more relevant results. For instance, a query about "climate change" will prioritise articles tagged with environmental topics rather than unrelated mentions.
3. Faster and Smarter searches
- Vector databases like Milvus and Pinecone are optimised for similarity searches, making them faster and more scalable than traditional databases. This is especially critical for large datasets or complex content structures.
4. Personalisation and filtering
- Semantic Search allows you to attach filterable attributes to records, enabling advanced filtering options like date ranges, categories, or user roles. This ensures users only see results that matter to them.
5. Future-proof technology
- As AI continues to evolve, Semantic Search will become even smarter, integrating with technologies like voice assistants, chatbots, and predictive analytics. Drupal’s flexibility ensures you’re ready for these advancements.
Comparison: Semantic search vs. traditional search
| Feature | Semantic search | Traditional search |
|---|---|---|
| Search approach | Understands the meaning and intent behind queries using natural language processing. | Relies on exact keyword matches or simple ranking algorithms. |
| Context awareness | Incorporates contextual details (e.g., titles, summaries, metadata) for richer results. | Ignores context; focuses solely on matching keywords in content. |
| Handling ambiguity | Can interpret ambiguous queries (e.g., "Apple" as a fruit vs. a tech company). | Struggles with ambiguity; often returns irrelevant results. |
| Scalability & performance | Optimised for large datasets using vector databases for fast similarity searches. | May struggle with scalability and performance for complex queries. |
Real-world use cases
Semantic Search has transformative potential across various industries:
- E-Commerce Websites: Customers can find products using conversational queries like "Show me eco-friendly sneakers under $100."
- Educational Platforms: Students locate resources, courses, or materials with ease, even when using vague or incomplete queries.
- Healthcare Websites: Patients find relevant health articles, FAQS, or services by asking questions in plain language.
- Corporate Intranets: Employees quickly locate internal documents, policies, or contact information, even without knowing the exact keywords.
Semantic search in action
Let’s consider an example:
- Query in Thai: “Kaeng Khiao Wan" (Green Curry in Thai)
- Traditional Keyword Search: Might return results based solely on the phrase "Kaeng Khiao Wan" without understanding its broader context.

- Semantic Search: Understands that the user is looking for recipes, ingredients, or cultural insights related to green curry, delivering richer and more relevant results.
.gif)
Conclusion
Instead of matching exact keywords, Semantic Search uses vector databases like Milvus or Pinecone to understand what users are really asking. It considers intent, phrasing, and related concepts, helping people find the right content even if they don’t use the exact terms.
When paired with Drupal’s Search API, Semantic Search can support faceted filters, multilingual queries, and complex taxonomies with more relevance and less friction. For content-heavy sites like legal portals, digital libraries, or nonprofit platforms, it means faster answers, fewer dead ends, and better usability.
Want to make your Drupal search smarter? Start by integrating a vector store and configuring your Search API to support embeddings. The result is a search experience that actually understands your content and your users.
For more information and to try it locally, explore these resources:

Mastering custom drush commands
The power of CLI in Drupal development
Imagine you’re managing a news website with thousands of articles. One morning, your editor asks, “How many ‘breaking news’ articles do we have?”
Without a custom Drush command, you’d log into the admin UI, filter the content list, and count manually tedious process.
But with a custom command, you simply type:
drush node-count-- type=breaking_news
…and get an answer in seconds!
This is the magic of Drush: transforming time-consuming tasks into instant insights. In this blog, we’ll walk through creating and refining custom Drush commands, showing how they can become indispensable tools in your Drupal workflow.
Why custom drush commands matter
Drush isn’t just a shortcut’s a command-line interface that lets you interact with Drupal at its core. Custom commands extend this power, letting you automate workflows, query data, and manage your site without touching a browser.
Real-world impact
Here’s how Drush can change your workflow:
- Automate repetitive tasks: Like clearing caches or rebuilding indexes.
- Quickly retrieve site information: Count nodes, check configuration, or validate data integrity.
- Streamline development: Run tests, generate reports, or pre-process assets.
- Extend Drupal’s capabilities: Create tools tailored to your site’s unique needs.
Building blocks of a custom drush command
Let’s start with a concrete example: a command that counts nodes. This will illustrate the key components and decisions involved in building custom commands.
Project structure
node_count_module/
├── node_count_module.info.yml
├── node_count_module.services.yml
└── src/
    └── Commands/
        └── NodeCountCommands.php
This structure follows Drupal’s conventions, ensuring your command is discoverable and maintainable.
Module information file
# node_count_module.info.yml
name: Node Count Module
type: module
description: Provides a Drush command to count nodes
core_version_requirement: ^9 || ^10 || ^11
package: Custom
This metadata tells Drupal what your module does and which versions it supports.
Services configuration
# node_count_module.services.yml
services:
  node_count_module.drush_commands:
    class: Drupal\node_count_module\Commands\NodeCountCommands
    arguments:
      - '@entity_type.manager'
    tags:
      - { name: drush.command }
Here, you’re defining a service that Drush can recognise. The @entity_type.manager argument gives your command access to Drupal’s entity system.
Learn more about services in Drupal
The command implementation
Let’s look at the code for a custom node-count command, with full validation and helpful output.
<?php

namespace Drupal\node_count_module\Commands;

use Drush\Commands\DrushCommands;
use Drupal\Core\Entity\EntityTypeManagerInterface;

/**
 * Provides Drush commands for node counting.
 */
class NodeCountCommands extends DrushCommands {

    /**
     * The entity type manager.
     *
     * @var \Drupal\Core\Entity\EntityTypeManagerInterface
     */
    protected $entityTypeManager;

    /**
     * Constructs a new NodeCountCommands object.
     *
     * @param \Drupal\Core\Entity\EntityTypeManagerInterface $entityTypeManager
     *   The entity type manager service.
     */
    public function __construct(EntityTypeManagerInterface $entityTypeManager) {
        $this->entityTypeManager = $entityTypeManager;
    }

    /**
     * Count the number of nodes in the Drupal site.
     *
     * @command custom:node-count
     * @aliases node-count nc
     * @option type Filter nodes by type
     * @usage custom:node-count
     *   Display total number of nodes
     * @usage custom:node-count --type=article
     *   Count nodes of type 'article'
     *
     * @param array $options
     *   An array of options.
     *
     * @return int
     *   The number of nodes.
     */
    public function nodeCount($options = ['type' => null]) {
        // Validate node type if provided.
        if (!empty($options['type']) && !$this->entityTypeManager->getStorage('node_type')->load($options['type'])) {
            throw new \InvalidArgumentException("Node type '{$options['type']}' does not exist.");
        }

        // Get the node storage.
        $nodeStorage = $this->entityTypeManager->getStorage('node');
        $query = $nodeStorage->getQuery()->accessCheck(true);

        // Filter by node type if specified.
        if (!empty($options['type'])) {
            $query->condition('type', $options['type']);
        }

        // Execute the query and get the count.
        $count = $query->count()->execute();

        // Output the result.
        if (!empty($options['type'])) {
            $this->output()->writeln("Total nodes of type '{$options['type']}': $count");
        } else {
            $this->output()->writeln("Total nodes in the site: $count");
        }

        return $count;
    }
}
How it works
This command uses Drupal’s entity query system to count nodes, varying the result based on the --type option. The entity_type.manager service provides access to this system, making the command reusable and testable.
Official Drush Command Authoring Docs
Integrating into existing modules
You don’t always need a new module. Adding commands to existing ones keeps your codebase clean.
Steps to integrate
- Create the command file: Place NodeCountCommands.php in src/Commands/.
- Update services YAML: Register the command in your module’s services.yml:
services:
  your_existing_module.drush_commands:
    class: Drupal\your_existing_module\Commands\NodeCountCommands
    arguments:
      - '@entity_type.manager'
    tags:
      - { name: drush.command }
This approach avoids bloating your project with unnecessary modules while keeping code organised.
Drupal 10 and 11: modernising your command
As Drupal evolves, so should your commands. Here’s how you can update the same command for Drupal 10/11 using modern PHP features.
<?php

namespace Drupal\your_module\Commands;

use Drush\Commands\DrushCommands;
use Drupal\Core\Entity\EntityTypeManagerInterface;
use Symfony\Component\DependencyInjection\ContainerInterface;

/**
 * Provides Drush commands for node counting.
 */
class NodeCountCommands extends DrushCommands {

    public function __construct(
        private readonly EntityTypeManagerInterface $entityTypeManager
    ) {}

    public static function create(ContainerInterface $container): static {
        return new static(
            $container->get('entity_type.manager')
        );
    }

    /**
     * Count the number of nodes in the Drupal site.
     *
     * @command custom:node-count
     * @aliases node-count nc
     * @option type Filter nodes by type
     * @usage custom:node-count
     *   Display total number of nodes
     * @usage custom:node-count --type=article
     *   Count nodes of type 'article'
     */
    public function nodeCount($options = ['type' => null]) {
        if (!empty($options['type']) && !$this->entityTypeManager->getStorage('node_type')->load($options['type'])) {
            throw new \InvalidArgumentException("Node type '{$options['type']}' does not exist.");
        }

        $nodeStorage = $this->entityTypeManager->getStorage('node');
        $query = $nodeStorage->getQuery()->accessCheck(true);

        if (!empty($options['type'])) {
            $query->condition('type', $options['type']);
        }

        $count = $query->count()->execute();

        if (!empty($options['type'])) {
            $this->output()->writeln("Total nodes of type '{$options['type']}': $count");
        } else {
            $this->output()->writeln("Total nodes in the site: $count");
        }

        return $count;
    }
}
Key improvements
- Readonly properties: Prevent accidental modifications.
- Container integration: Uses Symfony’s container for better dependency management.
- Static factory method: Enables cleaner instantiation, especially in testing environments.
These changes reflect Drupal’s shift toward stricter type safety and modern PHP practices.
Real-world example: content audit command
Scenario
A content agency migrates 50,000 articles from a legacy CMS. They need to verify data integrity:
- Are all articles imported?
- Do image fields reference valid media?
- Is taxonomy metadata preserved?
Solution: a custom drush command
/**
 * Provides Drush commands for content auditing.
 */
class ContentAuditCommands extends DrushCommands {

    protected $entityTypeManager;

    public function __construct(EntityTypeManagerInterface $entityTypeManager) {
        $this->entityTypeManager = $entityTypeManager;
    }

    /**
     * Audit taxonomy terms in a vocabulary.
     *
     * @command custom:audit-taxonomy
     * @option vocabulary The vocabulary machine name
     * @usage custom:audit-taxonomy --vocabulary=tags
     *   Audit all terms in the 'tags' vocabulary
     */
    public function auditTaxonomy($options = ['vocabulary' => 'tags']) {
        $termStorage = $this->entityTypeManager->getStorage('taxonomy_term');
        $query = $termStorage->getQuery()->condition('vid', $options['vocabulary']);
        $termCount = $query->count()->execute();

        $this->output()->writeln("Total terms in '{$options['vocabulary']}': $termCount");
        return $termCount;
    }
}
Why it works
This command leverages Drupal’s entity system to audit taxonomy terms, ensuring the migration team gets immediate feedback on taxonomy field integrity.
Best practices for custom commands
1. Use dependency injection
Injecting services like entity_type.manager makes your command testable and flexible.
Learn more about Dependency Injection in Drupal
2. Provide clear descriptions
Use the @usage annotation to document how users should run the command.
3. Handle edge cases
What happens if a node type doesn’t exist? Add validation:
if (!empty($options['type']) && !$this->entityTypeManager->getStorage('node_type')->load($options['type'])) {
    throw new \InvalidArgumentException("Node type '{$options['type']}' does not exist.");
}
This ensures your command fails gracefully instead of returning cryptic errors.
Common pitfalls and how to avoid them
Pitfall 1: Missing service tags
Forgetting to add drush.command in services.yml means Drush won’t recognise your command.
Pitfall 2: Overlooking access checks
Using accessCheck(true) ensures the command respects user permissions. Skipping it might expose sensitive data.
Pitfall 3: Hardcoding dependencies
Never hardcode services like \Drupal::entityTypeManager(). Always inject them for better testability.
Troubleshooting: When things go wrong
Case study: missing command after enabling the module
Symptoms: drush list doesn’t show your command.
Diagnosis:
- Confirm the module is enabled (drush pm:list).
- Check the service configuration for drush.command tags.
- Run drush cache-rebuild to refresh service definitions.
Case study: slow query on large sites
Symptoms: The command takes 10+ seconds to count nodes.
Fix: Add caching:
use Drupal\Core\Cache\Cache;

public function nodeCount($options = ['type' => null]) {
    $cache_key = 'node_count:' . ($options['type'] ?? 'all');
    $cached = \Drupal::cache()->get($cache_key);

    if ($cached) {
        $this->output()->writeln("Cached count: {$cached->data}");
        return $cached->data;
    }

    // Validate node type if provided.
    if (!empty($options['type']) && !$this->entityTypeManager->getStorage('node_type')->load($options['type'])) {
        throw new \InvalidArgumentException("Node type '{$options['type']}' does not exist.");
    }

    $nodeStorage = $this->entityTypeManager->getStorage('node');
    $query = $nodeStorage->getQuery()->accessCheck(true);

    if (!empty($options['type'])) {
        $query->condition('type', $options['type']);
    }

    $count = $query->count()->execute();

    \Drupal::cache()->set($cache_key, $count, Cache::PERMANENT, ['node']);

    if (!empty($options['type'])) {
        $this->output()->writeln("Total nodes of type '{$options['type']}': $count");
    } else {
        $this->output()->writeln("Total nodes in the site: $count");
    }

    return $count;
}
This adds caching to prevent redundant queries during frequent audits.
Expanding the possibilities: beyond node counting
Custom commands aren’t limited to counting nodes. Let’s explore advanced use cases:
Use case 1: bulk entity updates
A real estate platform uses a command to update property listings when market data changes:
public function updatePropertyPrices($options = ['increase' => 5]) {
    $query = $this->entityTypeManager->getStorage('node')->getQuery()
        ->condition('type', 'property');
    $nids = $query->execute();

    foreach ($this->entityTypeManager->getStorage('node')->loadMultiple($nids) as $node) {
        $price = $node->get('field_price')->value * (1 + ($options['increase'] / 100));
        $node->set('field_price', $price)->save();
    }

    $this->output()->writeln("Increased prices by {$options['increase']}% for " . count($nids) . " properties.");
}
Use case 2: health checks
A healthcare site runs nightly health checks to ensure critical content is up-to-date:
public function checkContentHealth() {
    $query = $this->entityTypeManager->getStorage('node')->getQuery()
        ->condition('status', 1)
        ->condition('changed', strtotime('-1 year'), '<');
    $staleNodes = $query->execute();

    if (empty($staleNodes)) {
        $this->output()->writeln("All content is up-to-date!");
    } else {
        $this->output()->writeln("Found " . count($staleNodes) . " stale nodes. Run `drush node-check stale` for details.");
    }
}
Best practices in action
1. Meaningful aliases
Instead of custom:node-count, use nc for brevity.
2. Usage examples
Always include @usage annotations. For instance:
/**
 * @usage custom:node-count --type=article
 *   Count all articles
 */
3. Help text
Describe what the command does in plain language:
Describe what the command does in plain language:
/**
 * Count nodes with optional filtering by type.
 *
 * This command helps you quickly audit content volume across content types.
 */
Conclusion
Custom Drush commands, when thoughtfully built, do more than automate tasks—they shape a cleaner, faster, and more predictable development workflow.
By applying best practices like dependency injection, validation, and clear documentation, developers create commands that are easy to maintain and trusted across teams.
Over time, these tools become integral to managing complexity, improving deployment confidence, and making Drupal development feel less like firefighting and more like engineering.
Ready to go further? Explore the official Drush command authoring docs and Drupal’s services and dependency injection guide to keep levelling up your CLI skills!
Happy Drushing!

Drupal Caching best practices and performance monitoring
Caching is both an art and a science. Mastering it can transform your Drupal site from a sluggish performer to a lightning-fast powerhouse.
In this final blog of our caching series, we’ll tie together everything you’ve learned: comprehensive best practices, performance monitoring, and real-world strategies.
Let’s consider what’s possible. Imagine a content-heavy education portal where students and teachers navigate through hundreds of resources daily. Without proper caching, every page request triggers a full rebuild, repeated database queries, heavy backend processing, and wasted server resources.
Now picture this: a regional school district site serving thousands of users every day. By implementing intelligent caching layers, Drupal page caching, dynamic route caching, and reverse proxies like Varnish, they cut average page load times from over 4 seconds to under 800 milliseconds. Traffic spikes from new semester enrollments no longer crash the site. Teachers upload assignments without delay. Students access learning materials instantly.
That’s the kind of transformation caching brings. By tailoring strategies to how your content is structured and consumed, you’re not just speeding up your site, you’re creating an experience that scales with demand and stays fast when it matters most.
Ready to build a caching system that evolves with your site’s needs? Let’s dive in.
Holistic Caching strategy
Building a multi-layered architecture
Caching isn’t one-size-fits-all. Think of it as assembling a toolkit: you need the right tools for the right jobs. Let’s break down the essentials:
Backend selection: matching needs to tools
Your cache backend is the foundation. Here’s how to choose:
- Memory stores (APCu, Redis): Lightning-fast for transient data.
- APCu is great for single-server setups and CLI scripts, but not for distributed environments.
- Redis works well for shared, scalable caching across multiple servers.
- Database (SQL): Reliable, but slower for high-traffic or high-frequency caching.
- File-based storage: Good for large, infrequently accessed objects (like PDFS or map tiles).
Example:
A news site might use Redis for the cache. render bin (frequent updates) and APCu for cache.dynamic_page_cache (fast access for authenticated users).
Granular Caching: precision over brute force
Imagine you’re updating just one article-wouldn’t it be wasteful to clear the cache for every article? By using granular cache tags like node:123, you ensure only the relevant cache is cleared. This keeps your site fast, even during bulk updates.
What are cache tags? Here’s a quick primer.
Intelligent invalidation: clear only what you must
Think of invalidation as surgery, not demolition. For example, when a product price changes:
- Clear node:123 (the product itself).
- Clear field: price (all price fields, if needed).
- Avoid clearing product_list unless absolutely necessary.
This ensures updates propagate instantly-without slowing down unrelated content.
Performance monitoring framework
Tracking what matters
Monitoring isn’t just about collecting numbers-it’s about understanding your site’s health. Here are four key indicators you should track:
1. Cache hit ratio
The percentage of requests served from cache. A 95%+ hit rate means your caching is efficient.
protected function calculateCacheHitRatio() {
  $cache_hits = \Drupal::state()->get('cache_performance.hits', 0);
  $cache_misses = \Drupal::state()->get('cache_performance.misses', 0);
  $total = $cache_hits + $cache_misses;
  return $total ? round(($cache_hits / $total) * 100, 2) : 0;
}
Note: You’ll need to instrument your code to increment these counters.
2. Average generation time
How long does it take to rebuild a cache when there’s a miss? If this exceeds 500ms, investigate slow field processing or external API calls.
protected function getAverageCacheGenerationTime() {
  $times = \Drupal::state()->get('cache_performance.generation_times', []);
  return count($times) ? array_sum($times) / count($times) : 0;
}
Again, ensure you’re logging these times when caches are regenerated.
3. Memory usage
Track memory consumption to avoid resource exhaustion.
protected function getCacheMemoryUsage() {
  return memory_get_usage(true);
}
4. Invalidation frequency
How often are caches cleared? Frequent invalidations (e.g., hourly) may indicate over-invalidation.
protected function getInvalidationFrequency() {
  return \Drupal::state()->get('cache_performance.invalidations', 0);
}
Real-World Example:
Here’s how the education portal can improve after optimization:

Advanced Drupal Cache techniques
Drupal’s default caching is robust, but if you’re building a site that needs to scale, think global e-commerce or high-traffic news, you’ll need to go beyond the basics. Imagine a global online retailer handling millions of visits per day. By layering caches, using targeted invalidation, and preventing cache stampedes, they can see a server load drop by 85% and response times can improve by 92%.
Ready to learn how? Let’s break down these advanced techniques and see how you can apply them to your own Drupal projects.
Chained Cache backends
Layered Caching for speed and resilience
Think of caching like a library: the most popular books are on the front shelf (memory), less popular ones are in the stacks (APCu), and the rarest are in the basement (database). Chained cache backends mimic these data flows through multiple layers, so you get speed and resilience.
Note: Drupal core doesn’t provide a built-in chained cache backend. The following is a conceptual example of how you could implement this pattern as a custom service. For more on cache backends, see the Cache Backend API docs.
use Drupal\Core\Cache\CacheBackendInterface;

class ChainedCacheBackend implements CacheBackendInterface {
  protected $backends = [];

  public function __construct(array $backends) {
    $this->backends = $backends;
  }

  public function get($cid, $allow_invalid = FALSE) {
    foreach ($this->backends as $i => $backend) {
      $cached = $backend->get($cid, $allow_invalid);
      if ($cached) {
        // Populate only the faster layers above this one.
        for ($j = 0; $j < $i; $j++) {
          $this->backends[$j]->set($cid, $cached->data, $cached->expire, $cached->tags ?? []);
        }
        return $cached;
      }
    }
    return FALSE;
  }

  // Implement other required methods: set(), delete(), invalidate(), etc.
}
Real-world use case: E-commerce product catalogue
A store with 100,000 products can use this approach:
- Memory Cache: For top-selling products.
- APCu: For mid-tier products.
- Database: For rarely accessed items.
When a user requests a product:
- Check memory cache.
- If not found, check APCu.
- If still not found, check the database and populate the faster caches for next time.
This keeps frequent visitors happy with lightning-fast responses, while new queries are handled efficiently.
Isolated Cache bins
Preventing Cache interference
Imagine two chefs sharing a pantry: one cooks Thai, the other Italian. If they don’t separate their ingredients, chaos ensues! The same goes for caches-unrelated data should live in separate bins to prevent accidental overwrites.
In Drupal, you usually isolate cache bins by configuring them in settings.php or via service overrides-not by prefixing cache IDS in code.
Configuration example in settings.php
$settings['cache']['bins']['product_search'] = 'cache.backend.redis';
$settings['cache']['bins']['user_profile'] = 'cache.backend.memory';
Why it matters
A news site might use cache.bin.product_search for search results and cache.bin.user_profile for user data. This way, a search cache clear won’t accidentally wipe out user sessions.
Intelligent Cache invalidation
Beyond Simple tag clearing
Invalidation isn’t just about clearing old data-it’s about knowing what to clear and when. For example, if a content editor updates a product, you want to invalidate not just that product’s cache, but also related categories and recommendations.
Learn more: Cache Tags
Example: smart invalidation with Cache tags
class SmartCacheInvalidator {
  public function invalidateRelatedContent($entity) {
    $tags = [
      'entity:' . $entity->getEntityTypeId(),
      'entity_bundle:' . $entity->bundle(),
      'entity_list',
    ];

    \Drupal::cache()->invalidateTags($tags);
    $this->triggerCustomInvalidation($entity);
  }

  protected function triggerCustomInvalidation($entity) {
    if ($entity->hasField('related_content')) {
      $related_items = $entity->get('related_content')->referencedEntities();
      foreach ($related_items as $related_item) {
        \Drupal::cache()->invalidateTags([
          'entity:' . $related_item->getEntityTypeId() . ':' . $related_item->id(),
        ]);
      }
    }
  }
}
Real-world use case: news aggregation
When an article is updated:
- The article’s cache clears (node:123).
- Its category listing refreshes (content_type:article).
- Related articles are invalidated (node:related_456).
This ensures updates propagate instantly-without over-clearing other content.
Cache stampede prevention
Avoiding the rush
A cache stampede is like hundreds of people rushing to rebuild a lost sandcastle at once-total chaos! In Drupal, the Lock API helps by letting only one request rebuild the cache, while others wait.
Example: Using the Lock API
use Drupal\Core\Cache\CacheBackendInterface;

class CacheStampedePreventor {
  public function getCachedData($cache_id, callable $callback, array $options = []) {
    $lock_id = "cache_rebuild:{$cache_id}";

    $cached = \Drupal::cache()->get($cache_id);
    if ($cached) {
      return $cached->data;
    }

    $lock = \Drupal::lock();
    if ($lock->acquire($lock_id)) {
      try {
        $data = $callback();
        \Drupal::cache()->set(
          $cache_id,
          $data,
          CacheBackendInterface::CACHE_PERMANENT,
          $options['tags'] ?? []
        );
        $lock->release($lock_id);
        return $data;
      } catch (\Exception $e) {
        $lock->release($lock_id);
        throw $e;
      }
    } else {
      // Wait for the other process to finish rebuilding.
      if (method_exists($lock, 'wait')) {
        $lock->wait($lock_id);
      } else {
        // Fallback: sleep briefly before retrying.
        sleep(1);
      }
      $cached = \Drupal::cache()->get($cache_id);
      return $cached ? $cached->data : null;
    }
  }
}
Note: The wait() method is available in most lock backends in Drupal 9/10, but always check your environment.
Real-world use case: flash sale page
During a flash sale, thousands hit the same product page. The first request rebuilds the cache; everyone else waits for their turn, no server meltdown!
Dynamic Cache contexts
Adapting to complex scenarios
Cache contexts tell Drupal when to vary the cache (e.g., by user role or language). But what if you need to vary by device type, or a combination of factors? That’s where custom cache contexts shine.
Learn more: Cache Contexts
Example: custom Cache context
use Drupal\Core\Cache\CacheContextInterface;

class DynamicCacheContext implements CacheContextInterface {
  public function getContext() {
    $current_user = \Drupal::currentUser();
    return md5(serialize([
      'user_roles' => $current_user->getRoles(),
      'device_type' => $this->getDeviceType(),
    ]));
  }

  protected function getDeviceType() {
    $user_agent = \Drupal::request()->headers->get('User-Agent');
    return preg_match('/mobile/i', $user_agent) ? 'mobile' : 'desktop';
  }

  public static function getLabel() {
    return t('User roles and device type');
  }
}
Real-world use case: responsive web app
A news app serves different layouts to mobile and desktop users. With a dynamic context:
- Mobile users get a lightweight version.
- Desktop users see a full-featured layout.
- Both caches stay independent and efficient.
Performance monitoring
Tracking what matters
Monitoring isn’t just about pretty graphs-it’s about actionable insights. You want to know:
- Which caches are hit most often?
- Which takes the longest to regenerate?
- Where are the bottlenecks?
Learn more: Logger API
Example: Tracking Cache performance
class CachePerformanceTracker {
  public function trackCachePerformance(callable $callback) {
    $start_time = microtime(true);
    $memory_before = memory_get_usage();

    $result = $callback();

    $execution_time = microtime(true) - $start_time;
    \Drupal::logger('cache_performance')->info(
      'Execution Time: @time ms, Memory Used: @memory KB',
      [
        '@time' => round($execution_time * 1000, 2),
        '@memory' => round((memory_get_usage() - $memory_before) / 1024, 2),
      ]
    );

    return $result;
  }
}
Real-world use case: analytics dashboard
A dashboard tracks:
- Cache hit rate by bin
- Average regeneration time
- Invalidations per hour
This helps engineers quickly spot and fix bottlenecks-like a slow block dragging down the homepage.
Implementation strategies
Putting it all together
1. Layered Caching architecture
Use chained backends for critical paths (e.g., product pages), and isolated bins for unrelated systems (e.g., user sessions vs. search results).
2. Contextual Caching
Be specific: avoid broad contexts like url; use url.path or custom contexts for business logic.
3. Granular Invalidation
Target specific entities (node:123) instead of broad tags (content_type:article).
4. Stampede Protection
Apply cache locks to high-traffic pages with frequent updates (e.g., stock tickers, live scores).
5. Continuous Monitoring
Log cache performance and set up alerts for anomalies (like a sudden drop in hit rate).
Series navigation
This article is part of our comprehensive 10-part series on Drupal caching:
- Introduction to Drupal Caching
- Understanding Drupal’s Cache API
- Choosing the Right Cache Backend for Your Drupal Site
- Mastering Page and Block Caching in Drupal
- Optimising Drupal Views and Forms with Caching
- Entity and Render Caching for Drupal Performance
- Building Custom Caching Services in Drupal
- Implementing Custom Cache Bins for Specialised Needs
- Advanced Drupal Cache Techniques (You are here)
- Drupal Caching Best Practices and Performance Monitoring (Coming soon)
What’s next?
Advanced caching techniques help Drupal sites stay responsive under pressure and efficient at scale. By layering cache backends, isolating bins, using precise invalidation, and adapting to context, you create a caching system that mirrors how real users interact with your site.
These methods work best when applied as part of a clear strategy. Each layer supports faster access. Each boundary between cache bins keeps systems focused. Context-aware caching and stampede prevention protect performance without adding complexity. And monitoring ensures every choice is informed by real data.
Together, they form a foundation for stability and long-term maintainability.
In our final blog, we’ll tie everything together with Drupal caching best practices. You’ll learn how to:
- Design caching strategies for long-term maintainability
- Monitor and optimise caching in production
- Troubleshoot common caching pitfalls
Stay tuned for the final chapter in our caching journey!
.avif "Implementing custom Cache bins for specialised needs")
Implementing custom Cache bins for specialised needs
Drupal’s default cache bins-such as cache. render and cache. Entities are designed for generalised use cases.
However, complex applications often require specialised caching strategies that transcend these built-in systems.
Imagine a scientific research platform that processes large datasets for computational models.
Default caching might reduce database queries, but it fails to address the computational overhead of recalculating results. In such cases, custom cache bins become essential to balance performance with precision.
Limitations of default Cache bins
Default cache bins are optimised for simplicity, but they struggle with niche requirements:
- Shared storage: All cached data shares the same backend, risking interference (e.g., a heavy computation overwriting frequently accessed data).
- One-size-fits-all expiration: Default bins use universal rules for cache invalidation, which may not align with domain-specific needs (e.g., invalidating a weather API cache every hour vs. a financial report cache every day).
- Backend constraints: Default bins often rely on the database (cache.backend.database), which may not suit high-throughput scenarios (e.g., real-time analytics requiring Redis).
When custom Cache bins add value
Custom bins shine in scenarios where default bins fall short:
- High-volume, low-change data: Scientific computations or machine learning predictions that take seconds to generate but change infrequently.
- Specialised backends: Applications requiring Redis for speed or file-based storage for large binary objects.
- Granular invalidation: Systems needing precise cache clearing (e.g., refreshing only weather forecasts for a specific region).
Tip: Avoid custom bins for rapidly changing data (like live chat messages) or sensitive information (such as user-specific financial records), where default mechanisms or no caching may be safer.
Understanding Cache bins
What are Cache bins?
Think of cache bins as labelled storage boxes in a warehouse. Each box holds a different type of item, and you can choose where to store each box for maximum efficiency. In Drupal, cache bins:
- Separate Cached content: Prevent interference between unrelated data (e.g., page content vs. API responses).
- Allow custom backends: Use different storage systems (e.g., Redis for fast access, database for persistence).
- Support unique policies: Define rules like expiration times, invalidation strategies, and access controls.
Default Drupal Cache bins
Drupal ships with predefined bins for common use cases:
- cache.default: Generic storage for arbitrary data.
- cache.render: Stores rendered HTML fragments.
- cache.entity: Caches raw entity data.
- cache.bootstrap: Critical data needed during early bootstrapping.
While these bins handle most scenarios, they lack flexibility for specialised needs.
Why create custom Cache bins?
Advantages of specialised storage
- Isolation: Prevent cache interference between unrelated systems (e.g., a weather API cache won’t evict a machine learning model cache).
- Tailored backends: Use Redis for low-latency access or file storage for large binary objects.
- Fine-grained control: Define custom expiration rules (e.g., “cache weather data for 15 minutes”) and invalidation logic.
Real-world scenarios
- Scientific computation results: A research platform caches complex simulations for 24 hours, invalidating them only when input parameters change.
- Machine learning predictions: Store model outputs in a Redis-backed bin to reduce redundant calculations.
- Geospatial data: Cache map tiles in a file-based bin to offload database pressure.
Cache bin architecture
Core components
A custom cache bin relies on four foundational elements:
- Cache backend: Defines where data is stored (e.g., database, Redis, file system).
- Cache tags: Determine what triggers cache invalidation (e.g., scientific_computation, ml_model:42).
- Metadata management: Includes rules like max-age and dependencies (tags, contexts).
- Isolation mechanism: Enforced through unique service definitions and backend configurations.
Dependency injection: why it matters
Drupal’s service container allows cache logic to be decoupled from business logic. By injecting dependencies like CacheBackendInterface, services become:
- Testable: Easily mocked in unit tests.
- Flexible: Replace backends (e.g., switching from database to Redis) without rewriting logic.
Example:
use Drupal\Core\Cache\CacheBackendInterface;

class SpecializedCacheBin implements CacheBackendInterface {
  protected $cacheBin;

  public function __construct(CacheBackendInterface $cache_bin) {
    $this->cacheBin = $cache_bin;
  }

  public function get($cid, $allow_invalid = FALSE) {
    return $this->cacheBin->get($cid, $allow_invalid);
  }

  // Implement all other required CacheBackendInterface methods...
}
Official Documentation: Service Container
Step-by-step: creating a custom Cache bin
1. Register the service
Define the bin in your module’s mymodule.services.yml:
services:
  cache.specialized_bin:
    class: Drupal\mymodule\Cache\SpecializedCacheBin
    arguments: ['@cache_factory']
    tags:
      - { name: cache.bin }
Note: The cache backend (e.g., Redis, database) is configured in settings.php, not in the service definition.
2. Configure the backend in settings.php
$settings['cache']['bins']['specialized_bin'] = 'cache.backend.redis'; // or 'cache.backend.database'
3. Implement the Cache bin class
Here’s an example for a scientific computation cache:
use Drupal\Core\Cache\CacheBackendInterface;
use Drupal\Core\Cache\CacheFactoryInterface;

class ScientificComputationCache implements CacheBackendInterface {
  protected $cacheBin;

  public function __construct(CacheFactoryInterface $cache_factory) {
    $this->cacheBin = $cache_factory->get('scientific_computation');
  }

  public function get($cid, $allow_invalid = FALSE) {
    $cached = $this->cacheBin->get($cid, $allow_invalid);
    if ($cached && $this->validateScientificData($cached->data)) {
      return $cached;
    }
    return FALSE;
  }

  public function set($cid, $data, $expire = CacheBackendInterface::CACHE_PERMANENT, array $tags = []) {
    $processed_data = $this->preprocessData($data);
    $this->cacheBin->set(
      $cid,
      $processed_data,
      $expire,
      array_merge($tags, ['scientific_computation'])
    );
  }

  protected function validateScientificData($data) {
    return is_array($data) && isset($data['result']) && isset($data['timestamp']);
  }

  protected function preprocessData($data) {
    return [
      'result' => $data,
      'timestamp' => time(),
      'source_hash' => md5(serialize($data)),
    ];
  }

  // Implement all other required CacheBackendInterface methods...
}
Practical implementation examples
Machine learning model Cache
Scenario: A recommendation engine generates predictions that take 5 seconds to compute.
Solution: Cache predictions with Redis for fast retrieval.
use Drupal\Core\Cache\CacheBackendInterface;

class MachineLearningModelCache {
  protected $cache;

  public function __construct(CacheBackendInterface $cache) {
    $this->cache = $cache;
  }

  public function cacheModelPrediction($model_id, $input, $prediction) {
    $cache_id = 'ml_prediction:' . md5($model_id . serialize($input));
    $this->cache->set(
      $cache_id,
      [
        'model' => $model_id,
        'input' => $input,
        'prediction' => $prediction,
        'timestamp' => time(),
      ],
      CacheBackendInterface::CACHE_PERMANENT,
      ['machine_learning_predictions']
    );
  }
}
Impact:
- Latency Reduction: Cuts prediction time from 5s to milliseconds.
- Scalability: Redis handles concurrent requests without database bottlenecks.
Geospatial data Caching
Scenario: A mapping application serves pre-rendered tiles that take 2 seconds to generate.
Solution: Use a file-based bin to offload the database.
use Drupal\Core\Cache\CacheBackendInterface;
use Drupal\Core\File\FileSystemInterface;

class MapTileCache implements CacheBackendInterface {
  protected $cacheBin;
  protected $fileSystem;

  public function __construct(CacheBackendInterface $cache_bin, FileSystemInterface $file_system) {
    $this->cacheBin = $cache_bin;
    $this->fileSystem = $file_system;
  }

  public function set($cid, $data, $expire, array $tags) {
    $uri = "public://cache/tiles/$cid.png";
    $this->fileSystem->saveData($data, $uri, FileSystemInterface::EXISTS_REPLACE);
    $this->cacheBin->set($cid, ['uri' => $uri], $expire, $tags);
  }

  public function get($cid, $allow_invalid = FALSE) {
    $cache = $this->cacheBin->get($cid, $allow_invalid);
    if ($cache && isset($cache->data['uri']) && file_exists($cache->data['uri'])) {
      return file_get_contents($cache->data['uri']);
    }
    return FALSE;
  }

  // Implement all other required CacheBackendInterface methods...
}
Impact:
- Resource Efficiency: Reduces database load by storing large binary objects on disk.
- Resilience: Falls back to metadata for invalidation during file system failures.
Performance optimisation techniques
Best practices
- Backend selection: Use Redis for low-latency access, file storage for large binaries.
- Granular tags: Use specific tags like ml_model:42 instead of broad tags.
- Dynamic expiration: Set max-age based on data volatility (e.g., weather data every 15 minutes).
- Monitor: Track hit rates and generation times for proactive tuning.
Common pitfalls
- Overly Broad Tags: Using ml_model:all clears unrelated predictions.
- Inappropriate Backends: Storing large files in the database instead of the filesystem.
Debugging and monitoring
Logging Cache operations
Track cache activity for auditing and debugging:
class CacheBinDebugger {
  public static function logCacheOperation($bin, $operation, $cid) {
    \Drupal::logger('cache_debug')->info(
      'Cache Operation: @operation in @bin for @cid',
      [
        '@operation' => $operation,
        '@bin' => $bin,
        '@cid' => $cid,
      ]
    );
  }
}
Why it works:
- Operational Visibility: Identifies slow or frequently invalidated entries.
- Troubleshooting: Diagnoses missing dependencies during invalidation.
Performance monitoring
Use backend-specific tools to measure effectiveness:
function mymodule_monitor_cache_bin_performance($bin_name) {
  $cache = \Drupal::cache($bin_name);

  // Example: Redis-specific stats (if using Redis)
  if (method_exists($cache, 'getConnection')) {
    $stats = $cache->getConnection()->info();
    \Drupal::logger('cache_performance')->info(
      'Redis Stats for @bin: @stats',
      [
        '@bin' => $bin_name,
        '@stats' => print_r($stats, TRUE),
      ]
    );
  }
}
Metrics to monitor:
- Hit rate: High hit rates indicate effective caching.
- Generation time: Identify slow-to-generate content for optimisation.
Series navigation
This article is part of a comprehensive 10-part series on Drupal caching:
- Introduction to Drupal Caching
- Understanding Drupal’s Cache API
- Choosing the Right Cache Backend for Your Drupal Site
- Mastering Page and Block Caching in Drupal
- Optimising Drupal Views and Forms with Caching
- Entity and Render Caching for Drupal Performance
- Building Custom Caching Services in Drupal
- Implementing Custom Cache Bins for Specialised Needs (You are here)
- Advanced Drupal Cache Techniques (Coming soon)
- Drupal Caching Best Practices and Performance Monitoring (Coming soon)
Wrapping up and what’s ahead?
As we wrap up, remember that implementing custom cache bins in Drupal is surprisingly straightforward once you understand the core concepts. Define your service in your module's services.yml file, create your cache bin class extending the appropriate backend, and register everything properly. These three steps will get you most of the way there. The real power comes when you fine tune your bin's configuration to match your specific caching needs and invalidation patterns. Don't hesitate to experiment with different backends and expiration strategies. Sometimes the best implementation reveals itself through trial and optimization. Your site's performance metrics will tell the story of your success.
Next, we’ll look at how advanced caching techniques build on this foundation. We’ll walk through cache hierarchies (memory → Redis → database), event-driven invalidation, and integrating with CDNs or edge networks to extend performance beyond the application layer.
.avif "Building custom Caching services in Drupal")
Building custom Caching services in Drupal
The need for custom solutions
Drupal’s default caching mechanisms include cache.render and cache.page are designed for general use cases. They work well for standard content delivery, reducing load times and database queries across a broad range of applications. However, complex applications often require specialised caching logic that transcends these built-in systems.
Take, for instance, a financial reporting platform that processes thousands of data points per request. Default caching might reduce some backend calls, but it doesn’t address the computational overhead of transforming raw financial data into user-specific reports with real-time accuracy. Similarly, consider a personalised learning platform that dynamically assembles course content based on a learner’s history, progress, and preferences. In both cases, caching needs to go beyond what Drupal offers out of the box.
Default strategies fall short when performance demands collide with precision and dynamic output. In such scenarios, a custom caching service becomes essential, engineered to recognise context-specific data dependencies, invalidate intelligently, and serve pre-processed results without compromising on accuracy or personalisation.
Limitations of default Caching
Default caching systems are optimised for simplicity, but they struggle with niche requirements:
- Static vs. dynamic content: While static content (like product descriptions) benefits from broad caching, dynamic data (such as stock prices) requires fine-grained invalidation rules.
- Complex data structures: Nested JSON responses or hierarchical datasets may need specialised serialisation formats or invalidation triggers.
- Contextual variations: Default contexts like user. roles or url. path cannot accommodate business-specific variations (for example, caching based on user subscription tiers).
- Third-party integrations: External APIS or microservices often demand unique caching strategies to reduce latency and avoid rate limits.
When custom Caching adds value
Custom services shine in scenarios where default caching falls short:
- High-traffic, low-change content: E-commerce product listings that update infrequently but receive frequent visits.
- External API reliance: Applications that pull data from third-party services and need to mitigate network latency.
- Granular invalidation: Systems requiring precise cache clearing (such as refreshing only reports tied to a specific user).
Avoid custom caching for rapidly changing data (like live chat messages) or sensitive information (such as user-specific financial records), where default mechanisms or no caching at all may be safer.
Designing a custom Caching service
Core components explained
A custom caching service in Drupal relies on four foundational elements:
1. Cache backend
This defines where data is stored. Common backends include:
- Database: Default storage (cache.default), suitable for small-scale applications.
- Memory stores: APCu or Redis for faster access in single-server setups.
- Distributed Caches: Redis clusters or Memcached for multi-server environments.
2. Cache tags
Tags determine what triggers cache invalidation. For example:
- node:123 clears caches tied to a specific node.
- financial_report:2023 targets caches related to annual financial data.
Avoid broad tags like content_type: article, which can inadvertently clear unrelated caches.
3. Cache contexts
Contexts define when to vary the cache. For instance:
- user.roles creates separate caches for admins vs. guests.
- Language ensures multilingual sites serve content in the correct language.
Use narrow contexts (like url. path instead of url) to prevent cache bloat. Note: For custom cache bins, you must include context values in your cache ID, as cache contexts are not natively supported outside render caching.
4. Cache metadata
Metadata includes rules like max-age (how long to store data) and dependencies (e.g., tags, contexts). This metadata ensures cached data remains fresh and relevant.
Dependency injection: why it matters
Drupal’s service container allows caching logic to be decoupled from business logic. By injecting dependencies like CacheBackendInterface and CacheContextsManager, services become:
- Testable: Easily mocked in unit tests.
- Flexible: Replace backends (for example, switching from database to Redis) without rewriting logic.
use Drupal\Core\Cache\CacheBackendInterface;
use Drupal\Core\Cache\Context\CacheContextsManager;

class CustomCacheService {
  protected $cacheBackend;
  protected $cacheContextsManager;

  public function __construct(
    CacheBackendInterface $cache_backend,
    CacheContextsManager $cache_contexts_manager
  ) {
    $this->cacheBackend = $cache_backend;
    $this->cacheContextsManager = $cache_contexts_manager;
  }
}
Learn about dependency injection in Drupal.
Step-by-step implementation
1. Register the service
Define the service in mymodule.services.yml:
services:
  mymodule.custom_cache:
    class: Drupal\mymodule\Cache\CustomCacheService
    arguments:
      - '@cache.default'
      - '@cache.contexts_manager'
This binds the service to Drupal’s dependency injection system, enabling reusability and testability.
2. Implement Caching logic
Create a method to fetch and cache data. Note: For custom cache bins, you must handle cache contexts by including them in the cache ID if needed.
public function getCachedData($cache_id, $callback, $options = []) {
  $options += [
    'expire' => \Drupal\Core\Cache\CacheBackendInterface::CACHE_PERMANENT,
    'tags' => ['my_custom_cache'],
  ];
  if ($cached = $this->cacheBackend->get($cache_id)) {
    return $cached->data;
  }

  $data = $callback();
  $this->cacheBackend->set(
    $cache_id,
    $data,
    $options['expire'],
    $options['tags']
  );

  return $data;
}
How It works:
- Check: First, the service checks if the cache exists.
- Generate: If not, the expensive operation (such as an API call) runs.
- Store: Results are saved with metadata for future reuse.
See the official Cache API usage guide.
Multi-level Caching: solving complex bottlenecks
Layered Caching Strategy
Multi-level caching balances speed and resilience by combining storage tiers:
- Memory Cache: Fastest but volatile (e.g., APCu).
- Local persistent Cache: Survives server restarts (e.g., Redis on a single server).
- Distributed Cache: Scales across servers (e.g., Redis clusters).
class MultiLevelCacheService {
  protected $memoryCache = [];
  protected $localCache;
  protected $distributedCache;

  public function __construct($localCache, $distributedCache) {
    $this->localCache = $localCache;
    $this->distributedCache = $distributedCache;
  }

  public function getData($key, $fetchCallback) {
    if (isset($this->memoryCache[$key])) {
      return $this->memoryCache[$key];
    }

    if ($local_cached = $this->localCache->get($key)) {
      $this->memoryCache[$key] = $local_cached->data;
      return $local_cached->data;
    }

    if ($distributed_cached = $this->distributedCache->get($key)) {
      $this->localCache->set($key, $distributed_cached->data, \Drupal\Core\Cache\CacheBackendInterface::CACHE_PERMANENT);
      $this->memoryCache[$key] = $distributed_cached->data;
      return $distributed_cached->data;
    }

    $data = $fetchCallback();

    $this->memoryCache[$key] = $data;
    $this->localCache->set($key, $data, \Drupal\Core\Cache\CacheBackendInterface::CACHE_PERMANENT);
    $this->distributedCache->set($key, $data, \Drupal\Core\Cache\CacheBackendInterface::CACHE_PERMANENT);

    return $data;
  }
}
Use case:
A news site with high traffic on its home page. The memory cache handles immediate requests, while the distributed layer ensures consistency across a server cluster.
Real-world example: Caching external API data
Scenario
An e-commerce platform pulls product pricing from a third-party API. Without caching, each request takes 2 seconds due to network latency.
Solution
Add a caching layer to reduce latency:
class ApiCacheService extends CustomCacheService {
  protected $apiClient;

  public function __construct($cache_backend, $cache_contexts_manager, $apiClient) {
    parent::__construct($cache_backend, $cache_contexts_manager);
    $this->apiClient = $apiClient;
  }

  public function fetchWithCaching($endpoint, $params = []) {
    $cache_id = 'api_cache:' . md5($endpoint . serialize($params));

    return $this->getCachedData($cache_id, function() use ($endpoint, $params) {
      try {
        $response = $this->apiClient->request($endpoint, $params);
        return $this->processApiResponse($response);
      } catch (\Exception $e) {
        \Drupal::logger('api_cache')->error('API fetch failed: @message', ['@message' => $e->getMessage()]);
        return null;
      }
    }, [
      'expire' => REQUEST_TIME + 1800,
      'tags' => ['external_api_data'],
    ]);
  }

  protected function processApiResponse($response) {
    // Transform or sanitise as needed.
    return $response;
  }
}
Impact:
- Latency reduction: Cuts API call time from 2s to near-instant.
- Graceful degradation: Falls back to cached data during API outages.
Error handling and fallbacks
Resilience through fallback layers
When a cache backend fails (e.g., Redis crashes), a fallback mechanism prevents downtime.
public function getFallbackData($primary_key, $fallback_callback) {
  try {
    return $this->getCachedData($primary_key, $fallback_callback);
  } catch (\Exception $e) {
    \Drupal::logger('cache_service')->warning('Primary cache failed, using fallback');
    return $fallback_callback();
  }
}
Why it works:
- User experience: Keeps the site functional during backend failures.
- Operational continuity: Ensures critical features remain accessible.
Performance monitoring
Tracking what matters
Create a tracker to measure cache effectiveness:
class CachePerformanceTracker {
  protected $stats = ['hits' => 0, 'misses' => 0, 'generation_time' => []];

  public function trackCachePerformance($cache_id, $callback) {
    $start = microtime(true);
    $result = $callback();
    $this->stats['generation_time'][$cache_id] = microtime(true) - $start;
    return $result;
  }
Metrics to monitor:
- Hit rate: High hit rates indicate effective caching.
- Generation time: Identify slow-to-generate content for optimisation.
Best practices and common pitfalls
Best practices
- Granular tags: Use financial_report:2023 instead of broad tags.
- Minimise contexts: Prefer url. path over url to reduce variants.
- Avoid sensitive data: Never cache CSRF tokens or PII.
- Monitor: Track hit rates and generation times for proactive optimisation.
Common pitfalls
- Overly broad contexts: Using url instead of url.path creates redundant cache entries.
- No fallbacks: A cache failure should not break the site.
Series navigation
This article is part of our comprehensive 10-part series on Drupal caching:
- Introduction to Drupal Caching
- Understanding Drupal’s Cache API
- Choosing the Right Cache Backend for Your Drupal Site
- Mastering Page and Block Caching in Drupal
- Optimising Drupal Views and Forms with Caching
- Entity and Render Caching for Drupal Performance
- Building Custom Caching Services in Drupal (You are here)
- Implementing Custom Cache Bins for Specialised Needs (Coming soon)
- Advanced Drupal Cache Techniques (Coming soon)
- Drupal Caching Best Practices and Performance Monitoring (Coming soon)
What’s next?
While Drupal’s default caching covers the basics, scaling performance for advanced applications often means thinking beyond the core. Custom caching services allow developers to fine-tune how data is stored, served, and invalidated, especially when dealing with highly dynamic or resource-intensive workloads.
In the next blog, we’ll explore how to go one step further with custom cache bins. You’ll learn how to create isolated cache storage for niche scenarios like session-based data, configure these bins in settings.php, and fine-tune caching strategies for performance-critical use cases.
To dive deeper into Drupal’s caching capabilities in the meantime, check out the Cache API documentation, along with resources on Cache Tags, Cache Contexts, and Cacheable Metadata.

Entity and render Caching for Drupal performance
Drupal’s entity system is powerful, but without proper caching, it can become a performance bottleneck. Understanding entity and render caching is crucial for building high-performance Drupal websites that can handle complex content structures efficiently.
In this blog, we’ll uncover the strategies that made this transformation possible.
Entity Caching fundamentals
In-depth explanation
Drupal’s entity caching system is a multi-layered mechanism that optimises performance by reducing redundant database queries and PHP processing. To understand its depth, let’s break down each layer and explore how it works under the hood.
1. Entity load Caching
What it does
When an entity (e.g., a node, user, or taxonomy term) is requested, Drupal typically queries the database to load its raw data. Entity Load Caching stores this raw data in the cache_entity bin (by default) to avoid repeated database calls for the same entity. The cache key is typically in the format entity:{entity_type}:{id}:{langcode} (e.g., entity:node:123:en).
Technical mechanics
- Entity storage system: Entities are loaded via the EntityStorageInterface (e.g., SqlContentEntityStorage). When an entity is first requested, it is fetched from the database and stored in the cache bin.
- Cache keys: The cache key is derived from the entity type, ID, and language (e.g., node:123:en).
- Invalidation: When an entity is updated or deleted, its cache entry is cleared using cache tags (e.g., node:123).
Why It matters
- Reduces database load: Eliminates redundant queries for frequently accessed entities.
- Speeds up entity access: Directly retrieves data from memory instead of parsing SQL results.
2. Render Caching
What it does
After an entity is loaded, Drupal generates a render array (a structured PHP array defining how the entity should be displayed). Render Caching stores these arrays to avoid rebuilding them on every request.
Technical mechanics
- Render arrays: Arrays like ['#markup' => 'Hello', '#cache' => [...]] are generated during entity rendering.
- Cache bin: Render arrays are stored in cache_render with keys based on entity type, ID, view mode, and cache contexts (e.g., user.roles).
- Cache contexts: Determine when to vary the cache (e.g., different render arrays for admins vs. anonymous users).
Why it matters
- Avoids rebuilding: Skips expensive operations like field rendering, template preprocessing, and access checks.
- Granular control: Uses cache tags (e.g., node:123) and contexts (e.g., url.path) to ensure freshness.
Example:
// Add cache metadata to a render array.
$build['my_element'] = [
  '#markup' => 'Cached Content',
  '#cache' => [
    'contexts' => ['user.roles'],
    'tags' => ['node:123'],
    'max-age' => 3600,
  ],
];
3. View mode Caching
What it does
Entities are often displayed in different formats (e.g., “teaser” for listings and “full” for detail pages). View Mode Caching stores separate render arrays for each view mode to avoid redundant processing.
Technical mechanics
- View modes: View Modes: Defined in hook_entity_type_build() or via the UI (e.g., teaser, full, custom_mode).
- Cache key structure: Combines entity type, ID, view mode, and language (e.g., node:123:teaser:en).
- Customisation: Developers can alter view mode rendering via hook_entity_view() or hook_ENTITY_TYPE_view().
Why it matters
- Efficient Multi-Format Rendering: Prevents rebuilding the same entity for different contexts.
- Consistency: Ensures view modes like “teaser” remain fast even if the “full” view is complex.
Example hook:
function mymodule_node_view(array &$build, \Drupal\Core\Entity\EntityInterface $entity, \Drupal\Core\Entity\Display\EntityViewDisplayInterface $display, $view_mode) {
  if ($view_mode === 'teaser') {
    $build['#cache']['max-age'] = 7200;
  }
}
4. Field-level Caching
What it does
Fields (e.g., a “body” text field or an “image” field) can be cached individually to avoid reprocessing static content.
Technical mechanics
- Field formatters: Each field’s display is handled by a formatter (e.g., text_default, image).
- Cache granularity: Developers can specify caching for individual fields using hook_field_formatter_view_alter(). Note: In practice, field formatter plugins should set cache metadata directly on render arrays. The hook is for last-resort alterations.
- Dependencies: Field caching relies on render arrays and cache metadata bubbled up from the field level.
Why it matters
- Optimises static fields: Caches rarely changing fields (e.g., author bio) while dynamic fields (e.g., stock status) remain uncached.
- Reduces overhead: Avoids reprocessing fields with expensive calculations (e.g., computed fields).
Example hook:
function mymodule_field_formatter_view_alter(array &$element, array $context) {
  if ($context['field_name'] === 'field_price') {
    $element['#cache'] = [
      'contexts' => ['user.roles'],
      'tags' => ['field:price'],
      'max-age' => 1800,
    ];
  }
}
Use Case 1: Hybrid Caching for a product catalogue
Scenario
An e-commerce site needs fast delivery of product pages for anonymous users but must update instantly when inventory changes.
Goal
Combine entity load caching with tag-based invalidation to reduce database queries while keeping content fresh.
Sample implementation
/**
 * Implements hook_node_view().
 *
 * Adds cache metadata for product nodes with tag-based invalidation.
 */
function mymodule_node_view(array &$build, \Drupal\Core\Entity\EntityInterface $entity, \Drupal\Core\Entity\Display\EntityViewDisplayInterface $display, $view_mode) {
  if ($entity->bundle() === 'product' && $view_mode === 'full') {
    $build['#cache']['tags'][] = 'product_list';
    $build['#cache']['max-age'] = 3600;
  }
}
Explanation:
This caches product entities for 1 hour (max-age) but clears the cache when the entity is edited (node:$nid) or when the product list changes (product_list).
Render pipeline overview
In-depth explanation
The render pipeline is the sequence of steps Drupal uses to transform entities into HTML. Let’s dissect each stage and explore its role in caching.
1. Entity loading
What happens
- Database query: Drupal queries the database for entity data (e.g., node title, body).
- Field data: Retrieves field values from field_data_* tables.
- Access checks: Verifies user permissions to view the entity.
Caching interaction
- Entity load Caching: If the entity is already in the cache_entity bin, it bypasses the database.
- Performance impact: Avoids 1–5 SQL queries per entity.
2. Field value loading
What happens
- Field definitions: Loads field definitions from core.entity_field_manager.
- Field values: Gathers values for all fields (e.g., field_image, field_tags).
- Field formatters: Determines how each field should be rendered (e.g., image style, link format).
Caching interaction
- Field-level Caching: If a field’s formatter is cached, its render array is pulled from cache_render.
- Performance impact: Reduces time spent processing field data for static fields.
3. Render array generation
What happens
- Structured array: Builds a render array with elements like #type, #markup, and #theme.
- Preprocessing: Invokes hook_preprocess_HOOK() functions to add variables for templates.
- Cache metadata: Aggregates cache contexts (e.g., user.roles) and tags (e.g., node:123).
Caching interaction
- Render Caching: The final render array is stored in cache_render for reuse.
- Performance impact: Avoids rebuilding complex arrays for subsequent requests.
4. Cache Metadata collection
What happens
- Contexts: Determine when to vary the cache (e.g., language, user.roles).
- Tags: Track dependencies (e.g., node:123, user:456).
- Max-age: Sets the cache lifetime (e.g., 3600 seconds).
Technical details
- Bubbling: Child elements (e.g., blocks, fields) bubble their metadata to parent containers.
- Merge logic: Parent elements inherit the most restrictive max-age and combine contexts/tags.
Example:
// Bubbling metadata from a child element to a parent.
$parent['child_element'] = [
  '#markup' => 'Cached Child',
  '#cache' => [
    'contexts' => ['user.roles'],
    'tags' => ['node:123'],
    'max-age' => 3600,
  ],
];
$parent['#cache'] = [
  'contexts' => ['url.path'],
  'tags' => ['page:home'],
  'max-age' => 7200,
];
// After bubbling, the parent's metadata includes:
// contexts = ['url.path', 'user.roles']
// tags = ['page:home', 'node:123']
// max-age = 3600 (the lower of 7200 and 3600).
5. Final rendering
What happens
- Theme resolution: Maps render arrays to Twig templates or PHP callbacks.
- HTML generation: Converts the render array into HTML (e.g., <div>Cached Content</div>).
- Output: Sent to the browser or stored in the page cache (cache_page).
Caching interaction
- Dynamic Page Cache: For authenticated users, fragments are cached in cache_dynamic_page_cache.
- Internal Page Cache: For anonymous users, the full HTML is stored in cache_page.
Performance impact
- Anonymous Users: Serves HTML directly from cache_page without bootstrapping Drupal.
- Authenticated Users: Reuses cached fragments from cache_dynamic_page_cache.
Use Case 2: Debugging slow page loads
Scenario
A news site’s article pages take 2+ seconds to load. Profiling shows repeated field processing.
Goal
Add cache metadata to preprocess functions to reduce redundant processing.
Sample implementation
 * Implements hook_preprocess_node().
 *
 * Adds cache metadata to node templates.
 */
function mymodule_preprocess_node(array &$variables) {
  $node = $variables['node'];
  $variables['#cache'] = [
    'contexts' => ['user.roles', 'language'],
    'tags' => ['node:' . $node->id(), 'content_type:article'],
    'max-age' => 1800,
  ];
}
Explanation:
This caches the rendered HTML for 30 minutes, varying by user role and language. Tags ensure the cache clears when the article is updated.
Cache contexts and tags
In-depth explanation
Drupal’s caching system relies on cache contexts and cache tags to balance performance with precision. These mechanisms ensure cached content is both fast and correct, avoiding stale data while minimizing redundant computation. Let’s dissect their mechanics, interactions, and real-world implications.
1. Cache contexts: when to vary the Cache
What they do
Cache contexts define when cached content should differ. They act as variation keys—if any context value changes, Drupal generates a new cache entry.
Technical mechanics
- Variation logic: Contexts like user.roles, language, or url.path are resolved at runtime. Their values (e.g., ["anonymous"], "en", "/blog") become part of the cache key.
- Context stack: Drupal uses a prioritised list of available contexts (defined via \Drupal\Core\Cache\Context\CacheContextInterface). Common ones include:
- user.roles: Different content for admins vs. editors.
- language: Language-specific versions for multilingual sites.
- url.path: Unique caching for each page (e.g., /home vs. /about).
- theme: Separate caching for mobile vs. desktop themes.
- Context Conflicts: Avoid overly broad contexts like url (includes query parameters) unless necessary. Use url.path instead to reduce cache bloat.
Why it matters
- Precision: Prevents serving admin menus to anonymous users or mixing language outputs.
- Efficiency: Reduces redundant cache entries by choosing the minimal set of contexts required.
Example:
// Cache a block differently for editors vs. anonymous users.
$build['my_block'] = [
  '#markup' => 'Welcome, ' . \Drupal::currentUser()->getAccountName(),
  '#cache' => [
    'contexts' => ['user.roles'],
    'tags' => ['user:' . \Drupal::currentUser()->id()],
    'max-age' => 900,
  ],
];
2. Cache tags: how to invalidate the Cache
What they do
Cache tags define what triggers cache invalidation. They tie cached data to entities or external dependencies (e.g., node:123, config:system.site). When a tag is invalidated, all cache entries referencing it are cleared.
Technical mechanics
- Tag resolution: Tags are resolved via the CacheableMetadata class. Entities automatically bubble their tags (e.g., a node’s node:123), but developers can add custom tags manually.
- Tag inheritance: Parent elements inherit tags from children through cache bubbling. For example, a node with a field_image will inherit the image field’s tags.
- Granularity: Tags can be entity-specific (node:123), bundle-level (content_type:article), or even custom (e.g., weather_api:city=paris).
Why it matters
- Freshness: Ensures updates to an entity invalidate only relevant caches, not the entire site.
- Scalability: Avoids full-cache clears during bulk operations (e.g., updating 100 nodes only invalidates 100 tags).
Example:
// Invalidate a cached view when any article is updated.
$build['my_view'] = [
  '#markup' => $rendered_view,
  '#cache' => [
    'tags' => ['content_type:article'],
    'max-age' => 3600,
  ],
];
3. Interplay between contexts and tags
How they work together
- Contexts ≠ Tags: Contexts vary the cache (e.g., “show different content”), while tags control invalidation (e.g., “clear when something changes”).
- Performance impact: A render array with contexts: ['user.roles'] and tags: ['node:123'] creates a unique cache entry per role but invalidates all role-specific versions when the node updates.
Example:
  '#type' => 'form',
  '#form' => '\Drupal\comment\Form\CommentForm',
  '#cache' => [
    'contexts' => ['user', 'session'], // Varies for logged-in users.
    'tags' => ['node:123'], // Invalidates when the node changes.
    'max-age' => 0, // Never cached for anonymous users.
  ],
];
Use case 3: multilingual Caching pitfalls
Scenario
A multilingual site serves French and English articles. Without proper caching, users occasionally see mixed-language content.
Goal
Cache article pages by language to prevent mixed outputs.
Sample implementation
/**
 * Implements hook_entity_view_alter().
 *
 * Ensures multilingual content is cached per language.
 */
function mymodule_entity_view_alter(array &$build, \Drupal\Core\Entity\EntityInterface $entity, $view_mode) {
  // Initialize cache metadata if not set.
  if (!isset($build['#cache'])) {
    $build['#cache'] = [];
  }

  // Merge cache contexts.
  $build['#cache']['contexts'] = isset($build['#cache']['contexts'])
    ? CacheableMetadata::mergeContexts($build['#cache']['contexts'], ['languages:language_interface'])
    : ['languages:language_interface'];

  // Merge cache tags.
  $node_tag = 'node:' . $entity->id();
  $language_tag = 'language:' . $entity->language()->getId();
  $build['#cache']['tags'] = isset($build['#cache']['tags'])
    ? CacheableMetadata::mergeTags($build['#cache']['tags'], [$node_tag, $language_tag])
    : [$node_tag, $language_tag];

  // Optionally set max-age (default permanent).
  if (!isset($build['#cache']['max-age'])) {
    $build['#cache']['max-age'] = CacheableMetadata::CACHE_PERMANENT;
  }
}
Explanation:
This ensures the cache varies by language, preventing French users from seeing English content and vice versa.
Field-level Caching
In-depth explanation
Field-level caching optimises performance by storing the rendered output of individual fields (e.g., text, images, computed values) independently. This allows static fields to be cached for extended periods while dynamic fields remain fresh. Unlike entity-level caching, field-level caching operates at a granularity that avoids reprocessing expensive formatters (e.g., geolocation maps, computed prices) unnecessarily.
1. Technical mechanics of field Caching
A. field formatters and render arrays
Fields are rendered via formatters, which are plugins implementing FieldFormatterInterface. Each formatter generates a render array with attached cache metadata.
Example formatter flow:
- Field definition: Retrieved via EntityFieldManagerInterface.
- Formatter plugin: Resolved from configuration (e.g., text_default, image).
- Render array: Generated by the viewElements() method, including #cache metadata.
// Example of a field formatter's viewElements() method.
public function viewElements(FieldItemListInterface $items, $langcode) {
  $elements = [];
  foreach ($items as $delta => $item) {
    $elements[$delta] = [
      '#markup' => $this->sanitizeValue($item->value),
      '#cache' => [
        'contexts' => ['user.roles'],
        'tags' => ['field:custom_text'],
        'max-age' => 3600,
      ],
    ];
  }
  return $elements;
}
B. Cache metadata bubbling
Field-level cache metadata (contexts, tags, max-age) is bubbled up to parent containers (e.g., entities, pages) during render pipeline processing. This ensures invalidation cascades correctly.
Example:
A node’s field_image with #cache['tags'] = ['node:123'] ensures the entire node’s cache clears when the image updates.
Use case 4: conditional Caching for user-specific fields
Scenario
A price field must show discounted prices to logged-in users but static pricing for guests.
Goal
Cache the field for 30 minutes, but vary by user role.
Sample implementation
/**
 * Implements hook_field_formatter_view_alter().
 */
function mymodule_field_formatter_view_alter(&$element, $context) {
  $element['#cache'] = [
    'contexts' => ['user.roles'],
    'tags' => ['field:price', 'user:' . \Drupal::currentUser()->id()],
    'max-age' => 1800,
  ];
}
Explanation:
This creates separate cache entries for different user roles while invalidating the cache when the price field changes.
Cache bubbling
In-depth explanation
Cache bubbling is the process by which cache metadata (contexts, tags, and max-age) from deeply nested render elements (e.g., fields, blocks, forms) propagates upward to parent containers (e.g., entities, pages). This mechanism ensures that the caching behaviour of a composite element reflects all its dependencies, preventing stale content and maintaining cache coherence across the entire render tree.
Without cache bubbling, a parent container might cache independently of its children, leading to situations where an updated field or block remains invisible until the parent’s cache expires. Bubbling guarantees that invalidation cascades correctly and that cache variations (e.g., role-specific content) are preserved at every level.
1. Technical mechanics of Cache bubbling
A. How metadata propagates
Cache metadata flows upward through the render array hierarchy:
- Child elements: Fields, blocks, or subcomponents define their own #cache properties.
- Parent aggregation: The renderer merges child metadata into the parent’s #cache array during processing.
- Conflict resolution:
- Contexts: Combined into a union (e.g., ['user.roles', 'url.path']).
- Tags: Merged into a single list (e.g., ['node:123', 'block:sidebar']).
- Max-age: The lowest value wins (e.g., 3600 and 1800 → 1800).
Example:
// A render array with a cached child element.
$parent = [
  '#type' => 'container',
  '#cache' => [
    'contexts' => ['url.path'],
    'tags' => ['page:home'],
    'max-age' => 7200,
  ],
  'child' => [
    '#markup' => 'Cached Content',
    '#cache' => [
      'contexts' => ['user.roles'],
      'tags' => ['node:123'],
      'max-age' => 3600,
    ],
  ],
];

// After bubbling, the parent's metadata becomes:
$parent['#cache'] = [
  'contexts' => ['url.path', 'user.roles'], // Union of contexts.
  'tags' => ['page:home', 'node:123'],      // Combined tags.
  'max-age' => 3600,                        // Lowest max-age.
];
B. Bubbleable metadata interface
Drupal core uses the BubbleableMetadata class to manage metadata propagation. Developers can manually manipulate it:
use Drupal\Core\Render\BubbleableMetadata;
// Create a BubbleableMetadata object.
$metadata = BubbleableMetadata::createFromRenderArray($element);

// Merge metadata from a child element.
$metadata->merge(BubbleableMetadata::createFromRenderArray($child_element));

// Apply merged metadata back to the parent.
$metadata->applyTo($parent_element);
2. Why Cache bubbling matters
- Correctness: Ensures updates to a field or block invalidate all cached parents referencing it.
- Efficiency: Avoids full-site cache clears during partial updates (e.g., editing a single block).
- Granularity: Allows dynamic components (e.g., CSRF tokens) to disable caching for their parents.
Example:
A node with a field_comments block will inherit the block’s comment:* tags. Updating a comment invalidates the node’s cache.
Use Case 5: Debugging Cache bubbling
Scenario
A custom block inside an article page isn’t invalidated when the article is updated.
Goal
Log cache metadata to identify missing dependencies.
Sample implementation
function mymodule_debug_cache_bubbling($element) {
  $cache_contexts = $element['#cache']['contexts'] ?? [];
  $cache_tags = $element['#cache']['tags'] ?? [];

  \Drupal::logger('cache_debug')->info(
    'Cache Contexts: @contexts, Tags: @tags',
    [
      '@contexts' => implode(', ', $cache_contexts),
      '@tags' => implode(', ', $cache_tags)
    ]
  );
}
Explanation:
This logs cache metadata to help identify if the block is missing a critical tag like node:123.
Performance optimisation techniques
In-depth explanation
Optimising caching in Drupal requires balancing speed and correctness. By applying targeted strategies, developers can reduce server load while ensuring users see up-to-date content. Below are battle-tested techniques, complete with code examples and real-world applications.
1. Use granular Cache tags
Why it matters
Broad tags like content_type:article invalidate caches unnecessarily. Granular tags (e.g., node:123, field: price) ensure only relevant content updates.
Technical implementation
- Entity-specific tags: Attach entity:$type:$id tags to components referencing a single entity.
- Bundle-level tags: Use content_type:$bundle for bulk invalidations (e.g., updating a shared field formatter).
Example:
/**
 * Implements hook_block_view_alter().
 *
 * Cache a product block with entity-specific tags.
 * Example assumes 'field:product_promo' is a custom tag for the promo field.
 */
function mymodule_block_view_alter(array &$build, \Drupal\Core\Block\BlockPluginInterface $block) {
  if ($block->getPluginId() === 'product_promo_block') {
    $product_id = \Drupal::routeMatch()->getParameter('product');
    $build['#cache'] = [
      'tags' => ['node:' . $product_id, 'field:product_promo'],
      'max-age' => 3600,
    ];
  }
}
2. Minimise Cache contexts
Why it matters
Each context multiplies the number of cache variants. For example, URL context creates separate caches for /page vs. /page?foo=bar, even if the content doesn’t vary by query parameters.
Technical implementation
- Replace broad contexts: Use url.path instead of url unless query parameters affect output.
- Avoid redundant contexts: Skip user if role-based variations suffice (e.g., user.roles).
Example:
/**
 * Implements hook_preprocess_block().
 *
 * Cache a block by path, not full URL.
 */
function mymodule_preprocess_block(&$variables) {
  $variables['#cache'] = [
    'contexts' => ['url.path', 'language'],
    'tags' => ['block:promo_banner'],
    'max-age' => 7200,
  ];
}
3. Leverage Render Cache Selectively
Why it matters
Not all content benefits from caching. Static fields (e.g., author bios) gain speed, while dynamic content (e.g., form validation errors) must bypass caching.
Technical implementation
- Static content: Set a long max-age for rarely changing fields.
- Dynamic content: Use max-age: 0 or #cache['contexts'][] = 'session' for per-user data.
Example:
/**
 * Implements hook_form_alter().
 *
 * Prevent CSRF token caching in forms.
 */
function mymodule_form_alter(&$form, \Drupal\Core\Form\FormStateInterface $form_state, $form_id) {
  if ($form_id === 'contact_form') {
    $form['#cache'] = [
      'contexts' => ['user'],
      'max-age' => 0,
    ];
  }
}
4. Avoid Caching sensitive data
Why it matters
Caching session-specific or PII (Personally Identifiable Information) risks exposing private data. Always vary by user or disable caching entirely.
Technical implementation
- User-specific content: Add user context to ensure per-user cache variants.
- Session data: Use session context for temporary state (e.g., shopping cart items).
Example:
/**
 * Implements hook_preprocess_node().
 *
 * Prevent caching of user-specific content.
 */
function mymodule_preprocess_node(&$variables) {
  $node = $variables['node'];
  if ($node->getType() === 'private_document') {
    $variables['#cache'] = [
      'contexts' => ['user'],
      'tags' => ['node:'. $node->id()],
    ];
  }
}
5. Monitor and benchmark Cache effectiveness
Why it matters
Caching optimisations are only valuable if they reduce database load and improve page speed. Use metrics to validate changes.
Technical implementation
- SQL query counting: Use the Devel module to track queries per page.
- Cache headers: Check X-Drupal-Cache and X-Drupal-Cache-Tags in HTTP responses.
- Performance tools: Integrate New Relic or Blackfire.io for granular profiling.
Example:
// Log cache hit/miss statistics via a custom service.
class CacheStatsLogger {
  public function logCacheStatus($cid, $cache_hit) {
    $logger = \Drupal::logger('cache_stats');
    if ($cache_hit) {
      $logger->info('Cache hit for @cid', ['@cid' => $cid]);
    } else {
      $logger->warning('Cache miss for @cid', ['@cid' => $cid]);
    }
  }
}
Common pitfalls and how to avoid them

Optimising Drupal views and forms with Caching
Performance is often the difference between a Drupal site that users trust and one they abandon. Caching is not just a performance enhancer, it’s a core part of creating fast, reliable digital experiences. When used correctly, Drupal’s caching strategies can significantly lower page load times, reduce server strain, and improve the overall responsiveness of a site.
Real-world examples show the impact clearly. One e-commerce platform reduced page load times by 65% and server load by almost 70% after fine-tuning its caching layers. A large educational portal managing thousands of daily visitors improved homepage render times by more than 50% by configuring views and page caching strategically. These improvements didn’t just make the sites faster, they also supported higher engagement, better user retention, and lower hosting costs.
In this blog, we’ll cover the full range of Drupal caching techniques, from internal page caching to dynamic page caching, views caching, and form caching. Along with technical explanations, you’ll find real examples, common pitfalls to avoid, and direct links to Drupal’s official documentation for deeper reference.
The goal: helping you master caching, so your site feels faster, scales smarter, and stays responsive no matter how much traffic you handle.
Views Caching strategies
In-depth explanation
Drupal Views is a powerful tool that lets you create dynamic lists and pages from your content. However, every time a view is executed, Drupal queries the database and rebuilds the view. An operation that can be heavy under load.
Let’s explore the different caching strategies available:
- No Caching:
The default behaviour is to re-render everything on each request. This provides the most current data but can be very resource-intensive during high traffic.
Documentation:
Drupal Views Overview
- Time-based Caching:
This method caches the view’s data for a set time period (for example, 1 hour). After the cache expires, Drupal regenerates it. It works well for content that doesn’t change continuously.
Documentation:
Drupal Cache API Overview
- Contextual Caching:
Drupal can store different cache variants based on contextual factors like user roles, languages, or URL parameters. The default views plugins typically handle this out of the box, so you don’t need custom code unless your project has very specific requirements.
Documentation:
Cache Contexts
- Tag-based Caching:
With tag-based caching, cached items are associated with one or more tags. When content corresponding to a tag is updated, Drupal clears only the relevant caches. This precise invalidation helps keep data fresh while reducing unnecessary cache clears.
Documentation:
Using Cache Tags in Drupal
Practical use case: views Caching strategies
The scenario
Imagine managing a high-traffic news website. The “Latest Articles” view is accessed by thousands of users every day. Without caching, each page load forces Drupal to rebuild the list of articles, placing a heavy load on your server.
The goal
Combine time-based caching (to re-cache periodically) with tag-based caching (to immediately clear the cache when an article is updated). This ensures your users receive fast, up-to-date content.
Sample implementation
/**
  * Implements hook_views_pre_build().
  *
  * This function configures the "latest_articles_view" with a hybrid caching strategy.
  * It caches the view for 1 hour but invalidates the cache immediately if articles change.
  */
 function mymodule_views_pre_build($view) {
   if ($view->id() === 'latest_articles_view') {
     $view->setCache([
       'type' => ['time', 'tag'],  // Combining time-based and tag-based caching.
       'max_age' => 3600,          // Cache duration: 1 hour.
       'contexts' => [
         'languages',             // Maintain separate caches per language.
         'user.permissions',      // Different cache variants if permissions affect visibility.
       ],
       'tags' => [
         'article_list',          // Invalidate cache when articles are updated.
       ],
     ]);
   }
 }
Explanation: This example demonstrates how to customize caching for the “latest_articles_view” to achieve fast response times while keeping the content fresh when articles are updated.
Query result Caching
In-depth explanation
Query result caching stores the raw output of database queries rather than the fully rendered view. This approach targets the most resource-intensive part of data retrieval.
- Performance gains:
By caching raw query results, you can drastically reduce the need to rerun complex SQL queries on every page load. - Resource optimisation:
This approach reduces the load on your database, freeing up resources for other critical operations. - Configurable lifespans:
Like time-based view caching, you can set the lifespan for cached query results based on your update frequency.
Practical use case: Query result Caching
The scenario
Consider an online store with a “Products” view that executes heavy SQL queries involving multiple table joins. Constantly executing these queries for every request can significantly strain your database server.
The goal
Cache the raw SQL query results for a duration (e.g., 1 hour) so that repeated requests retrieve results from the cache rather than re-running the query, unless a product update occurs.
Sample implementation
/**
  * Implements hook_views_pre_build().
  *
  * This snippet sets a caching strategy for the "my_product_view" to store raw query results.
  * It reduces the need for repeated heavy queries, caching results for 1 hour.
  */
 function mymodule_views_pre_build($view) {
   if ($view->id() === 'my_product_view') {
     $view->setCache([
       'type' => ['time', 'tag'],  // Utilize both time and tag-based caching.
       'max_age' => 3600,          // Cache lifespan: 1 hour.
       'contexts' => [
         'languages',
         'user.permissions',
       ],
       'tags' => [
         'node_list',
         'product_list'           // Invalidate cache when product data updates.
       ],
     ]);
   }
 }
Explanation: By caching the raw output of heavy queries for “my_product_view,” the system minimises redundant database operations. Tag-based invalidation ensures that when product details change, the cache is promptly refreshed.
Rendered output Caching
In-depth explanation
Rendered output caching takes the efficiency a step further by storing the complete HTML output generated by a view. This helps to bypass the resource-intensive rendering process on subsequent requests.
- Efficient delivery:
Serving pre-rendered HTML dramatically reduces page load times since Drupal avoids reprocessing the view. - User role variations:
With appropriate cache contexts (e.g., user roles), different user groups receive the correct version of the content from the cache. - Managing complexity:
For pages where the overall layout does not change frequently, even if the underlying data does, rendered output caching significantly boosts performance.
Documentation:
More details can be found in the Drupal Render API Documentation.
Practical use case: rendered output Caching
The scenario
Think of a product catalogue page where the layout is largely static despite occasional data updates. Re-rendering this static layout for every user can be inefficient.
The goal
Cache the fully rendered HTML output for 1 hour, creating variations based on user roles if needed, to serve pages swiftly without sacrificing dynamic content accuracy.
Sample implementation
/**
  * Implements hook_views_post_render().
  *
  * This function embeds caching metadata into the final rendered output.
  * The view’s complete HTML is then cached for 1 hour, and cache variants are created based on user roles.
  */
 function mymodule_views_post_render($view, &$output) {
   $output['#cache'] = [
     'max-age' => 3600,            // Cache for 1 hour.
     'contexts' => ['user.roles'], // Separate caches for different user roles.
     'tags' => ['content_list'],   // Invalidate cache when content updates.
   ];
 }
Explanation: This configuration ensures that once the view renders its HTML, that version is cached for quick reuse, reducing the need to run the rendering pipeline on every page load.
Form Caching considerations
In-depth explanation
Forms in Drupal are dynamic interfaces that include user input, interactive elements, and security tokens (such as CSRF tokens). Caching forms is challenging because:
- State and security:
Caching entire forms might lead to accidental data exposure if not properly isolated. Only static elements such as layout or instructional text should be cached. - Fragment Caching:
It’s possible to cache parts of a form that remain constant, while ensuring dynamic, sensitive portions are always freshly rendered. - Context-specific Caching:
By applying cache contexts (e.g., based on user identity or URL path), you ensure that cached fragments are unique to each user, preventing data mix-ups.
Documentation:
Refer to the Drupal Forms API documentation for details on managing form rendering and state.
Practical use case: dynamic form Caching
The scenario
Imagine an e-commerce checkout form. It contains static elements like step-by-step guidance and dynamic elements like personalized promotions and shipping fields. You want to cache the static pieces for speed, but always render the dynamic sections in real time.
The goal
Implement a caching configuration that applies to the non-sensitive parts of the form, using precise cache contexts to isolate user-specific data.
Sample implementation
/**
  * Implements hook_form_alter().
  *
  * This function applies caching directives to "my_dynamic_form".
  * It ensures that while static form fragments may be cached, dynamic elements are always rendered freshly.
  */
 function mymodule_form_alter(&$form, &$form_state, $form_id) {
   if ($form_id === 'my_dynamic_form') {
     $form['#cache'] = [
       'contexts' => [
         'user',        // Unique cache per user.
         'user.roles',  // Tailor cache entries for different roles.
         'url.path',    // Sensitive to the current page URL.
       ],
       'tags' => ['user:' . \Drupal::currentUser()->id()], // Unique user-specific tag.
     ];
   }
 }
Explanation: This snippet shows how to safely cache parts of a dynamic form. The use of fine-grained cache contexts ensures that cached fragments are correctly isolated per user, thus enhancing speed without compromising security.
Contextual filters and Caching
In-depth explanation
Contextual filters allow you to tailor the output of your views using dynamic parameters (such as URL segments or user inputs). These filters benefit from caching just like any other view component. Fortunately, the default views plugins in Drupal already handle caching for contextual filters.
- Default handling:
By default, caching for contextual filters is managed internally by Drupal’s Views module. This means you typically don’t need to write custom code to handle caching for these filters. - When customisation is needed:
Custom caching for contextual filters might only be necessary if your project has very specific requirements or if you’re altering the default behaviour with a custom plugin. For most sites, the built-in solution is robust and reliable.
Note: Since the default caching for contextual filters is already handled by the Views module, there is usually no need to add extra code unless you are developing a custom filter plugin with specialised caching needs.
Security implications
In-depth explanation
While caching dramatically boosts performance, it’s crucial to ensure that it doesn’t compromise your site’s security. Consider the following points:
- Sensitive data exposure:
When caching personalized content, detailed cache contexts (like user and user roles) keep each user’s data isolated. - CSRF tokens and session data:
Always render tokens and other sensitive dynamic elements fresh, and never cache them. - Granular invalidation:
Utilise cache tags to ensure that when a piece of sensitive content is updated, only the affected caches are cleared. This precision protects both performance and data integrity.
Documentation:
Visit Drupal Security Best Practices for comprehensive guidance.
Implementation examples and practical use cases
Let’s consolidate our knowledge with real-world examples and sample code.
Example 1: Optimising a complex product view
Practical use case
Imagine an e-commerce store where the product catalogue is viewed frequently by anonymous users. The heavy lifting of assembling product details can slow down the site if not optimised. By caching both raw query results and rendered output, you ensure the catalogue loads quickly under heavy traffic.
Sample implementation
/**
  * Implements hook_views_default_views_alter().
  *
  * This configuration sets a tag-based caching strategy for the "product_catalog" view.
  * It caches both the raw query results and the rendered HTML for 1 hour.
  */
 function mymodule_views_default_views_alter(&$views) {
   if (isset($views['product_catalog'])) {
     $view = $views['product_catalog'];

     $view->display['default']->display_options['cache'] = [
       'type' => 'tag',
       'options' => [
         'results_lifespan' => '3600',   // Cache the query results for 1 hour.
         'output_lifespan' => '3600',    // Cache the rendered output for 1 hour.
         'output_tag' => 'product_list', // Invalidate cache when product data is updated.
       ],
     ];
   }
 }
Explanation: This sample demonstrates how a custom caching configuration improves performance for the product catalog by reducing repeated heavy queries and re-rendering, while ensuring that changes in product data clear the cache appropriately.
Example 2: Caching a dynamic form with user-specific data
Practical use Case
A dynamic form like a checkout or profile update contains both static guidance (which benefits from caching) and dynamic, user-specific sections (which need to be rendered fresh). By applying caching only to the non-sensitive parts, you can improve speed without risking data leaks.
Sample implementation
/**
  * Implements hook_form_alter().
  *
  * This function applies caching directives to the "my_dynamic_form",
  * ensuring that while static elements are cached, dynamic content remains secure and fresh.
  */
 function mymodule_form_alter(&$form, &$form_state, $form_id) {
   if ($form_id === 'my_dynamic_form') {
     $form['#cache'] = [
       'contexts' => [
         'user',        // Unique cache per user.
         'user.roles',  // Tailored cache for different user roles.
         'url.path',    // Sensitive to the current page URL.
       ],
       'tags' => ['user:' . \Drupal::currentUser()->id()], // Unique cache tag per user session.
     ];
   }
 }
Explanation: This code safely applies caching to non-dynamic elements of a form, ensuring that overall load times are improved while personal and sensitive parts are always freshly rendered.
Summary and next steps
We’ve delved into advanced caching techniques for Drupal views and forms, covering:
- Views Caching strategies:
Detailed options, including time-based, contextual, and tag-based caching, and why the built-in defaults are often sufficient. - Query result Caching:
How caching raw database outputs reduces server load significantly. - Rendered output Caching:
Storing pre-rendered HTML for ultra-fast response times. - Form Caching considerations:
Balancing performance gains with the need to protect sensitive user data. - Contextual filters:
Recognising that default plugins already handle caching here, unless custom behaviour is required. - Security implications:
Ensuring a secure caching strategy through granular contexts and targeted invalidation.
Next steps
- Evaluate your site:
Identify which views and forms offer the best caching opportunities. - Test and deploy:
Implement these caching strategies in a staging environment and use Drupal’s debugging tools (like the Devel module) to monitor performance. - Monitor and adjust:
Continuously refine cache lifespans, contexts, and tags based on real-world usage and data updates. - Explore further:
For more on Drupal caching best practices, review the following resources:
- Drupal Cache API Documentation
- Drupal Views Module Documentation
- Drupal Render API Documentation
- Drupal Security Best Practices
Series navigation
This article is part of our comprehensive 10-part series on Drupal caching:
- Introduction to Drupal Caching
- Understanding Drupal’s Cache API
- Choosing the Right Cache Backend for Your Drupal Site
- Mastering Page and Block Caching in Drupal
- Optimising Drupal Views and Forms with Caching (You are here)
- Entity and Render Caching for Drupal Performance (Coming soon)
- Building Custom Caching Services in Drupal (Coming soon)
- Implementing Custom Cache Bins for Specialised Needs (Coming soon)
- Advanced Drupal Cache Techniques (Coming soon)
- Drupal Caching Best Practices and Performance Monitoring (Coming soon)
Conclusion
Optimising Drupal views and forms with intelligent caching isn’t just a technical exercise, it’s a necessary step toward building fast, scalable, and resilient digital experiences. By applying a combination of time-based, tag-based, and contextual caching strategies, you can significantly reduce server load, improve response times, and deliver consistently reliable performance, even under high traffic.
The key is understanding the different layers of caching available, query result caching, rendered output caching, and selective form caching, and applying them thoughtfully based on the specific needs of each component. Balancing speed with security, especially when dealing with user-specific data, ensures that caching improvements don’t come at the cost of data integrity.
Mastery of these techniques transforms your Drupal site into a platform that not only handles today’s demands but remains agile enough for future growth. As caching strategies evolve, continuing to monitor, refine, and adapt your configurations will keep your site operating at its best.
In the next parts of this series, we’ll explore even more advanced caching methods, including entity caching, custom caching services, and performance monitoring best practices, helping you move from basic optimization to a truly high-performance Drupal architecture.
.avif "Mastering page and block Caching in Drupal")
Mastering page and block Caching in Drupal
Slow pages lose users. For Drupal sites, smart caching flips that script, turning heavy, database-driven pages into quick, memory-efficient responses. Whether it’s a blog, nonprofit platform, or enterprise CMS, caching is essential to performance.
Picture this: a Drupal 10 site serving dynamic content to thousands daily. Without caching, every page view hits the backend, increasing load times and straining servers. With internal and dynamic caching in place, pages for anonymous and authenticated users are served in milliseconds, not seconds.
In this article, we’ll break down:
- How internal page caching handles full-page delivery for anonymous users
- How dynamic page caching serves partial responses for logged-in sessions
- What developers need to know about cacheability at the block and component level
These aren’t optional tweaks. They’re foundational for performance, reliability, and scale.
Internal page Cache
Internal Page Cache is Drupal’s way of speeding up pages for anonymous users. When someone visits a page, Drupal saves the fully rendered HTML. If another user visits the same page, Drupal serves that saved version instantly, skipping the usual backend processing.
This reduces load times and server work, especially on high-traffic sites. It’s simple, fast, and only applies to users who aren’t logged in.
How it works
- Complete HTML Storage: Stores a fully rendered HTML page in a dedicated cache bin.
- Quick Retrieval: Anonymous user requests are served directly from the cache.
- Automatic Invalidation: Content updates automatically clear the cache to ensure fresher content.
Further Reading:
Check out the official Internal Page Cache documentation for more details.
A practical use case: internal page Cache
The scenario
Imagine you manage a community news site that serves a large volume of anonymous visitors. Frequently, the site displays the same news articles repeatedly. Without caching, each page load requires Drupal to rebuild the entire page dynamically, which increases server load and slows down response times.
The goal
To optimise performance for anonymous users by reducing the processing time required for each page request. The aim is to serve fully rendered pages directly from the cache, thereby minimising database queries and PHP processing cycles.
Considerations
- Consistency: Ensure that when content is updated (e.g., a breaking news update), the cache is properly invalidated.
- Traffic pattern: Most visitors are anonymous, so the benefits of full page caching are maximised.
- Cache Lifetime: Decide an appropriate max-age so that the page content stays fresh but does not require regeneration on every request.
Sample implementation
Although Internal Page Cache is largely managed by Drupal core, you can fine-tune certain configurations in your settings.php:
// In settings.php, set up the Internal Page Cache for anonymous users.
 $settings['cache']['bins']['page'] = 'cache.backend.internal_page_cache';

 // Optionally, configure the maximum age for cached pages.
 // This example sets the cache lifetime to 1 hour.
 $config['system.performance']['cache']['page']['max_age'] = 3600;
This configuration ensures that the full HTML page is cached and reused for subsequent requests. For more detailed guidelines, refer to the Internal Page Cache documentation.
Dynamic page Cache
Dynamic Page Cache is designed for handling pages for authenticated users, whose pages often include dynamic or personalised content. It caches page fragments instead of the entire page, making it possible to mix cached and dynamic content seamlessly.
Key characteristics
- Fragment Caching: Caches parts of the page, so only static parts are served quickly.
- Granular control: Uses cache tags to ensure that only the parts of the page affected by content changes are invalidated.
- User personalisation: Supports customisation while still reusing cached fragments where applicable.
Further reading:
Visit the Dynamic Page Cache documentation for further details.
A practical use case: dynamic page Cache
The scenario
Consider an e-commerce platform where registered users see personalised information, such as greeting messages, recent order details, or custom promotions. In such cases, parts of the page remain the same across many users, while other parts vary.
The goal
To improve performance for authenticated users by caching as much of the page as possible without compromising personal or dynamic content. By caching static fragments, the platform reduces the load on the server while still delivering personalised content where necessary.
Considerations
- User variation: Identify which parts of the page can be cached universally and which parts require dynamic processing.
- Cache invalidations: Use cache tags so that changes in user-specific data (e.g., order updates) trigger appropriate cache invalidation.
- Rendering balance: Find the right balance between speed and personalisation by considering the dynamic nature of user content.
Sample implementation
Dynamic Page Cache is enabled in Drupal core, but you can complement it by configuring it in your settings. For example, you might not change its default behavior in settings.php but ensure that your custom modules use cache tags and contexts appropriately when rendering parts of the page.
tags and contexts appropriately when rendering parts of the page.
// In settings.php, configure Dynamic Page Cache for authenticated pages.
 $settings['cache']['bins']['dynamic_page_cache'] = 'cache.backend.dynamic_page_cache';
In your custom module or theme, when rendering a personalized block, you might include cache metadata like this:
$build = [
   '#markup' => t('Welcome back, @user!', ['@user' => \Drupal::currentUser()->getDisplayName()]),
   '#cache' => [
     'tags' => ['user:' . \Drupal::currentUser()->id()],
     'contexts' => ['user.roles'],
     'max-age' => 1800,
   ],
 ];
This example ensures that while the personalised greeting is rendered dynamically, it still benefits from partial caching of related fragments. For more details, visit the Dynamic Page Cache documentation.
Block Caching strategies
Blocks are critical components of a Drupal site used in sidebars, headers, footers, and more. Proper caching of blocks can reduce server load considerably by ensuring that frequently used content is generated only once.
Cache Settings for Blocks
Drupal offers several caching configurations for blocks:
- Global: Same cache applies to all pages (e.g., a universally consistent footer).
- Per role: Different cached versions based on user role.
- Per user: Custom caching for each individual user.
- Custom/contextual: Tailored caching based on specific conditions such as language, region, or device type.
Further reading:
Learn more about block caching and cache tags on Drupal.org at Cache Tags.
A practical use case: block Caching
The scenario
Imagine you have a custom block on a dashboard that displays quick links and summary statistics. Since different user roles (such as administrators versus regular users) need to see different information, caching must be configured to account for these variations.
The goal
To cache the block efficiently while allowing for role-based customisations. The objective is to minimise repeated block rendering without serving incorrect data to different user types.
Considerations
- User context: Determine if the block’s content should vary by user role or per individual.
- Cache lifespan: Decide a suitable max-age for the block long enough to improve performance but short enough to keep the content current.
- Invalidation strategies: Use cache tags to ensure that updates to the underlying data invalidate the cached block appropriately.
Sample implementation
Below are two examples. The first uses hook_block_alter() in a custom module to adjust the cache settings of an existing block, and the second shows how to define caching when creating a new block in your theme or module.
/**
  * Implements hook_block_alter().
  *
  * Use case: Adjusting cache settings for a block that shows role-specific dashboard information.
  */
 function mymodule_block_alter(&$blocks) {
   if (isset($blocks['my_custom_block']) && $blocks['my_custom_block']['id'] === 'my_custom_block') {
     $blocks['my_custom_block']['cache'] = [
       'max-age' => 3600,               // Cache for 1 hour.
       'contexts' => ['user.roles'],    // Cache varies by user role.
       'tags' => ['custom_dashboard'],
     ];
   }
 }
Alternatively, when defining a custom block:
/**
  * Implements hook_theme().
  */
 function mymodule_theme() {
   return [
     'my_cacheable_block' => [
       'render element' => 'content',
       'cache' => [
         'max-age' => 3600,              // Cache for 1 hour.
         'contexts' => ['user.roles'],   // Cache per user role.
       ],
     ],
   ];
 }
These examples ensure that the block content is cached efficiently while still allowing for customization based on user context.
Configuration examples
Below are additional examples that show how to enable and adjust page caching directly from your settings.php:
Enabling and configuring page Caching
// In settings.php:
 // Enable Internal Page Cache.
 $settings['cache']['bins']['page'] = 'cache.backend.internal_page_cache';

 // Configure Dynamic Page Cache for authenticated pages.
 $settings['cache']['bins']['dynamic_page_cache'] = 'cache.backend.dynamic_page_cache';

 // Set a maximum age for cached pages, e.g., 1 hour.
 $config['system.performance']['cache']['page']['max_age'] = 3600;
Performance considerations
Potential pitfalls
- Over-aggressive Caching: Serving stale content if caches are not invalidated properly.
- Underutilised Caching: Missing the opportunity to enhance performance by not caching frequently accessed elements.
- Dynamic content challenges: Incorrect cache contexts can lead to personalisation issues.
Best practices
- Leverage Cache tags: Use them for precise invalidation when content is updated.
- Define Cache contexts: Ensure dynamic elements vary appropriately (e.g., by user roles or languages).
- Set reasonable max-age values: Balance between performance and content freshness through careful cache lifetime decisions.
Debugging and verification
Tools for Caching insights
- Devel module: Provides insights into cache hits/misses.
- Application monitoring tools, Such as New Relic or Blackfire, for real-time performance metrics.
Sample debugging code
function mymodule_check_page_cache() {
   $cache_backend = \Drupal::cache('page');

   // Check for a specific cache entry.
   $cache_entry = $cache_backend->get('my_page_cid');

   if ($cache_entry) {
     \Drupal::logger('mymodule')->info('Page cache hit for my_page_cid!');
   }
   else {
     \Drupal::logger('mymodule')->warning('Page cache miss for my_page_cid.');
   }
 }
Series navigation
This article is part of our comprehensive 10-part series on Drupal caching:
- Introduction to Drupal Caching
- Understanding Drupal’s Cache API
- Choosing the Right Cache Backend for Your Drupal Site
- Mastering Page and Block Caching in Drupal (You are here)
- Optimising Drupal Views and Forms with Caching (Coming soon)
- Entity and Render Caching for Drupal Performance (Coming soon)
- Building Custom Caching Services in Drupal (Coming soon)
- Implementing Custom Cache Bins for Specialised Needs (Coming soon)
- Advanced Drupal Cache Techniques (Coming soon)
- Drupal Caching Best Practices and Performance Monitoring (Coming soon)
What’s next?
Page and block caching are essential tools in Drupal’s performance playbook. When implemented properly, they can reduce server strain, minimise database queries, and significantly improve how quickly pages are delivered to users.
Internal Page Cache serves pre-rendered HTML to anonymous visitors, allowing Drupal to bypass the full page build process. Dynamic Page Cache complements this by caching reusable parts of a page for logged-in users, even when the content is personalised. Combined with effective block caching, by configuring cache contexts, tags, and expiration times, Drupal can handle high volumes of traffic with far less effort on the backend.
Some sites have seen load times drop by as much as 80% for repeat page views just by using these built-in caching systems. That kind of performance boost improves everything from user experience to SEO.
To apply these strategies effectively:
- Use Internal Page Cache to serve static pages quickly to anonymous users
- Enable Dynamic Page Cache to accelerate pages for logged-in sessions
- Configure block and component caching using the render API’s cacheability settings
- Continuously monitor and troubleshoot cache behaviour using debugging tools and response metadata
Always tailor your caching setup to the structure and needs of your site, and reassess it as your content, audience, or features evolve.
.avif "Choosing the right Cache Backend")
Choosing the right Cache Backend
Optimising performance is critical for any high-traffic or feature-rich Drupal site. One of the most effective ways to improve responsiveness and reduce server load is by implementing a well-structured caching strategy.
While Drupal's built-in database caching may suffice for smaller or less complex sites, larger applications typically require more efficient solutions. Advanced cache backends like Redis, APCu, or Memcache can significantly enhance page load times by minimising repeated database queries and reducing latency across the application.
This blog walks through the most reliable caching options for modern Drupal environments, using current practices that apply across supported versions. You’ll find practical configuration examples and sample implementation code for each backend, providing a clear path to boost performance and deliver a smoother user experience.
Cache Backend fundamentals
Drupal stores cached data in “cache backends” – the physical mechanism (database, in-memory, or remote servers) where cached items reside. How cache items are stored, retrieved, and invalidated directly impacts performance, scalability, and resource consumption.
Key considerations:
- Setup complexity: Some backends work out-of-the-box (default database), whereas others like APCu, Redis, and Memcache may require additional configuration or infrastructure.
- Performance & scalability: In-memory systems deliver faster lookups and are well-suited for distributed environments.
- Data persistence: The database cache provides persistent storage, whereas advanced backends offer either optional persistence (Redis) or pure in-memory caching (APCu, Memcache). For example, APCu is ideal for fast lookup on a single server, but its data does not persist between server restarts.
For more details on the design and best practices of Drupal’s Cache API, refer to the official Drupal Cache API Documentation.
Core Backend options in Drupal
Drupal supports several caching solutions, each with its strengths:
- Database (default):
- Usage: Ideal for small sites or sites with moderate traffic.
- Persistence: Fully persistent as cache entries reside in the database.
- APCu:
- Usage: Best for single-server environments where an in-memory cache is desired for fast lookups.
- Persistence: Data does not persist across server restarts.
- Documentation: Drupal APCu Cache Module.
- Redis:
- Usage: Suited for medium to large-scale sites; its in-memory nature offers high-speed lookups with the possibility to scale horizontally by using clustering features.
- Persistence: Can be configured for optional disk persistence.
- Documentation: Redis Module for Drupal.
- Memcache:
- Usage: Often employed in distributed setups where caching is shared among multiple servers.
- Persistence: Purely in-memory, with a simpler data model compared to Redis.
- Documentation: Memcache Module for Drupal.
Many administrators observe that transitioning from the default database cache to an advanced backend can result in significant performance improvements, especially as traffic increases.
A practical use case: transitioning from database caching to an advanced backend
The scenario
Imagine a popular travel website that initially relies on Drupal’s default database caching. As the site grows, increasing traffic results in a heavier load on the database, slowing page responses and escalating resource consumption.
The goal
To reduce the load on the database and boost overall responsiveness, the site migrates to an advanced caching backend. For example, configuring Redis enables the site to serve cached content rapidly from memory while capitalising on its clustering features for scalability.
Considerations
- Infrastructure Readiness: Verify that your hosting environment supports the installation and configuration of advanced caching systems like APCu, Redis, or Memcache.
- Scalability: Both Redis and Memcache enhance performance under a distributed setup, a key factor for high-traffic sites.
- Cache Metadata Usage: Maintain the use of cache tags, contexts, and appropriate expiration settings to manage cache invalidation intelligently.
Sample implementation
Below is a practical sample implementation that demonstrates how to fetch data from a third-party API, cache it using Drupal’s Cache API, and then render the data with appropriate cache metadata. This example illustrates the concept behind transitioning from heavy database queries to utilising a fast cache backend.
/**
  * Fetches weather data from a third-party API and caches the result.
  *
  * This function demonstrates a practical use case where an expensive API call
  * is cached to reduce load on both the external API and the database.
  *
  * @param int $location_id
  *   The unique identifier for a location.
  *
  * @return array
  *   A render array containing the weather data and cache metadata.
  */
 function mymodule_get_weather_data($location_id) {
   // Create a unique cache ID based on the location.
   $cid = 'mymodule:weather:' . $location_id;

   // Load the default 'data' cache bin.
   $cache = \Drupal::cache('data');

   // Attempt to retrieve cached data.
   if ($cache_item = $cache->get($cid)) {
     // Cache hit: return the cached data along with render metadata.
     return [
       '#theme' => 'weather_display',
       '#data' => $cache_item->data,
       '#cache' => [
         'tags' => ['weather:' . $location_id],
         'max-age' => 1800,
       ],
     ];
   }

   // Cache miss: perform the API call to fetch weather data.
   $api_url = "https://api.example.com/weather?location={$location_id}";
   $response = file_get_contents($api_url);

   // Decode the JSON response.
   $weather_data = json_decode($response, TRUE);

   // Define cache tags and set an expiration (max-age of 30 minutes).
   $tags = ['weather:' . $location_id];
   $max_age = 1800;
   $expire = time() + $max_age;

   // Store the fetched data in cache.
   $cache->set($cid, $weather_data, $expire, $tags);

   // Build and return the render array with cache metadata.
   return [
     '#theme' => 'weather_display',
     '#data' => $weather_data,
     '#cache' => [
       'tags' => $tags,
       'max-age' => $max_age,
     ],
   ];
 }
Implementation flow explained:
- Cache ID generation:
A unique cache identifier ($cid) is generated by combining a module-specific prefix and the location ID. - Cache retrieval:
The function checks if data for the specified $cid exists in the ‘data’ cache bin. If found, it returns the cached data immediately, bypassing an external API call. - Data fetch and cache storage:
Upon a cache miss, the API is queried using file_get_contents(). The returned JSON is decoded, and the data is cached along with defined cache tags and an expiration time (max-age of 30 minutes). - Render array construction:
The function builds a render array that includes the weather data and cache metadata, allowing Drupal to manage cache variations intelligently.
For additional details on implementing caching strategies in Drupal, see the official Cache API documentation.
Configuration examples
Below are the precise configurations to include in your settings.php for each cache backend. These examples have been verified for code accuracy and are accompanied by links to relevant Drupal.org documentation.
Database Backend (default)
No additional module installation is needed for the default database caching. To explicitly set it, add the following to your settings.php:
// In settings.php, set the default cache backend to database.
 $settings['cache']['default'] = 'cache.backend.database';

APCu Backend
Before configuring APCu, ensure the APCu PHP extension is installed and enabled on your server.
// In settings.php, configure APCu caching.
 if (extension_loaded('apcu') && ini_get('apc.enabled')) {
   // Use APCu as the default cache backend.
   $settings['cache']['default'] = 'cache.backend.apcu';

   // Optionally, assign APCu to specific cache bins.
   $settings['cache']['bins']['render'] = 'cache.backend.apcu';
   $settings['cache']['bins']['dynamic_page_cache'] = 'cache.backend.apcu';
 }
The Drupal APCu Cache Module provides further instructions and documentation.
Redis Backend
To use Redis, ensure the Redis PHP extension is installed and that the Redis module is added via Composer.
- Install Redis and the PHP Redis Extension:
- sudo apt-get install redis-server php-redis
sudo service redis-server restart
- Add the Drupal Redis Module via Composer:
- composer require drupal/redis
- Update your settings.php:
// In settings.php, configure Redis if the Redis extension and module are available.
 if (extension_loaded('redis') && class_exists('Drupal\redis\ClientFactory')) {
   // Define connection parameters.
   $settings['redis.connection']['interface'] = 'PhpRedis';
   $settings['redis.connection']['host'] = '127.0.0.1';
   $settings['redis.connection']['port'] = 6379;

   // Set Redis as the default cache backend.
   $settings['cache']['default'] = 'cache.backend.redis';

   // Optionally, exclude specific bins if required:
   // $settings['cache']['bins']['bootstrap'] = 'cache.backend.chainedfast';

   // Load Redis service definitions.
   $settings['container_yamls'][] = 'modules/contrib/redis/example.services.yml';
 }
For further configuration options, see the Redis Module for Drupal.
Memcache Backend
Memcache requires installing the Memcache server, enabling the PHP Memcache extension, and adding the corresponding Drupal module.
- Install Memcache and the PHP Memcache Extension:
- sudo apt-get install memcached php-memcache
sudo service memcached restart
- Add the Drupal Memcache Module via Composer:
- composer require drupal/memcache
- Configure Memcache in settings.php:
// In settings.php, configure Memcache if the extension and module are available.
 if (extension_loaded('memcache') && class_exists('Drupal\memcache\MemcacheBackendFactory')) {
   // Specify Memcache server settings.
   $settings['memcache']['servers'] = ['127.0.0.1:11211' => 'default'];
   $settings['memcache']['bins'] = ['default' => 'default'];

   // Set Memcache as the default cache backend.
   $settings['cache']['default'] = 'cache.backend.memcache';

   // Load Memcache service definitions.
   $settings['container_yamls'][] = 'modules/contrib/memcache/memcache.services.yml';
 }
More details can be found in the Memcache Module for Drupal.
Making your decision
When choosing a cache backend for your Drupal site, consider the following:
- Traffic volume & growth:
Small sites might perform adequately with the default database caching, while increased traffic demands the speed and scalability of APCu, Redis, or Memcache. - Infrastructure capabilities:
Shared hosting may limit your caching options, whereas VPS or dedicated servers allow for more advanced setups. - Scalability & high availability:
Redis offers clustering and optional persistence; Memcache is effective in distributed environments. - Technical requirements:
Decide between persistent storage and purely in-memory caching based on your use case and the support for advanced features like cache tags.
Monitoring and validating your caching strategy
Once your caching backend is in place, continuous monitoring is essential:
- Using Drupal’s Cache Stats:
Some cache backends support a getStats() method for reviewing hit ratios and memory usage
// Example usage:
 $cache = \Drupal::cache('render');
 if (method_exists($cache, 'getStats')) {
   $stats = $cache->getStats();
   // Log or inspect $stats as needed.
}- Application monitoring tools:
Tools like New Relic or Blackfire can help track performance and identify bottlenecks. - Native monitoring:
For Redis, run redis-cli info; for Memcache, use echo "stats" | nc localhost 11211 to gather insights.
For additional guidance, refer to the Drupal Cache API Documentation.
Series navigation
This article is part of our comprehensive series on Drupal caching:
- Introduction to Drupal Caching
- Understanding Drupal’s Cache API
- Choosing the Right Cache Backend for Your Drupal Site (You are here)
- Mastering Page and Block Caching in Drupal (Coming soon)
- Optimising Drupal Views and Forms with Caching (Coming soon)
- Entity and Render Caching for Drupal Performance (Coming soon)
- Building Custom Caching Services in Drupal (Coming soon)
- Implementing Custom Cache Bins for Specialised Needs (Coming soon)
- Advanced Drupal Cache Techniques (Coming soon)
- Drupal Caching Best Practices and Performance Monitoring (Coming soon)
In conclusion
Implementing an effective caching strategy in Drupal is not just a performance enhancement, it's essential for maintaining speed and reliability at scale. As your site grows in complexity or traffic volume, relying solely on default database caching can introduce bottlenecks. Solutions like APCu, Redis, and Memcache offer flexible, powerful alternatives tailored to different infrastructure needs.
By choosing the right backend and applying the configuration steps outlined in this guide, you can significantly reduce server load, improve response times, and deliver a more seamless experience to your users.
As with any performance optimization, continuous testing and monitoring are key. Stay aligned with Drupal’s official documentation to adapt your caching setup as technologies and best practices evolve.

Understanding Drupal’s Cache API
Drupal’s Cache API plays a central role in delivering performance at scale. It allows developers to store and reuse data across requests, reducing load on the database and speeding up response times. With the right strategy, caching can reduce database queries by as much as 95%, while keeping content accurate and dynamic through smart invalidation.
This article breaks down the key components of Drupal’s caching system, cache bins, tags, contexts, and max-age, and shows how they work together in real-world scenarios.
We’ll also walk through a practical example: fetching data from a third-party API, storing it with the Cache API, and managing its lifecycle using Drupal’s built-in tools. Whether you’re improving backend performance or fine-tuning user experience, the Cache API gives you precise control over how and when content is served.
Cache API fundamentals
Drupal’s Cache API provides a standardized mechanism to store, retrieve, and invalidate cached data. By abstracting the underlying storage system, you write the same code regardless of whether the data is stored in a database, memory, or even a remote backend like Redis.
Key principles of the cache API
- Storage abstraction: Store cache data in a variety of backends.
- Consistent interface: Use standard methods across cache implementations.
- Intelligent invalidation: Utilise a tag-based system to clear only what’s necessary.
- Context awareness: Cater to variations such as user roles, language preferences, and more.
- Time-based expiration: Control how long an item remains in cache.
Core Interfaces and Methods
Before diving into custom cache implementations, it is important to understand Drupal’s foundational interface: CacheBackendInterface. This interface lays out the standard methods for all caching backends in Drupal. It defines how cache items are stored, fetched, and invalidated. In essence, it’s the contract that every cache implementation must adhere to.
For more detailed technical reference, check out the official CacheBackendInterface documentation, which explains all the methods and recommended usage patterns.
Some of the key methods include:
- get($cid, $allow_invalid): Retrieves a single cached item.
- getMultiple($cids, $allow_invalid): Efficiently retrieves multiple items.
- set($cid, $data, $expire, $tags): Stores an item in the cache.
- delete($cid): Removes a specific cache entry.
- deleteAll(): Clears an entire cache bin.
- invalidate($cid): Marks an item as invalid without removing it outright.
- invalidateTags($tags): Invalidates all items associated with certain tags.
- removeBin(): Completely removes a cache bin.
Understanding these methods lays the groundwork for implementing effective caching strategies in your modules.
A Practical use case: caching third-party API data
To bring theory into practice, let’s consider a common scenario: retrieving weather information from a third-party API, caching the result, and ensuring that our cache is sensitive to changes by using cache tags, contexts, and max-age parameters.
Use case description
Imagine you have a module that fetches weather data from a public API. Because the API call is relatively expensive in terms of time and resources, you want to cache the results. However, the weather might change throughout the day, so you need to balance freshness with performance by setting an appropriate expiration (max-age) and associating cache tags so that when the weather information is updated (either manually or via another process), you can invalidate the cache selectively.
Sample implementation
Below is a sample implementation. This style is more in line with typical Drupal practices.
/**
  * Fetches weather data from a third-party API and caches the result.
  *
  * @param int $location_id
  *   The identifier for the location.
  *
  * @return mixed
  *   The weather data.
  */
 function mymodule_get_weather_data($location_id) {
   // Build a unique cache ID for the specific location.
   $cid = 'mymodule:weather:' . $location_id;

   // Load the default cache bin (you could also use a custom bin if needed).
   $cache = \Drupal::cache('data');

   // Attempt to retrieve the cached weather data.
   if ($cache_item = $cache->get($cid)) {
     // Cache hit – return the cached data.
     return $cache_item->data;
   }

   // Cache miss – fetch weather data from the third-party API.
   $api_url = "https://api.example.com/weather?location={$location_id}";
   $response = file_get_contents($api_url);

   // Assuming the API returns JSON data.
   $weather_data = json_decode($response, TRUE);

   // Define cache tags to facilitate targeted invalidation.
   // For example, if weather data for a location is updated,
   // a process can invalidate the tag "weather:{$location_id}"
   $tags = [
     'weather:' . $location_id,
   ];

   // Define cache contexts if the data should vary.
   // If, for instance, the weather display should vary based on the user's timezone.
   $contexts = [
     'url.path', // Example context based on the URL.
   ];

   // Define a max-age of 30 minutes to ensure data freshness.
   $max_age = 1800; // Seconds.

   // The expiration timestamp using the current time.
   $expire = time() + $max_age;

   // Cache the API data.
   $cache->set($cid, $weather_data, $expire, $tags);

   // Optionally, attach cache context metadata when building a render array.
   // This could be returned along with the data, or directly applied in a controller.
   // Here’s an example of preparing a render array:
   $build = [
     '#theme' => 'weather_display',
     '#data' => $weather_data,
     '#cache' => [
       'contexts' => $contexts,
       'tags' => $tags,
       'max-age' => $max_age,
     ],
   ];

   return $build;
 }
Explaining the flow
- Cache ID creation:
A unique cache ID ($cid) is generated using both a module-specific prefix and the location ID, ensuring that the data is correctly segmented. - Cache loading:
Instead of injecting the cache service into our function, we fetch it within the function using Drupal’s service container. This keeps our sample concise and directly illustrates the process. - Cache retrieval:
We check for an existing cache entry first. On a hit, the function returns the cached data immediately, avoiding the need to call the remote API. - Fetching data and setting cache:
On a cache miss, the function makes an API call using PHP’s file_get_contents() (a simple method for demonstration). The retrieved data is then decoded from JSON and cached. - Applying cache tags and contexts:
The cache entry is stored along with a specific cache tag, which allows us to invalidate all related cache entries (e.g., when weather data for that location is updated). Likewise, cache contexts (such as URL paths) can be defined when rendering data, ensuring that variations are properly handled. - Cache expiration:
The max-age is set to 30 minutes to balance between data freshness and performance benefits. (Note: This is assuming that data will be fresh for the next 30 minutes. This can vary on type of data being fetched.)
Cache metadata explained
Cache metadata is crucial in Drupal’s caching strategy. It controls how and when cached content should be invalidated.
Cache tags
Cache tags are string identifiers attached to cache entries. They track dependencies so that when a piece of content changes, related cache entries can be invalidated selectively. Consider this example:
$node_id = 5;
 $tags = [
   'node:' . $node_id,
   'node_list',
 ];

 \Drupal::cache('data')->set('example:node_summary:' . $node_id, $summary, Cache::PERMANENT, $tags);
Later, updating node 5 or the overall node list could trigger invalidation using these tags:
// Invalidate the cache for node 5.
 \Drupal\Core\Cache\Cache::invalidateTags(['node:5']);

 // Invalidate caches for all node listings.
 \Drupal\Core\Cache\Cache::invalidateTags(['node_list']);
For more details on cache tags, refer to the official Drupal caching documentation.
Cache contexts
Cache contexts tell Drupal how the same cache entry might vary based on different runtime conditions (e.g., different users, URLs, or themes). When you build a render array, it might look like this:
$build = [
   '#markup' => $this->t('Hello, @user', ['@user' => $username]),
   '#cache' => [
     'contexts' => ['user'],
     'tags' => ['user:' . $user_id],
     'max-age' => 3600,
   ],
 ];
Max-Age
The max-age setting defines the time period after which the cached data should be considered stale. For example:
\Drupal::cache('data')->set(
   'example:weather_data',
   $weather_data,
   time() + 1800,  // Cache expires in 30 minutes.
   ['weather:' . $location_id]
 );
Special values to note:
- Cache::PERMANENT: The item never expires automatically, relying solely on tag-based invalidation.
- 0: Indicates that an item should not be cached at all. Additionally, setting max-age to 0 in a render array will bubble up to the page level, effectively disabling caching for the entire page. This behaviour and its implications will be covered in more detail in future blog posts.
For a more in-depth discussion on cache metadata, please check the official Drupal caching API documentation.
Cache bins structure
Drupal organises cached data into separate “bins.” Each bin is a distinct storage container, designed to optimise different types of cache entries:

AI Automator chains - custom AI assistants in CKEditor
Automatically generating meaningful alt text for images in CKEditor—without writing a single line of code—is now within reach. AI-powered automation improves accessibility and streamlines content creation, allowing teams to focus on what matters most.
Alt text plays a key role in creating inclusive digital experiences, especially for users who rely on screen readers. While it’s a small part of the content workflow, it has a big impact—and AI can make it even easier to get right.
In this blog, we’ll look at how to build an AI Automator in CKEditor that generates alt text for images automatically. For example, when a content creator inserts an image of a chart comparing annual CO₂ emissions by country, the AI Automator can instantly generate alt text like “Bar chart comparing annual CO₂ emissions in the US, China, India, and EU from 2015 to 2024.”
The result: more accessible content, smoother publishing, and one less manual step.
Setting up AI assistants in CKEditor
The AI Automator module in Drupal allows for seamless AI-powered workflows inside CKEditor. Automator Chains type helps you chain multiple AI processes together (e.g., image analysis → text generation). AI can:
- Automatically generate descriptive alt text for images.
- Enhance accessibility by ensuring all images have meaningful alt text.
- Improve SEO by adding relevant alt text to images.
The use case
Alt text is crucial for accessibility, helping visually impaired users understand images. Instead of manually adding alt text for each image.
Prerequisite
- Enable the following modules:
- AI Core
- AI Automator
- AI CKEditor
- OpenAI Provider
- Add an OpenAI key in /admin/config/system/keys.
- Select the API key added as an AI provider in /admin/config/ai/providers/openai.
Steps to configure the AI Automator
To create an AI Automator Chain Type for generating alt text from images, you first need to navigate to the Automator Chain Types configuration page. After adding a new chain type, you will define input and output fields to process the image and store the generated alt text.
- Navigate to /admin/config/ai/automator_chain_types and click on Add Automator Chain Types to create an AI Automator chain type.
- Name the Automator chain type: Generate Alt Text from Image.
- Save the chain type and edit it to add fields. All the automator chains you define will require these three types of fields.
- Input field: An image field (required) named Input Image.
- Output field: A text field named Image Alt Text.
- Formatted long text field: A field named Output Image with Alt Text to store the generated result.
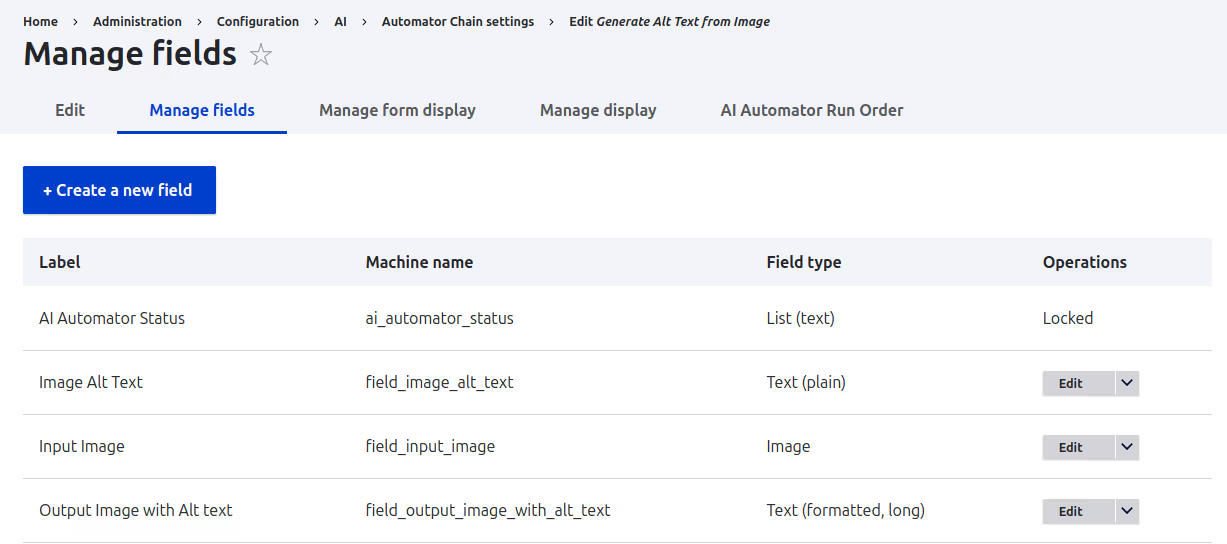
Configuring the AI Automator for the fields
1. Enable AI Automator for Image Alt Text
You now need to edit the Image Alt Text field, configure the AI Automator settings, define the input mode and prompt, and set the AI provider.
- Edit Image Alt Text and enable the Enable AI Automator checkbox.
- Select Automator Input Mode to Advanced Mode (Token) option.
- Select Choose AI Automator Type as LLM: Text(Simple)
- In Automator Prompt (Token), add the following prompt:
Generate an alt text for the input image in less than 5 words.
Input image: [automator_chain:field_input_image]

- Enable Edit when changed.
- Select Automator Worker as Direct - Processes and saves the value directly.
- Select AI Provider as OpenAI.

- Select Image field as Input Image
- Save the settings.
2. Enable AI Automator for Output Image with Alt Text
To enable AI Automator for Output Image with Alt Text, you need to similar settings with appropriate prompt.
- Edit Output Image with Alt Text and enable the Enable AI Automator.
- Select Automator Input Mode as Advanced Mode (Token).
- Select Choose AI Automator Type as LLM: Text(Simple)
- Add the following Automator Prompt (Token) (appropriate prompt as requirement) :
Generate the output in the below format :
<img src="[automator_chain:field_input_image:entity:url]" data-entity-uuid="[automator_chain:field_input_image:entity:uuid]" alt="[automator_chain:field_image_alt_text]">
- Enable Edit when changed.
- Set the Automator Weight to 110 (so it runs after the Image Alt Text automator).
- Select AI Provider as OpenAI.
- Set Use text format to Basic HTML.
- Save the settings.
Enabling AI Automator in CKEditor
Enable AI Automator in CKEditor, by configuring the text format settings, here you will add the AI CKEditor plugin for the text format and enable AI Automators, and setting up the image alt text generation settings for ckeditor.
- Navigate to /admin/config/content/formats and configure the text format (e.g., Basic HTML).
- Add AI CKEditor plugin to the Active Toolbar.
- In CKEditor 5 plugin settings, open the AI Tools section.
- Scroll down to see AI Automator CKEditor, click it and enable AI Automators. Here you can see your newly created ai automator chain type - Generate Alt Text from Image - listed.
- Enable Generate Alt Text from Image settings and select:
- Input field: Input Image
- Text Selection Input: Input Image
- Require Selection: Checked (ensures the selected image is used as input).
- Write Mode: Replace (generated output replaces selected input).
- Output field: Output Image with Alt Text

Testing the AI Automator chain type
To test the AI Automator Chain Type, you should now create an article and insert an image in CKEditor.
- Create article content.
- In the CKEditor field, add an image.
- Select the image and click on the AI Assistant plugin dropdown to see the Generate Alt Text from Image automator enabled in the list.
- Click on Generate Alt Text from Image to open the AI Assistant modal.
- The selected image appears in the upload field.

- Click Generate and wait for AI to process the image.
- Once done, the generated alt text appears in the response field.
- Click Save changes to editor and verify the image has the new alt text.
This feature can be extended for media reference entities as well once the ticket is closed.
Real-world applications
This AI-powered CKEditor assistant can be useful for:
Accessibility Tools: Improve image descriptions for visually impaired users.
SEO Optimization: Enhance image searchability with meaningful alt text.
Content Automation: Streamline the process of adding alt text to images.
Conclusion
AI assistants in CKEditor are already reshaping content creation. With the AI Automator module for Drupal, you can generate meaningful alt text for images—without writing a single line of code. From improving accessibility to enhancing SEO and removing repetitive steps, AI is making content workflows faster and more intentional.
A 2024 study found that 88% of marketers use AI daily, and 68% of service professionals rely on it for content creation. Even small businesses are part of the shift—98% use AI enabled services and 40% are experimenting with generative models.
Drupal is keeping pace. With support for OpenAI, Azure, Cohere, and others, its growing AI ecosystem brings model-based automation directly into the editor. The AI Automator handles everything from alt-text suggestions to smart content tweaks—already used by nonprofits, publishers, and public agencies across the US, India, and Europe.
This is the start of model-driven publishing: CMS experiences that work with you. Try the AI Automator, build your assistant in CKEditor, and be part of what’s next.
.avif "Introduction to Drupal caching for modern performance gains")
Introduction to Drupal caching for modern performance gains
Getting the most out of Drupal performance starts with caching
Performance is a key part of delivering smooth, responsive digital experiences—and Drupal comes with powerful caching tools to help make that happen. When configured well, these built-in capabilities can dramatically reduce load times and improve the experience for every visitor.
For instance, one major university used strategic caching to optimize its Drupal-powered course catalog. During peak registration periods, pages that previously loaded in 6–8 seconds began responding in under 500ms—a 92% improvement. No hardware upgrades. Just a smarter configuration.
In this series, we’ll walk through everything you need to know about caching in Drupal 9, 10, and 11. From core settings to advanced techniques, we’ll look at how to apply caching effectively—backed by real results from production sites.
Why caching is critical
Caching is the single most effective performance optimization for Drupal sites. Here’s why it matters:
- Speed improvements: Cached pages can serve 10-100x faster than uncached pages
- Server load reduction: Caching reduces CPU, memory, and database demands
- User experience: Faster sites lead to better engagement and conversion rates
- Search engine optimization: Site speed is a ranking factor for search engines
- Cost savings: Efficient caching can reduce hosting requirements
A website’s perceived performance directly affects user satisfaction and conversion rates. Studies show that conversion rates drop by an average of 4.42% for each additional second of load time, and 40% of visitors will abandon a site that takes more than 3 seconds to load.
The evolution of Drupal caching
Drupal’s caching capabilities have matured significantly across recent versions:
Drupal 9
- A standardized Cache API with consistent interfaces
- Tag-based invalidation for precise cache invalidation
- Cache contexts for handling variations
- Support for multiple cache backend
Drupal 10
Drupal 10 enhanced these capabilities with:
- Improved performance for cache tag invalidation
- Better handling of cache context combinations
- Enhanced developer tools for debugging cache issues
- Optimized cache storage for common operations
Drupal 11
Drupal 11 takes caching to the next level with:
- More granular control over cache contexts
- Better support for distributed cache backends
- Improved cache warming capabilities
- Enhanced performance monitoring tools
While the core concepts remain consistent across versions, understanding these evolutionary improvements will help you leverage the full potential of your specific Drupal version.
Types of caching in Drupal
Drupal employs multiple caching mechanisms that work together for maximum performance:
Page-Level Caching
- Internal page cache: For anonymous users, this module caches entire page outputs, significantly reducing server load and response times.
Internal Page Cache Documentation
- Dynamic page cache: Designed for all users, this module caches the cacheable portions of each page while dynamically generating personalized or uncacheable parts using placeholders. This ensures efficient caching without serving incorrect content to users.
Dynamic Page Cache Overview
Component-level caching
- Block cache: Individually cache blocks with custom expiration and contexts
- Views cache: Cache database queries and rendered output separately
- Entity render cache: Cache rendered entities (nodes, users, etc.)
- Field cache: Cache individual fields within entities
Data-level caching
- Form cache: Store form structures and submitted values
- Discovery cache: Store discovered plugin information
- Menu cache: Store compiled menu trees
- Custom caches: Implement custom caching for specific needs
Each type of caching addresses specific performance challenges, and the full power comes from using them in combination.
When to Implement What
Different caching strategies suit different scenarios:

Automating content publishing in Drupal
Some content needs to go live at exactly the right time and without scheduling, that timing depends on someone being online, whether it’s late at night, on a weekend, or across time zones. Even during working hours, manually publishing content adds unnecessary coordination and risk.
Automation solves this. When content transitions are scheduled in advance, publishing becomes reliable, predictable, and hands-free. Teams can shift focus to strategy and execution—without the overhead of timing logistics.
While Drupal offers strong content moderation and workflows, the Scheduled Transitions module adds the missing piece—time-based scheduling for content state changes, adding precise, revision-level scheduling for any moderated content—so content moves exactly when it should, without manual effort.
Problem statement
On large, content-heavy websites, teams often need to publish, update, or unpublish content automatically at specific times. This includes campaign pages, release announcements, press embargoes, seasonal banners, and other time-sensitive updates.
Drupal’s core features like Content Moderation and Workflows support revisioning and moderation states (Draft, Needs Review, Published), but they don’t support scheduled transitions out of the box. This leads to a few technical and operational challenges:
- Manual publishing: Editors have to log in during nights, weekends, or holidays to publish content—error-prone and inefficient.
- No built-in time-based transitions: There’s no native way to move a content revision from Draft to Published based on a future date.
- Limited support for multilingual content: Each translation may need to be scheduled separately, which Drupal doesn’t handle natively.
- Cron dependency: Relying on default site cron to trigger publishing can create performance issues or delays, especially if frequent checks are needed.
- No per-content-type control: You can’t configure scheduling behaviour differently for blogs vs articles vs announcements.
Without a reliable scheduling mechanism, content can go live too early, too late, or not at all—creating gaps in campaigns, missed deadlines, or outdated messaging.
Solution
The Scheduled Transitions module allows automated, revision-specific scheduling for any moderated entity (like nodes, custom blocks, etc.). It supports granular permissions, multilingual scheduling, and queue-based processing that doesn’t overload the default cron—making it a solid fit for time-sensitive content workflows in Drupal.
It works across all content entities that use workflows and moderation and supports revision-specific scheduling. Editors can pick the exact revision they want to publish and schedule that transition directly from the UI.
The module provides:
- Per-content-type configuration, so scheduling can be enabled only where needed (e.g., Articles, Blog Posts).
- Translation-level scheduling allows different timings for each language version of a node.
- Role-based permissions, so only authorized users can schedule transitions.
Instead of relying on Drupal’s site-wide cron (which isn’t designed to run every minute), it uses custom queue jobs:
- drush scheduled-transitions:queue-jobs to create queue items
- drush queue: run scheduled_transition_job to process them
This lets scheduling run every minute without affecting site performance. If needed, the module can also run via default site cron at a longer interval.
By using Scheduled Transitions, editorial teams can automate time-sensitive publishing workflows, avoid manual errors, and remove the need to be online during off-hours. The result: reliable, accurate, and maintainable content scheduling across complex Drupal sites.
Drupal 10 modules used for scheduling
- Scheduled Transition
- Workflows
- Content Moderation
Configure Scheduler module in Drupal 9
- Install the module using Composer
- composer require 'drupal/scheduled_transitions:^2.5'
- Enable using Drush
- ddev drush en scheduled_transitions
- Go to admin/config/workflow/workflows

- Edit the pre-installed Editorial Workflow
- Select any entity which needs to use scheduler and save (As shown in image Content types ‘Article’ and ‘Course Content’ is selected )

- Go to the Scheduled transitions settings Page from URL: admin/config/workflow/scheduled-transitions

- Enable entities that need scheduling
- Uncheck the automation tab because we will create queue jobs to run the scheduler instead of site cron.
- As per the requirement of the module to create queue jobs for scheduler, we can upload queue jobs commands on the server with frequency of 1 min. Both the commands will run at the interval of 1 min to check if any content is ready to be published or not as per given time.
- Create queue items.
drush scheduled-transitions:queue-jobs - Process the queue.
drush queue:run scheduled_transition_job

- If the Automation tab is enabled/checked, scheduling will check scheduled jobs on default site cron run and usually it’s not a good idea to run site cron at each minute as this may impact the overall site performance.
- However the Automation tab can be enabled if you want to check scheduled jobs at a longer interval of time. In that case, Scheduling will run with default site cron run at a few hours of interval and publish the node who’s publishing time has already passed current time.
Let’s understand the use of this module with the example. The following example uses a flow of draft to publish, but any transition is possible. The general flow for users is:
- Users create content and can create many revisions of it. Revisions move between states such as draft, needs review, and published.
- When the content reaches a point where it’s ready to be published. Find the ready Revision and take note of the Revision ID of it.
- Go to the Scheduled Transitions tab for the content.

- Click the Add scheduled transition button.
- Locate the ready revision, and schedule it.

- Now on scheduler cron run or on default site cron run (This will be chosen based on the above cron configuration) content will be published.
Conclusion
The Scheduled Transitions module fills a key gap in Drupal’s content moderation system: the ability to automate publishing based on scheduled dates and times for specific revisions. It ensures content goes live exactly when planned, without any manual effort.
Over 1,000 Drupal sites use the module, including government platforms, universities, newsrooms, and nonprofits. It supports multilingual content, strict timelines, and globally distributed workflows.
But scheduling is just the start. Drupal’s next phase is being shaped by AI-assisted publishing.
Features like auto-tagging, translation support, and semantic search are already in use. Organizations like Acquia are adding AI/ML to Drupal DXP stacks, while community-led projects explore LLM integrations.
Governments and global organisations are leading this shift. Drupal powers platforms for the European Commission, UNESCO, the City of Boston, and UNICEF. Major brands like NASA, Pfizer, and The Economist also use Drupal at scale—integrating AI to optimize publishing.
The trend is clear: AI content automation is projected to grow 18.7% annually through 2030. Scheduling will move beyond fixed dates to AI-informed windows based on engagement, traffic, and campaign timing.
Modules like Scheduled Transitions will evolve with this shift—helping Drupal build smarter, data-driven workflows for modern content teams.