All blogs

Drupal 8 End of Life: What does it mean for your D8 website?
The only truth in the universe which is constant, is that everything evolves. So why would Drual be any different? Like all things, Drupal versions evolve and older versions reach ‘End of Life’ (EOL) after their full lifecycle.
The latest version of Drupal is version 9 which was released in 2020. This means that previous versions of Drupal which are currently in use, Drupal 7 & 8, will reach their end of life soon.
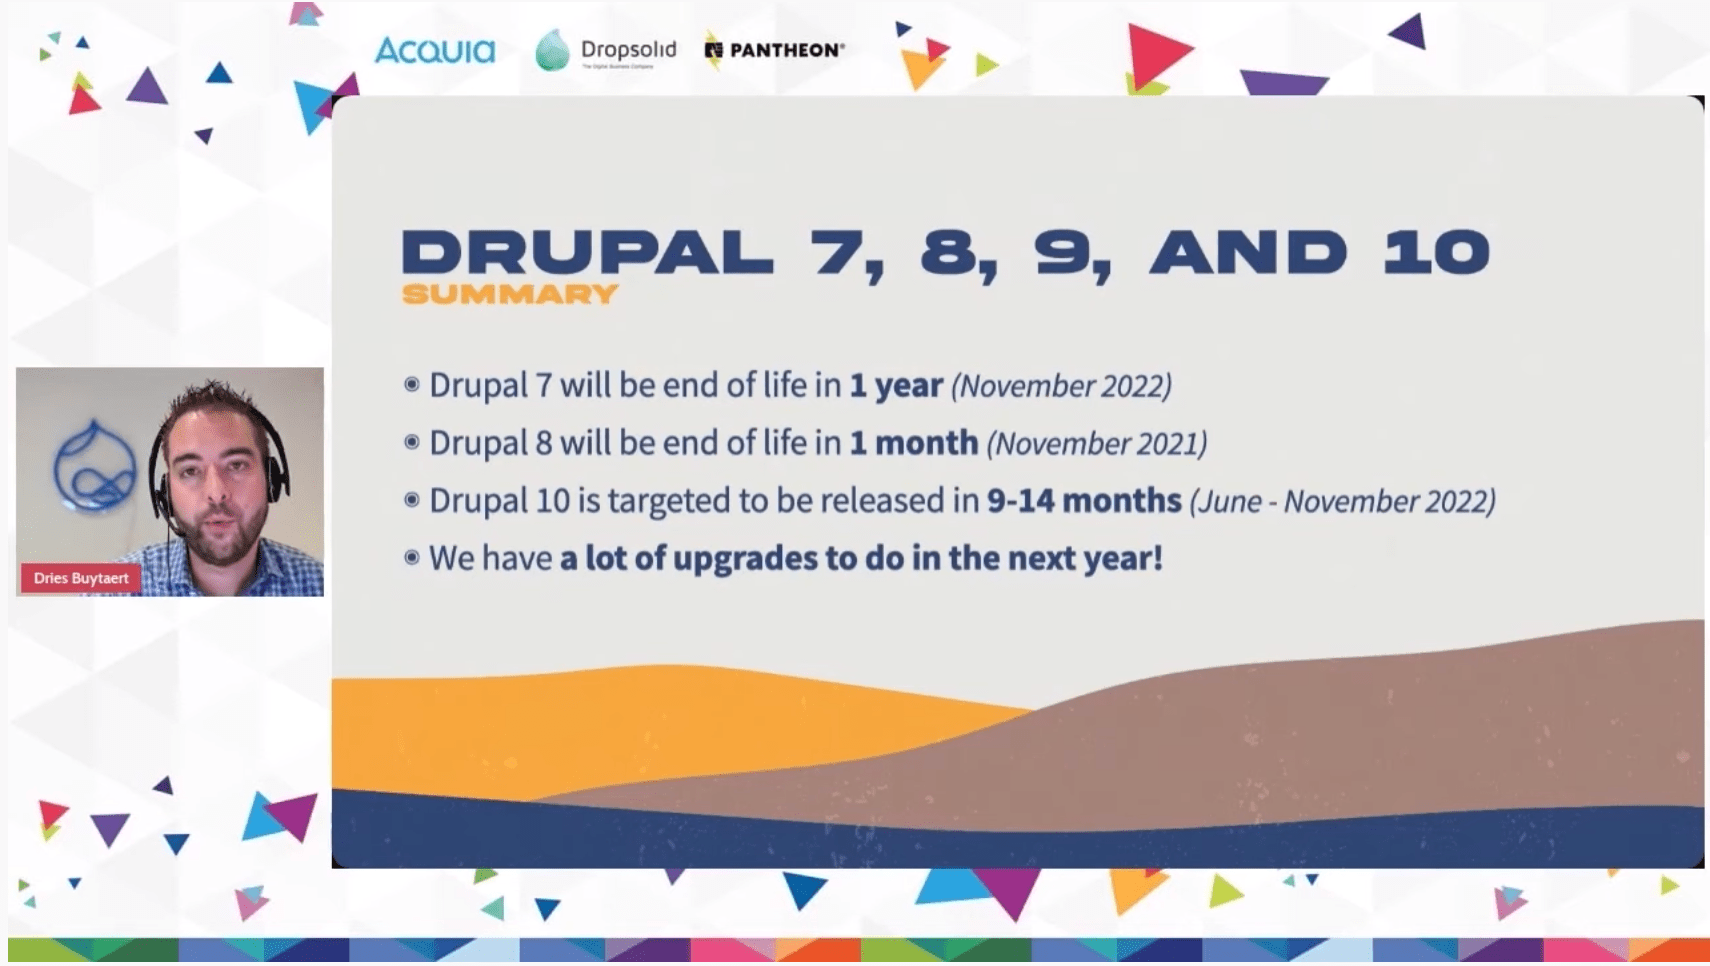
Let us first understand what is ‘end of life’ in the context of Drupal.
What does End of Life really mean?
Think of a large container ship which is anchored. Till you’re anchored you’re supported and fixed. Minor waves cannot shake you. But what if we remove the anchor. In the context of web development, you can relate these waves to security threats and vulnerabilities.
So when any version of Drupal reaches its EOL, the bugs are not fixed by the community, vulnerabilities are not identified nor removed. So after reaching EOL, your Drupal website will be like an unanchored ship floating in dangerous waters with the constant threat looming over.
Everything will still work on your website, just like the ship which can still float without the anchorage. But you don't know, nor can you predict when you’ll hit a rogue wave and topple over.
So in order to keep your website (and your business) anchored, it's best to upgrade while you still have time.
When and why is Drupal 8 reaching End of Life?
Drupal 8 is reaching its end of life on November 2, 2021. That means post this date there will not be community support, updates of bug fixes. But let us understand why this is happening.
Drupal, to be the all-round CMS we all know and love, uses certain third-party dependencies.
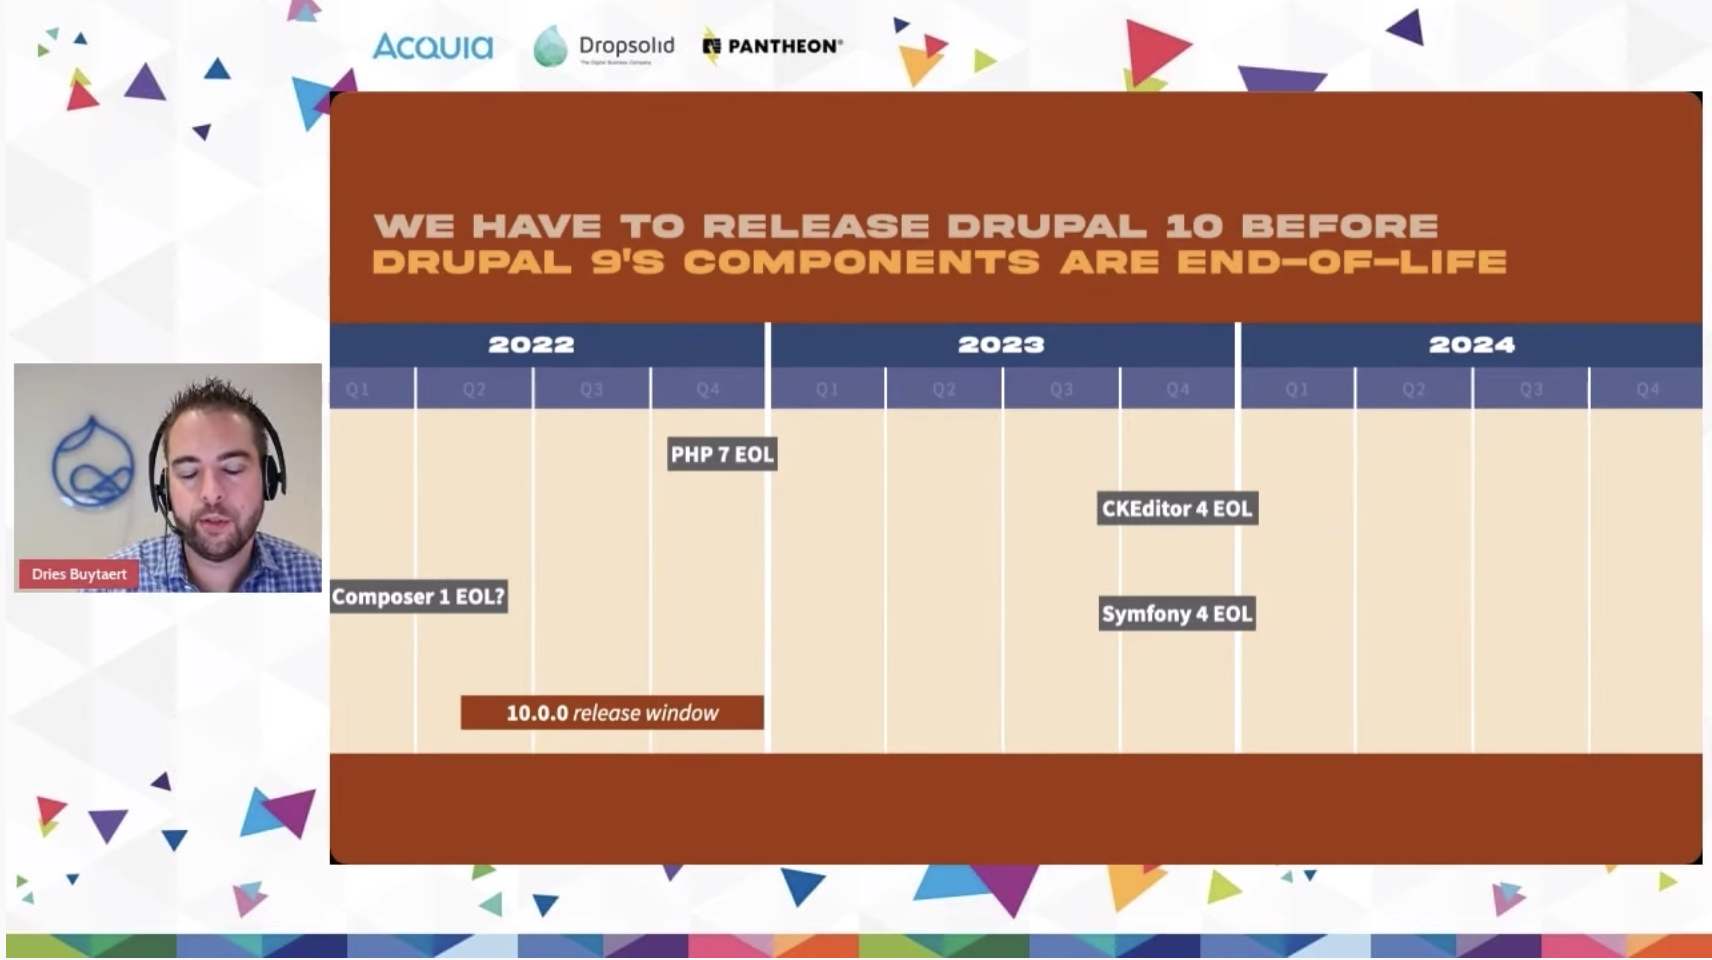
Symfony 3 EOL
The biggest dependency of them all currently, is Symfony. Drupal 8 makes use of Symfony 3. Drupal 8 is connected to the life cycle of Symfony 3, which is reaching its end of life in November of 2021.
Now, Drupal could have supported Drupal 8, if Symfony 4 (the next version of Symfony) would have supported backwards compatibility. But since that is not the case, Drupal must also move to its next version, which is Drupal 9.
PHP 7.3 EOL
Similarly, the official support for PHP version 7.3, another component Drupal 8 relies on, will end after December 6, 2021. The same thing will happen to CKEditor 4.
“Each of these components have their own lifecycle. They release new major versions, they end of life major versions, they may or may not create backwards compatibility and so on and this is something we have to manage.”
– Dries Buytaert
These are the primary reasons behind Drupal versions reaching end of life, because of critical third-party dependencies moving ahead.
What happens to your website when Drupal 8 reaches EOL
Nothing immediately. But without critical support and bug fixes, the framework will soon start to crack and after a certain amount of time, will reach a point where your bottom line will start getting affected. In the worst-case scenario, it can even result in a cyber-threat leading to data breaches and attacks.
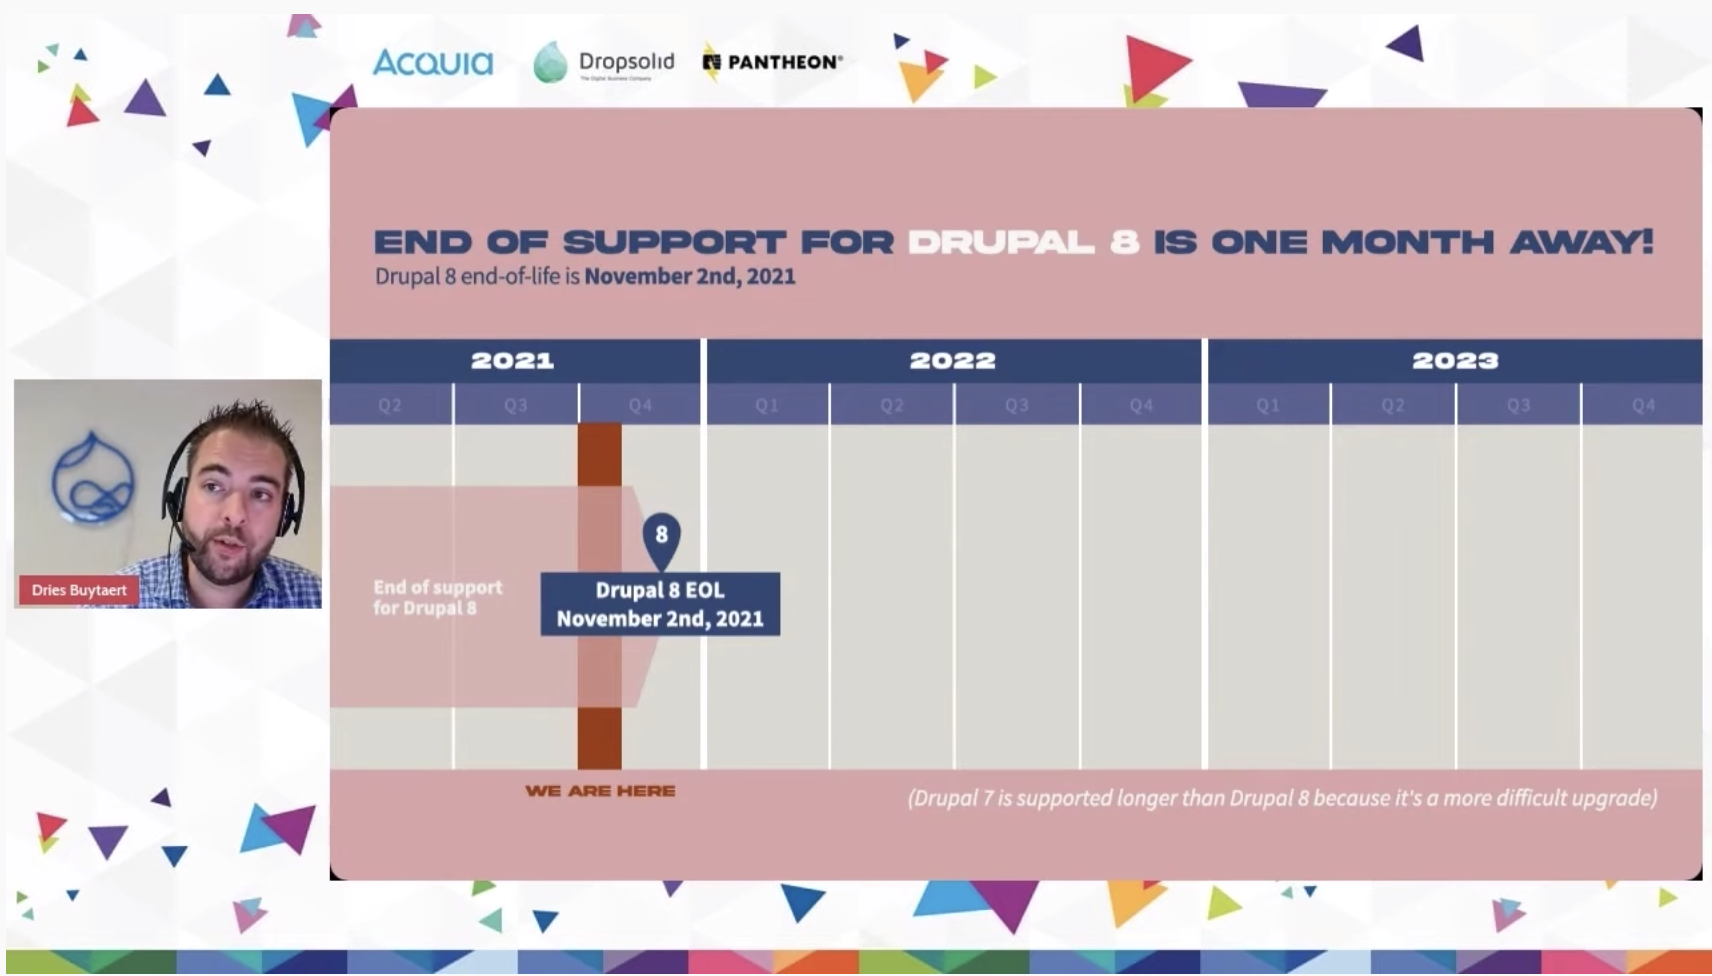
What should you do to stay secure?
Upgrade to Drupal 9
To stay protected and save your website (and business) upgrade to Drupal 9 as soon as possible. We offer a free Drupal 9 readiness audit to help you determine how easy or difficult it would be for you to upgrade. In either of the scenarios, we can help you with end-to-end solutions for your Drupal 9 upgradation or migration needs.
Steps to a Drupal 9 upgrade
Step 1: Make your Drupal 8 website compatible to Drupal 9. Which means that you’ll have to install the minor Drupal 8 upgrade and bring your D8 website to version 8.8 or 8.9 which are directly compatible with Drupal 9.
Step 2: Update your themes, modules and third-party integrations to make them compatible with Drupal 9.
Step 3: Once you have updated your core to Drupal 8.8 or later, and have updated all the modules, themes, install Upgrade Status module and check for deprecated codes.
Step 4: Once you have removed the deprecated code you are truly ready for your Drupal 9 upgrade
Step 5: Upgrade your Drupal core to D9 and voila, you’re there!
Frequently asked questions
Will your Drupal 8 website stop working after it reaches the end of life?
As stated before, no your website will still function, but it will not receive critical updates which keeps the entire core secure and bug-free.
When will Drupal 9 reach the end of life?
Drupal 9 will reach its end of life in November of 2023.
When will Drupal 10 be released?
With no fixed date yet, Drupal 10 is slated to release between June and November of 2022.
What if you have a Drupal 7 website?
The easier way is to upgrade to Drupal 8 then go to Drupal 9, but since Drupal 8 is almost at the end of its upgrade cycle, it would be pointless to go through D8. In this situation, it would be best for you to migrate your Drupal 7 website directly to Drupal 9. It would be more work, but you can offload that to us.
Need help?
Going to Drupal 9 is the best thing that can happen to your Drupal website. Whether you are on Drupal 7, or on Drupal 8, or even Drupal 6 (ideally you shouldn’t be on Drupal 6), we are happy to help you in reaching the latest and greatest of Drupal. We have done this for numerous of our clients and can do this for you as well, click here to know more about the Drupal Migration services we offer.


Building a powerful university brand with Drupal
The digital revolution which is currently sweeping over the world, has only been accelerated by the ongoing pandemic. This will help serve the future generations. As the changemaker in the higher education industry, you too can contribute by offering one hell of digital experience through your digital assets. But the process of creating such digital platforms is painstaking and tedious. This is where we can help. Taking cues from our in-house team, and from the world’s best university websites, we have developed three stages of creating the perfect digital version of your higher education institution.
Stage I: Plan
Just like every other project, creating this digital experience will require a lot of planning. Everyone's contribution is the picture-perfect scenario. This is the part where you’ll plan, and strategize. This is also the part where you (and/or your team, including external vendors) will brainstorm and come up with the best possible ways to present the most relevant information in the most succinct manner possible.
Ranked 1st on the World University Rankings 2022 by Times Higher Education, the website of Oxford University (Which is built on Drupal) clearly provides resources for the students and staff on the very first page.
.avif)
But as they say, to each their own. You have to find your way of highlighting one aspect/portion of the page, yet being accessible for the rest of the page.
1.1 What to plan for?
While planning, you’ll have to account for your primary objectives from the website. That is, what exactly are you trying to achieve with this website? Write these down as clearly as possible because this will help you throughout your project and will leave you with a clearer and crispier communication plan. In this part of the project, you may also want to define your target audience.
Pro-tip A: It is the students who are your primary audience, followed by the staff. It is better to have a consensus among the stakeholders regarding this before moving further.
1.1.1 This is what your website goals should ideally zero in on
Brand awareness: You want to get the word out that you have a remarkable college, where students and the faculty, both, can flourish in a manner ultimately beneficial to society. To make this happen, your university/college/school website needs to be front and center.
What is a brand image? One of the earliest definitions, “the total impression an entity makes on the minds of others” (Dichter, 1985), still holds true in 2021 for every industry, even in this digital age (Something like, ‘evergreen content’?)
Research by American and Indian academicians shows that “a distinct brand image plays an important role in students’ level of satisfaction.” They further add that the service quality has a greater impact on student satisfaction levels (as compared to university heritage and trustworthiness). The authors also found a positive mediating effect of university reputation in the relationship between university brand image and student satisfaction levels. Still, wondering why you should try to build a brand rather than a website? Perhaps not.
Revenue:You want to hire the best faculty for the students, you also want to have the best infrastructure, you would also want to offer the best facilities. All of this will demand money, a lot of it. Even though your primary aim may be (or could be) to serve the students, you’ll still want money to do that in your best possible capacity.
An article on Medium by a UK-based education-entrepreneur, Shinaz Navas, even claims in his research that financial sustainability is the ‘biggest existential threat facing the higher education (HE) sector today.' We believe that the reality lies somewhere in the middle. Neither completely towards a for-profit approach, nor towards a completely charitable cause. So you will need to make money, to thrive.
1.1.2 Identify your audience
To have clarity on what messages to display, you’ll have to first ascertain who it is that you’re speaking to. Once you have the knowledge of the potential audience of your website(s) you’ll be able to take your marketing efforts in a more focused direction.
As discussed before, your primary audience will be the students; past, present, and prospective. Next comes the staff and faculty, both of them essential for smooth operations. Similarly, parents of the students also need to know where their child is studying or is going to study.
Stage II: Build
2.1 Craft the digital experience
Now that you have a communication plan, complete with goals and target audience, you can start creating your website. Hire a professional full-service digital agency to power your digital ambitions. You’ll want the most powerful CMS, coupled with a beautiful front end. Something like Decoupled Drupal should definitely get this job done.
2.2 How do you communicate across regions and geographies
Few higher-ed institutions realize this, but eventually, you’ll need a framework where you can deploy multiple websites (for research publications, for different branches/specializations, for different audiences). Not only this, what if you could control all the said websites using one dashboard? Drupal is among the sparingly few options that let you do that.
Besides multisite, Drupal is also multilingual. So, communicating your message across different geographies and languages is just a matter of an additional module in the Drupal core. But being consistent with your messaging across these multiple platforms will be tricky.
2.3 A list of features your audience is expecting from your website
- Accessibility: The mantra of creating an equitable society is to impart education to all sections of students, including people with disabilities. Therefore, your website should empathize with all those who are likely to visit your website. One of the most accessible CMS out there, Drupal, has core features that make the user experience friendly for all sections of the society.
- Ease of Usability: Undoubtedly, your website should be easy to navigate for all of your audiences. The typography and the content should be such that it creates a digital impression of your values. It should be easy for stakeholders to manage the website, including ease of content management, publishing, and distribution.
| Pro-tip B: Place your navigation page’s link somewhere on the main homepage. This will enable entire chunks of unanticipated audiences to navigate comfortably on your website and find the resources they’re looking for.
- Student and payment data require the highest security: When you have personally identifiable information stored on your servers, including payment data, it becomes your responsibility to protect this information. One thing you can do is to use a CMS core which is widely known for its security, Drupal.
- Best to work with a mobile-first mindset: The youth of today interact with your website through multiple touchpoints. Therefore your website should also offer seamless digital experiences across all platforms.
- Content authoring experience: It is with your content, you’ll capture the attention of your audience, and it is the content on your website that can make or break a budding relationship with the audience. Therefore, it becomes imperative to empower the editors to create and edit the content with ease.
2.4 We don’t live in a cave
Since we don’t, you will need to collaborate with others. For this, to work on your website, you’ll need the power of third-party integrations. This is where Drupal does a remarkable job. Coming ripe with Modules, Distribution, and Integrations, Drupal gives you the flexibility to mould your digital identity around the walls of your institution.
2.5 Bring it all together with a design system
To make consistency your brand value, you’ll need a design system in place. A design system will not only serve you in offering a consistent digital experience right now, but it will allow you to offer a unique and particular brand voice till the time this design system will live.
This will allow all current and future site contributors to create content that is within the brand guidelines. Think of it as a stylesheet for your website(s). This also results in a faster turnaround time for every new piece of content or every new page/website that you come up with. Basically, a design system ties everything in one thread to offer a consistent digital experience unique to your institution.
Stage III: Analyze
Just like any other organisation, you’ll want to understand if your digital efforts are working for you or not. Therefore, collecting and analyzing performance data is critical for your website’s improvements over time.
The more data points you gather, the better the strategies you’ll come up with. This will also inform you of the parts of your website which are not working and will require a course correction. One of our clients, the world's top business school, was looking for a way to unify their digital offerings and wanted to enhance the all-round effectiveness of the website.
We developed a strategically manufactured Design System, and upgraded their website from Drupal 7 to Drupal 8. This enabled their content editors to create and manage webpages while maintaining an unified Design System.
Conclusion
We, at QED42, pride ourselves in having offered solutions to our clients, which gave their audience an exceptional experience across all of their digital offerings. We can do the same for your higher-ed institution’s digital heart and soul as well. All you have to do is get in touch.

Top 10 things you should know while working on a Site Studio project
We have shared our experiences with Site Studio and covered all the features and how this low-code tool helps marketers. In this blog post, we will be covering the top 10 things you must keep in mind while working on a Site Studio project.
Let's Begin!
1. First, go through all the task/ticket OR sprint wise task/ticket and write down your findings in the ticket comment like,
- Is there BE work that needs to be ready before starting to work on the component/template
- If form fields are not mentioned for component building then What form fields are required? to build a component
- If any design is missing for that component/template.
- Missing Acceptance criteria/Implementation details
2. Create sub-theme using Site studio Minimal theme and used only required files to create sub-theme like,
- .info.yml
- .libraries.yml (if any custom style or custom js required which we are not able to handle from site studio)
3. Website setting → It's a good idea to set these up at the start of your project as per the style guide. So that once it’s done we can take other tasks/stories/tickets to work on and there will be no re-work and no re-testing.
- Base unit settings
- Colour palette
- Default font settings
- Font libraries
- Icon libraries
- Responsive grid settings
- SCSS variables
4. Set Base styles /admin/cohesion/styles/cohesion_base_styles and custom styles /admin/cohesion/styles/cohesion_custom_styles depending on the style guide provided.
5. While setting H1-H6 styles - Build it from base style /admin/cohesion/styles/cohesion_base_styles and also from custom styles (under Heading category) /admin/cohesion/styles/cohesion_custom_styles so that it will be directly available in the Custom style options list of components/templates.

6. CTA can be both types like Button or Links so it’s better to create both custom styles (under Button and Links category) /admin/cohesion/styles/cohesion_custom_styles so that it will be directly available in the Custom style options list of components/templates.
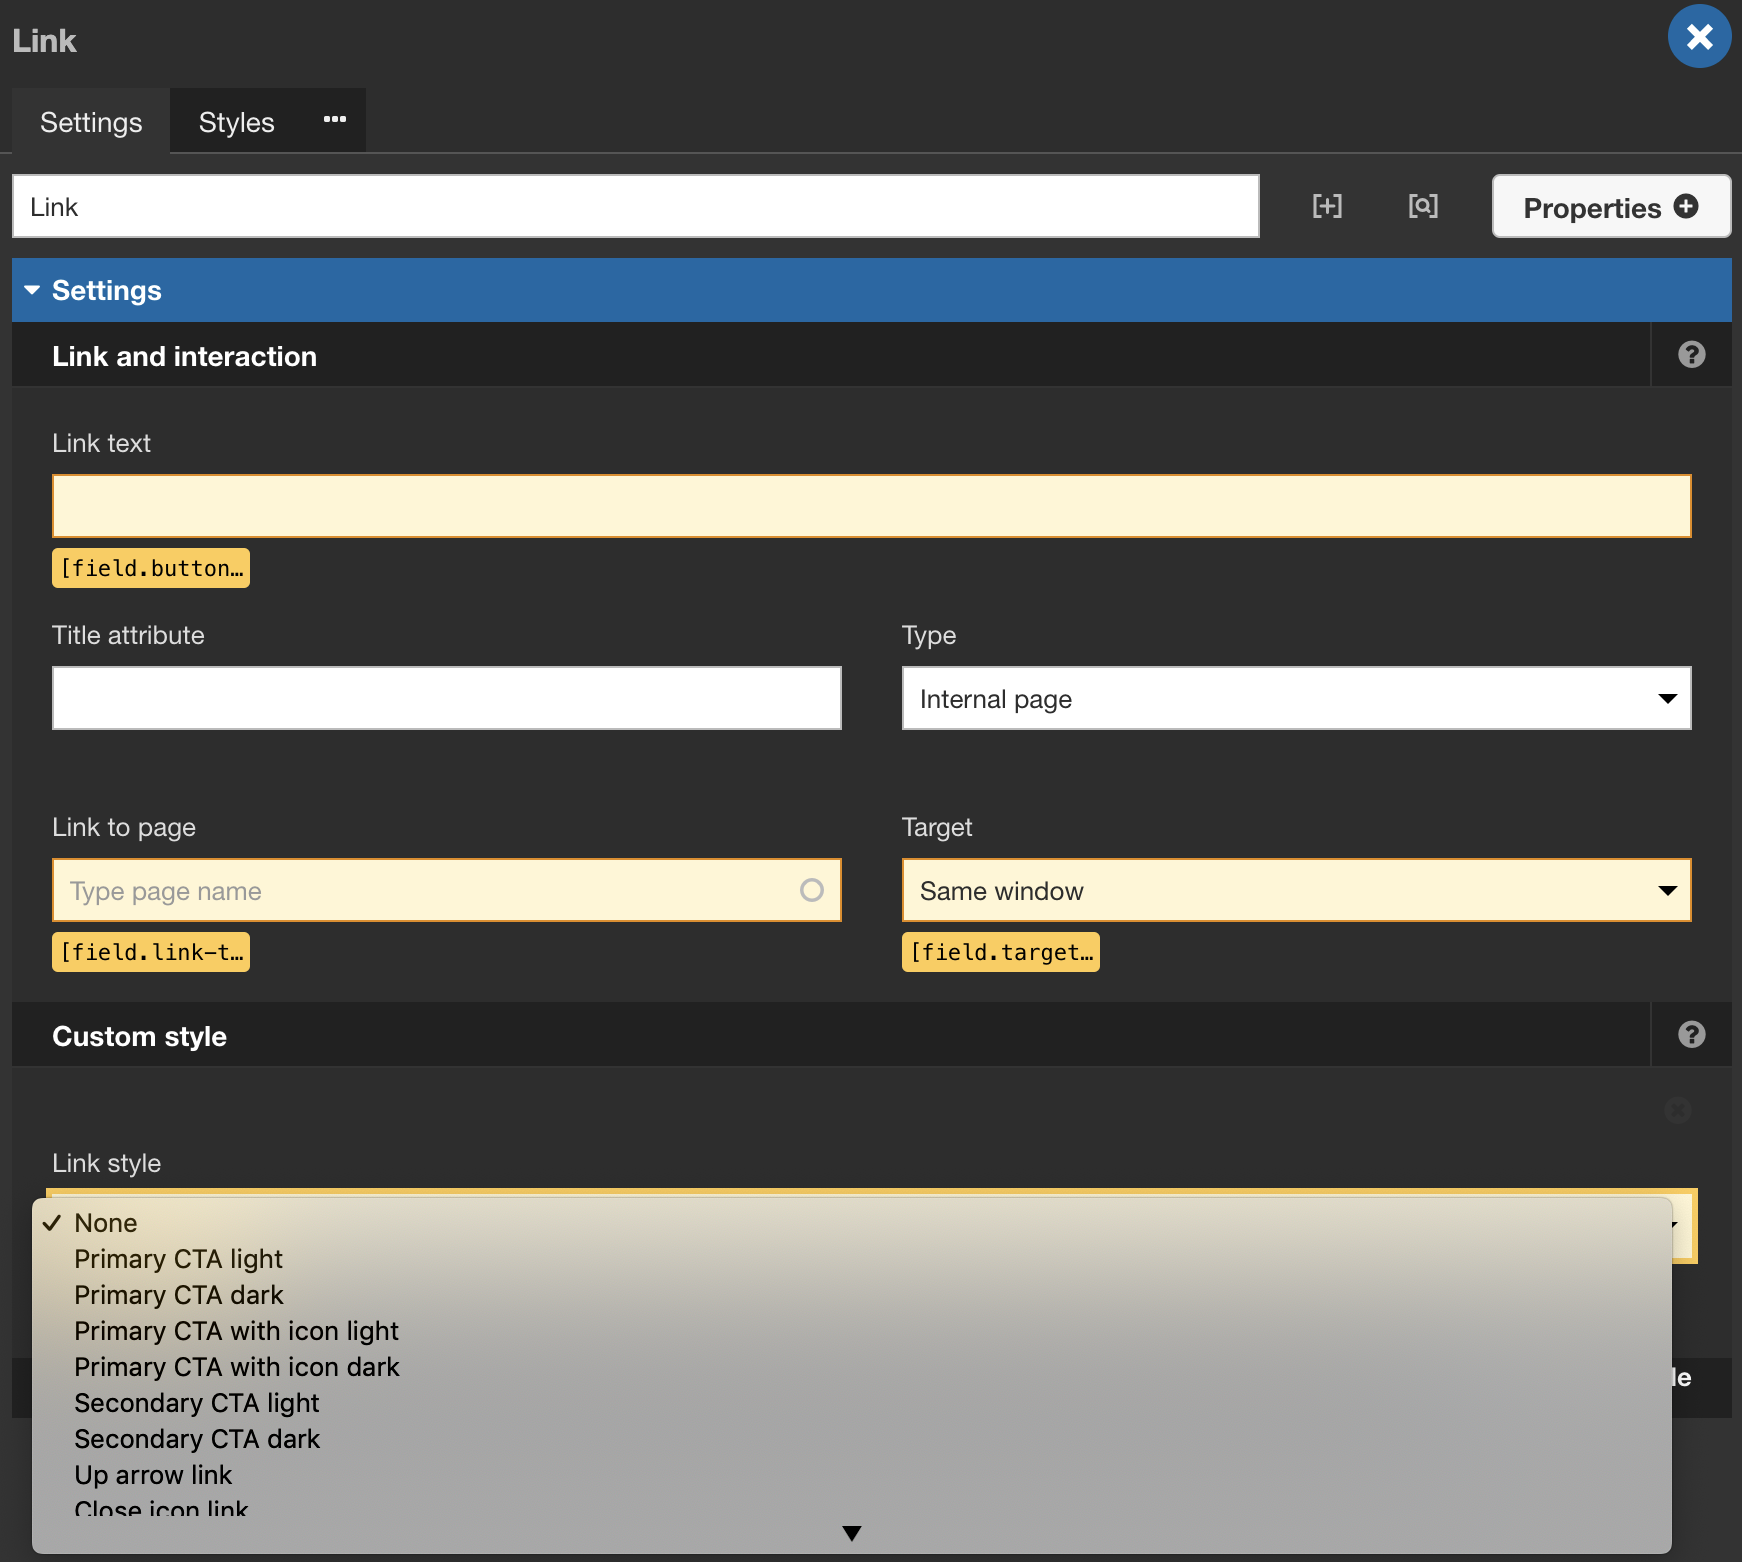
7. Set default master template after analysing design structure that can be boxed or fluid.
8. On layout canvas, for a component, if we are providing content editor/Site manager access to upload/update image so in that case in your component inside Component form builder for image uploader form field keep default image added to get rid of popup notification - Failed to load preview image and Server error please try again.
9. If anything is updated in SS Component like field settings, default content, etc. and if that component is already in use somewhere for example Site header component is used in Master template fluid/Master template boxed so in that case, that updated things will not be in your master template. So in that case you need to Rebuild the settings by accessing /admin/cohesion/developer/rebuild
Or terminal command drush dx8:rebuild
Or We need to update it manually where it is used or we can remove that component and again drag/drop the same component then you will get updated content, settings, styling etc.
We need to do it locally and re-export the master templates when this happens.
10. Block → If you want to use any drupal block or custom block (except menu & breadcrumb) in site studio component/template/views template then first you need to place that particular block in the Site Studio hidden region

and now you can add or drag/drop a particular block in site studio component/template/views template using Drupal core elements block from sidebar panel.


Once the element is in layout canvas → Double click on it to edit.
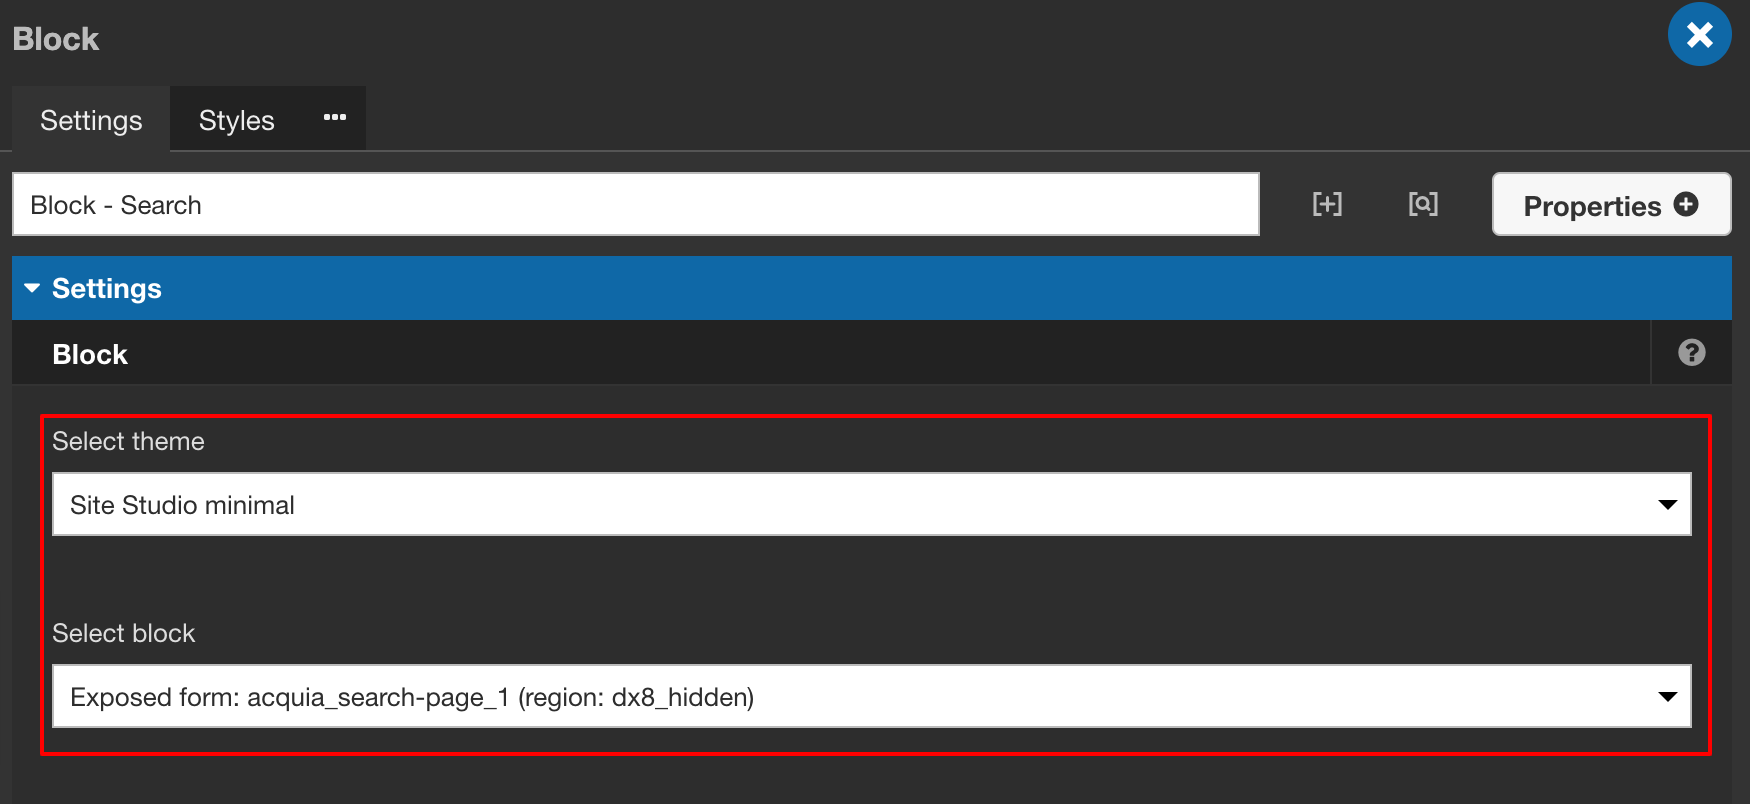
Select your theme(sub-theme if created) and a particular block from the hidden region and save.
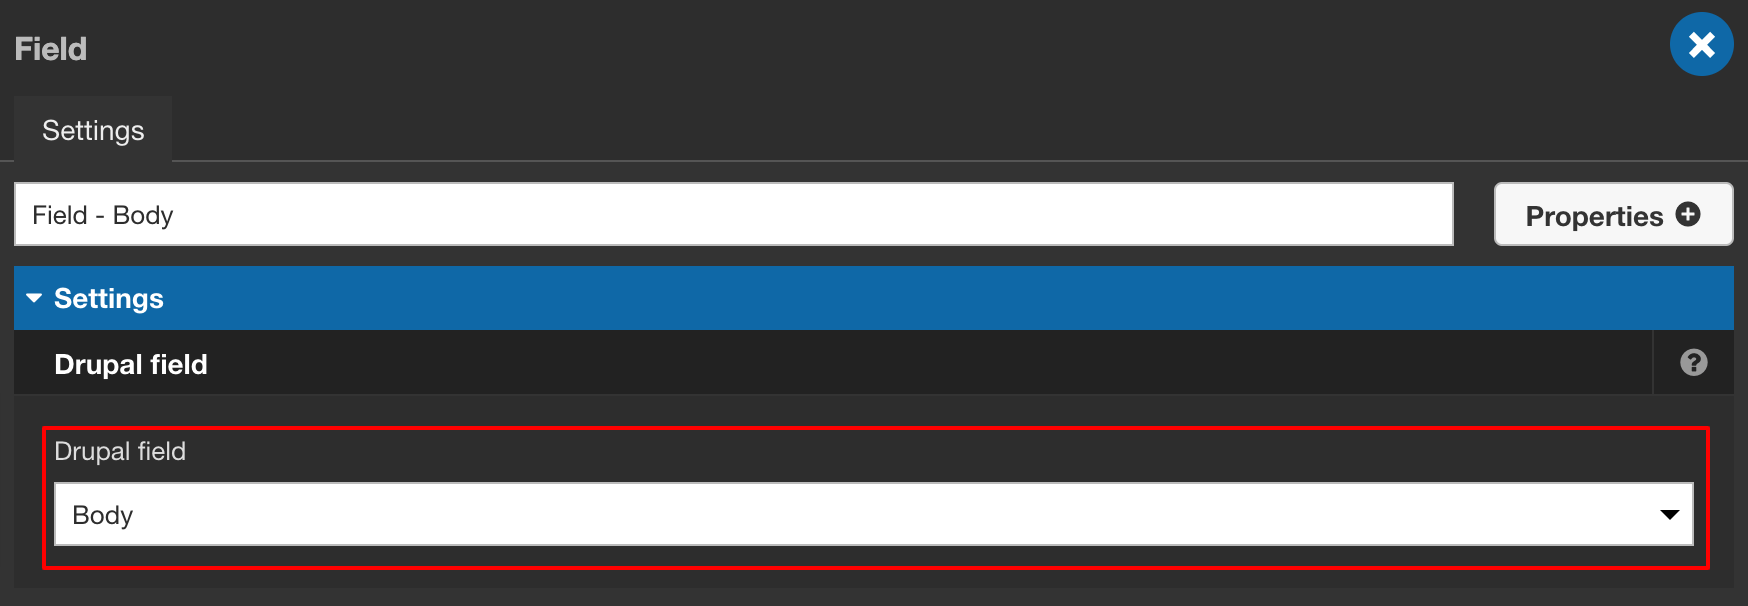
11. In the content template if you want to show content-type field data which is having WYSIWYG editor then use Drupal core elements field directly

and by double-clicking on the field element, you can select a particular field directly for e.g: body field
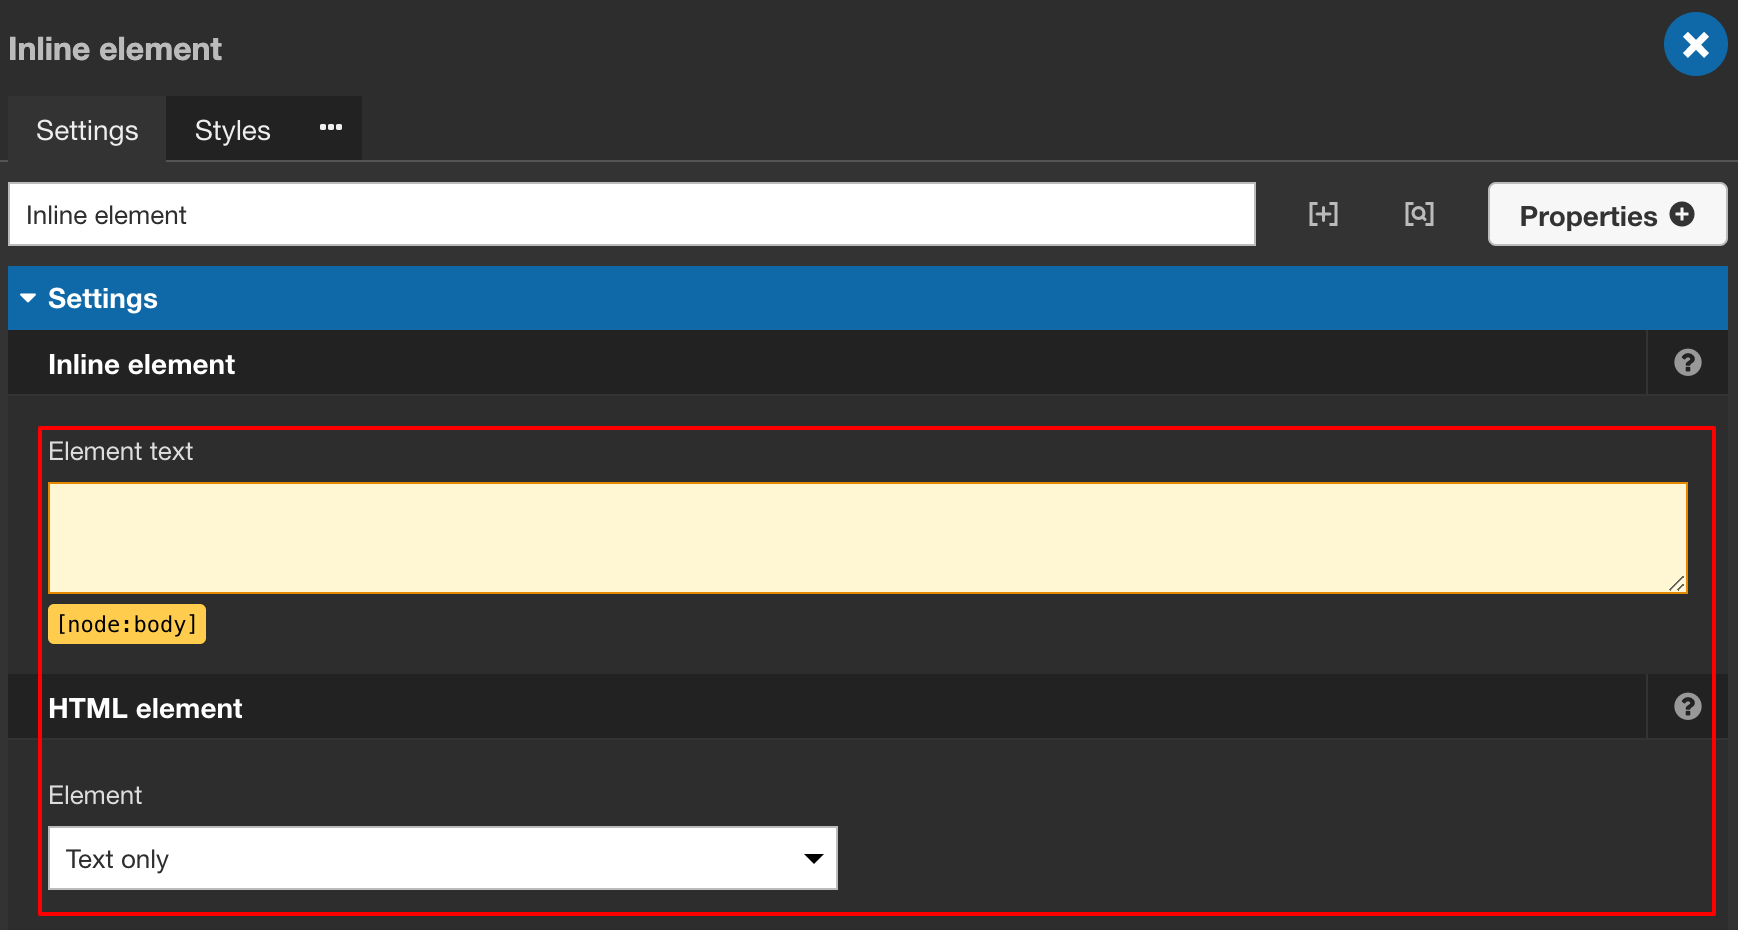
Or use Inline element from Content elements section

and by double-clicking on the inline element you can add a token of body field for e.g: [node:body] and select HTML element Text only.
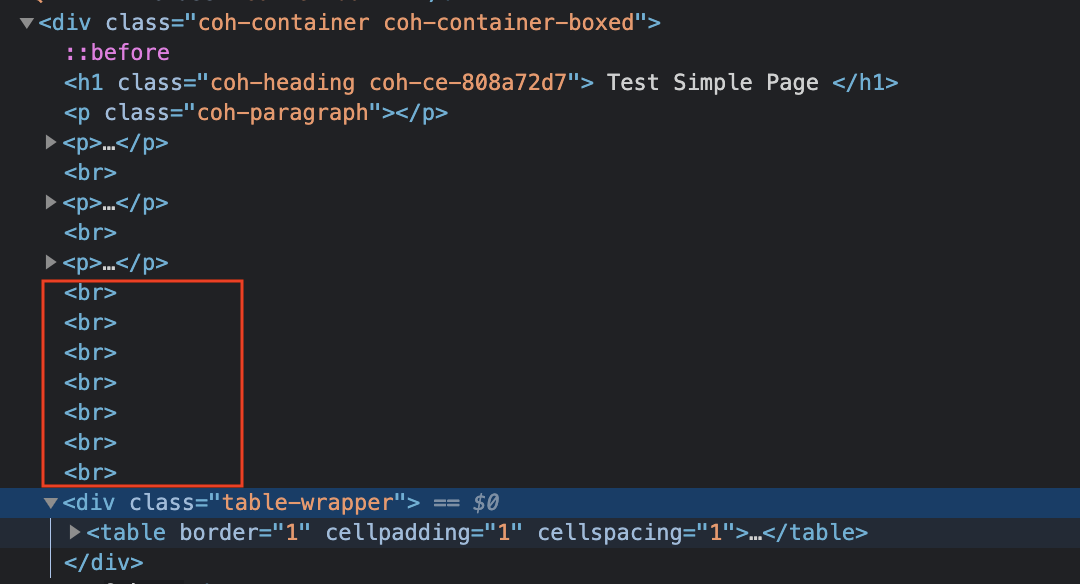
Because if you use a field element with a paragraph element then it will create/add multiple break tags on the front-end even if there is a single line break added while creating content.

Thank you for reading!

Creating a vertical timeline with Acquia Site Studio
Using a vertical timeline is one of the best methods to display information over a period of time. With the help of it, you can easily share your information with others. As a use-case, you can state the history of politics, famous people, company profile and personally easily etc.
Let's explore how to create a vertical timeline in Site Studio containing a heading, description at the top, and place any Site Studio component as content to the left and right side with auto-increment serial number in the middle. Here's an example:
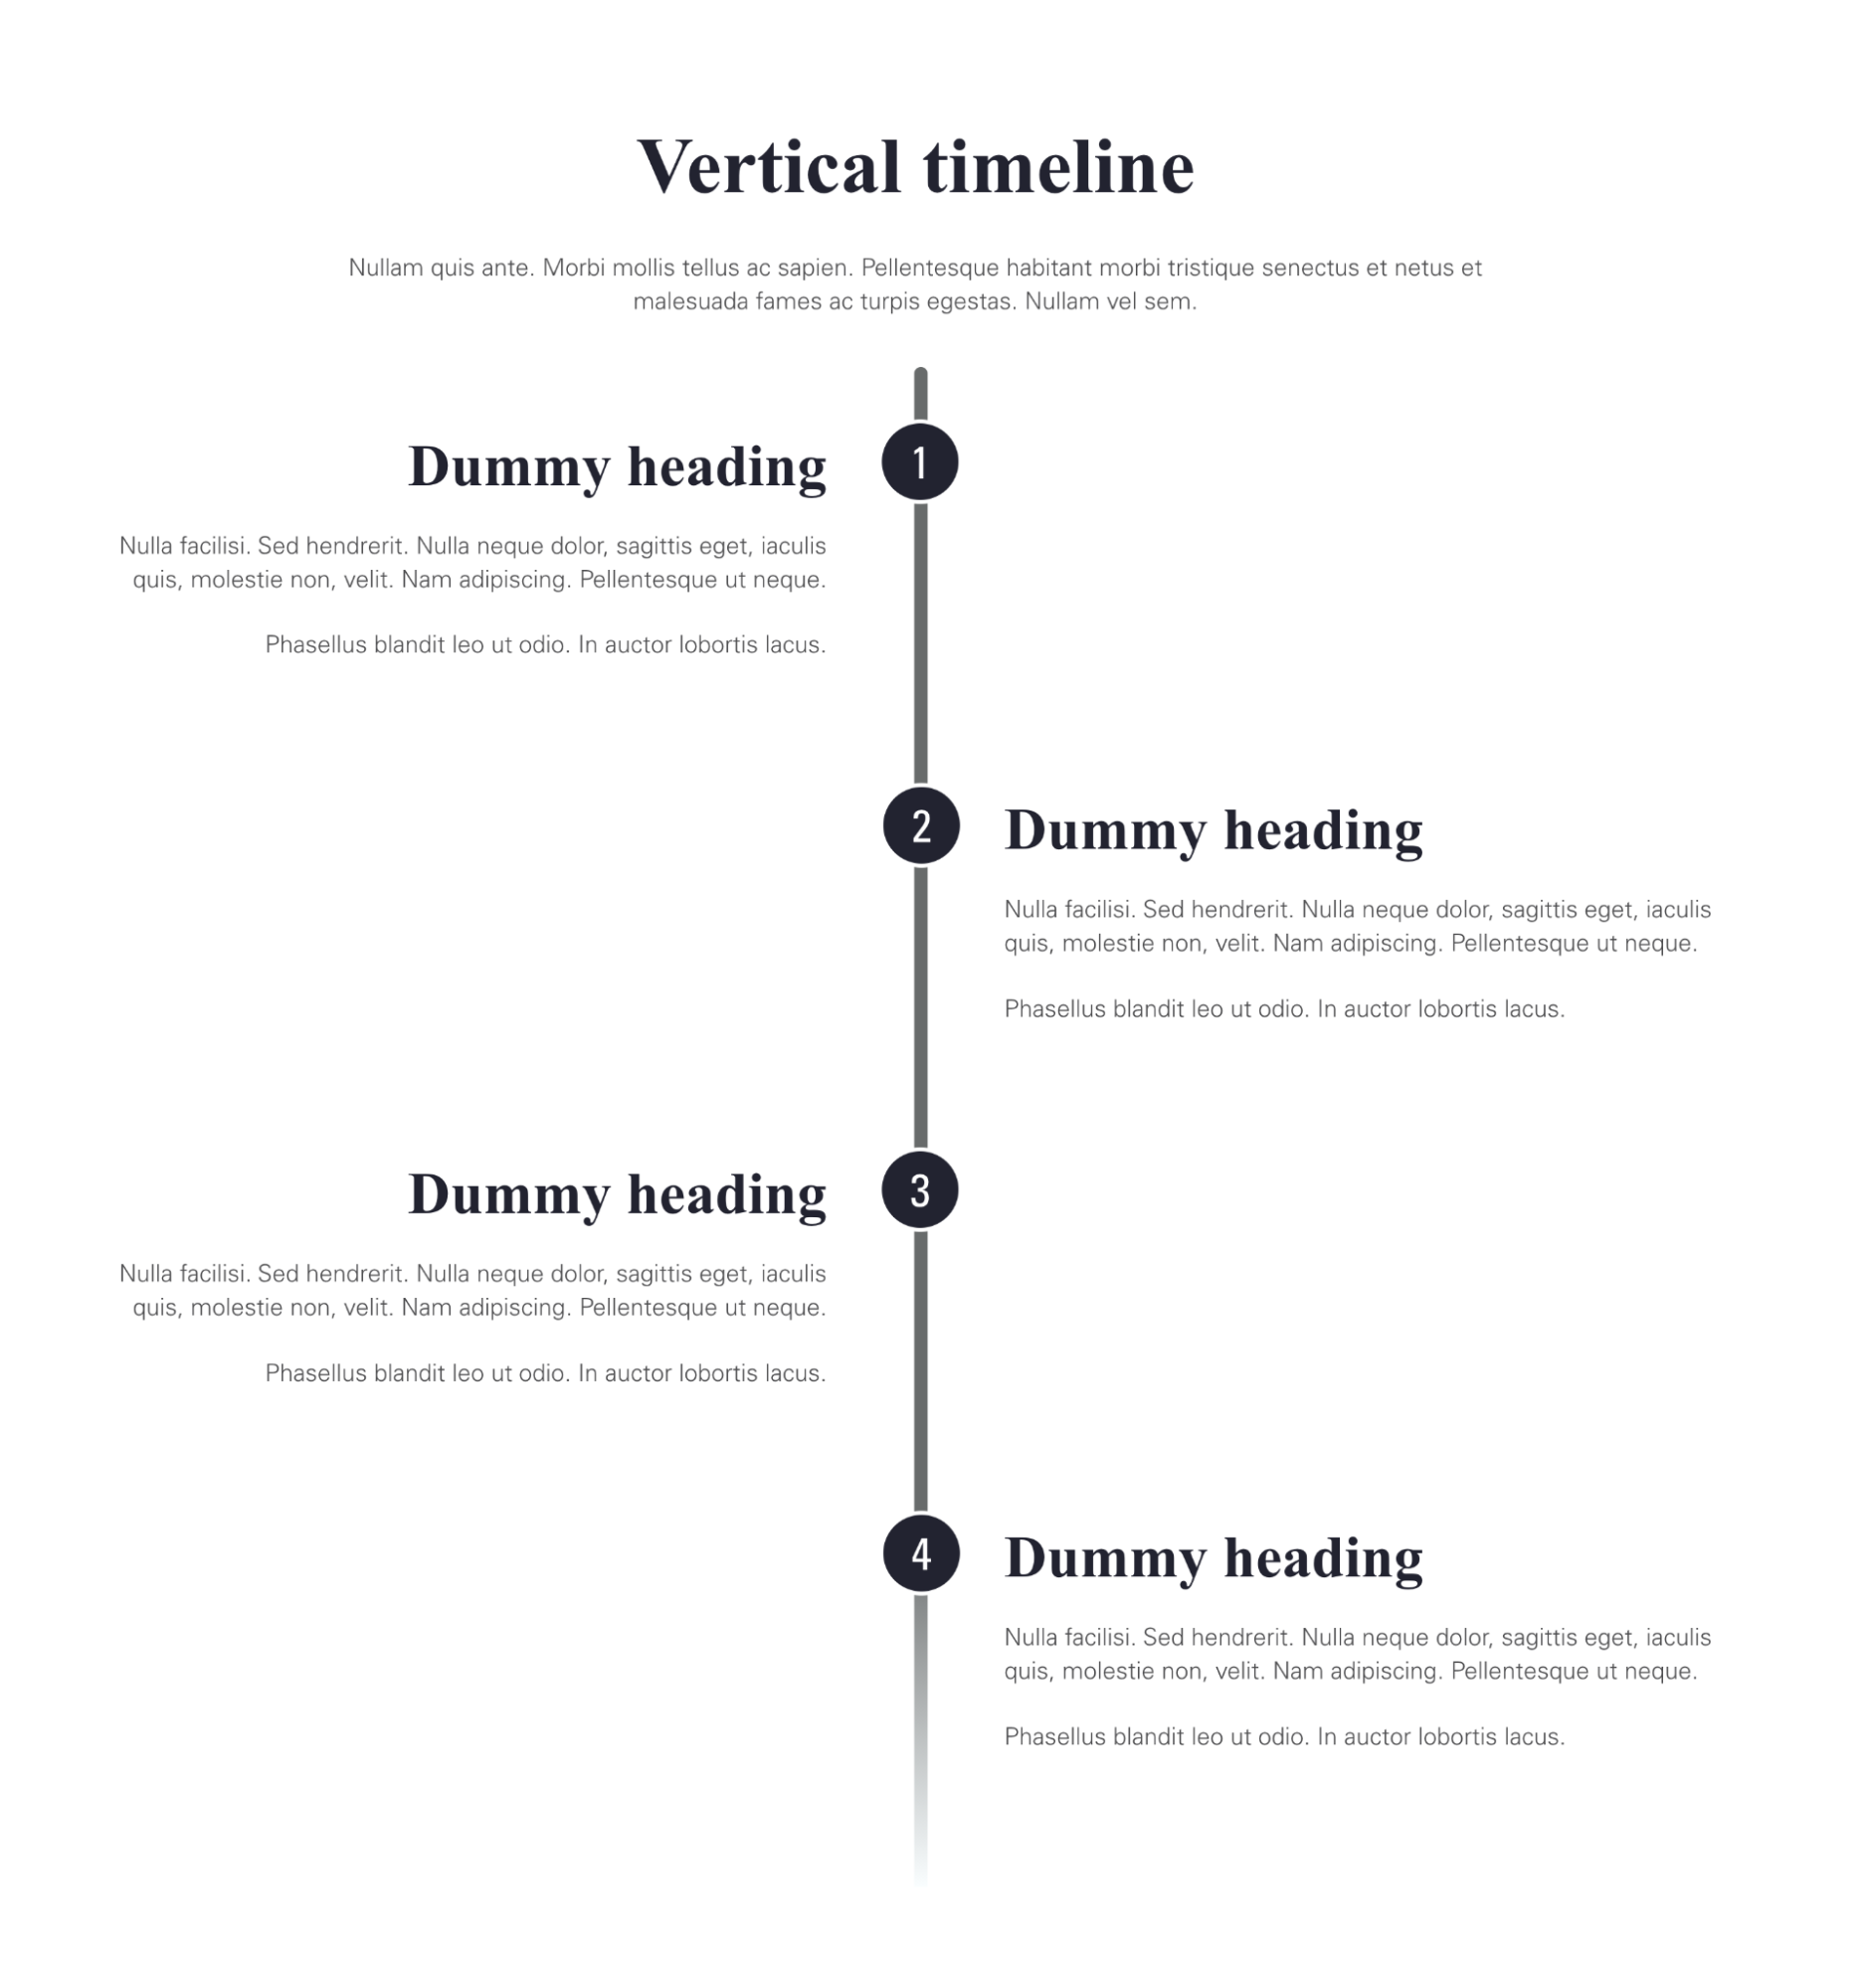
To achieve the above timeline we need to create two Site Studio components:
- Timeline
- Timeline item
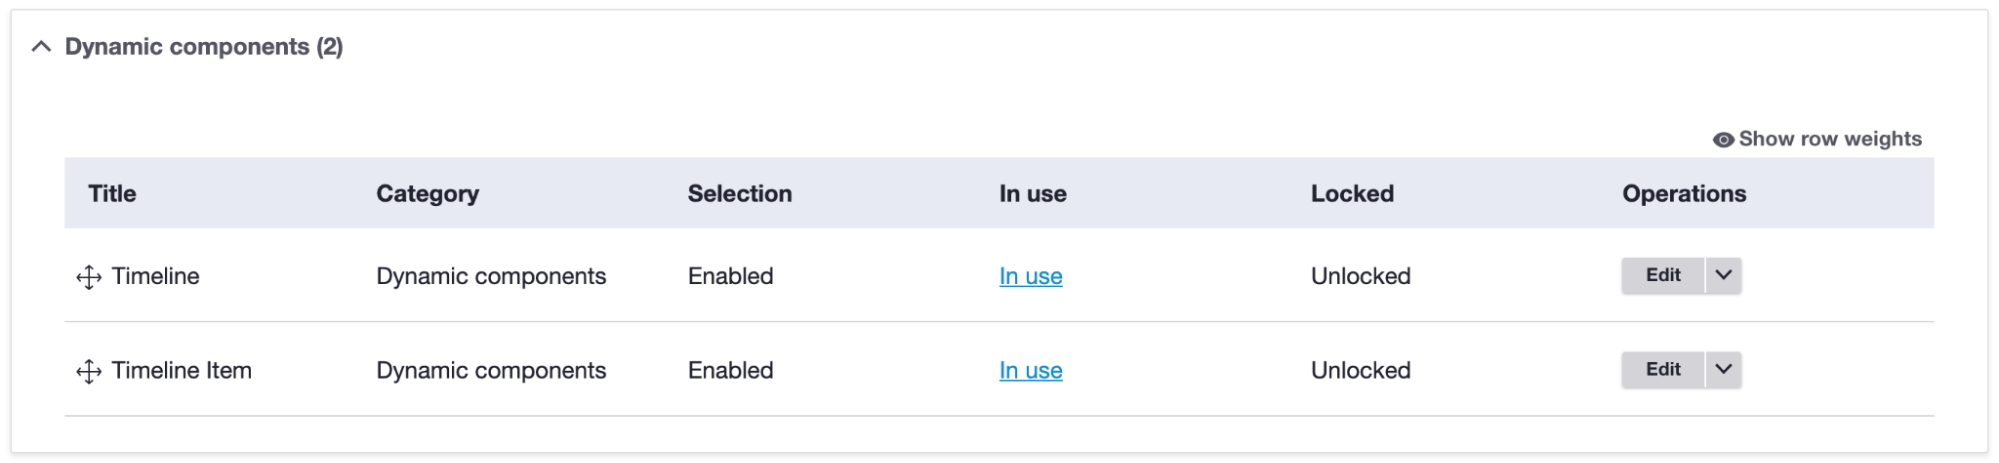
By navigating Site Studio > Components > Components > + Add components (admin/cohesion/components/components)
Timeline: This will act as a container component and the site manager/content editor can drop timeline items inside. This will have the following things,
- Timeline heading
- Timeline description
- Component dropzone for timeline item
- Select padding - Top and Bottom from Layout & style tab
- Help text (if needed)
Timeline item: This will act as a single item component and the site manager/content editor can drop/add multiple items. Site managers can also set timeline item positions as per requirement on the left or right side of the middle bar. This will have the following things,
- Component dropzone for Site Studio component
- Option to set timeline item position (Left or Right)
- Help text (if needed)
When we build Timeline it will look like:

When we build the Timeline item it will look like:
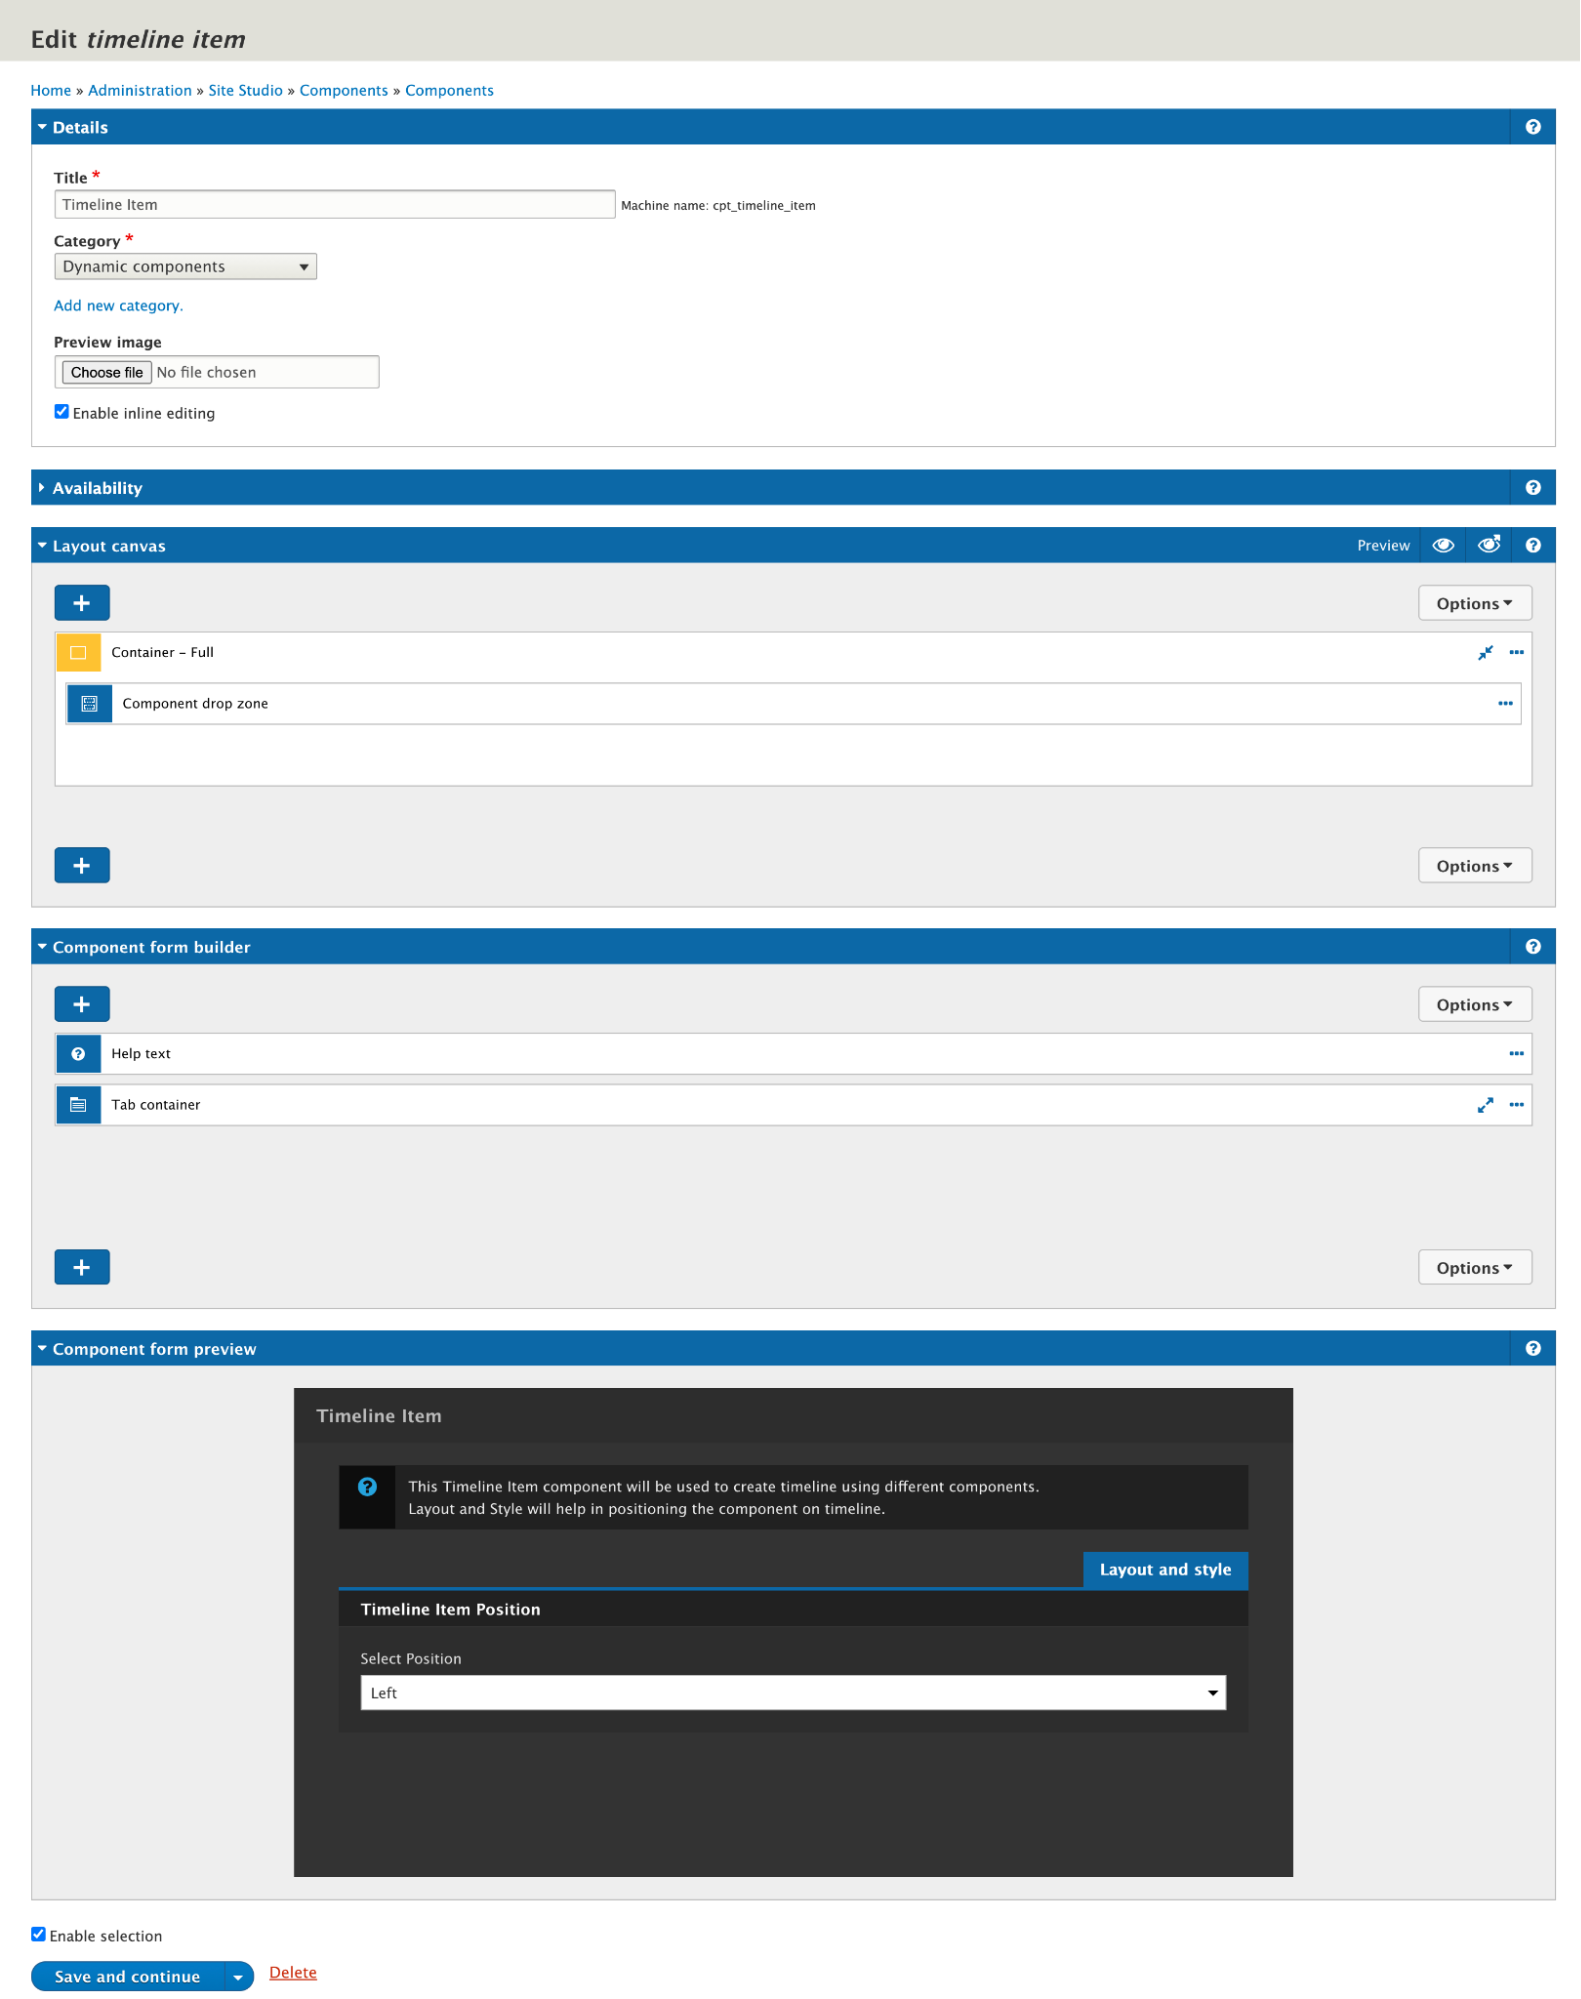
Styling of heading, description, vertical middle bar, auto-increment counter and then items positions left/right all are done inside these components only. We have taken a timeline reference from Super Simple Timeline.
Thank you for reading!
_1.avif "Configuration management with Acquia Site Studio")
Configuration management with Acquia Site Studio
Up till now, we have seen what Acquia Site Studio is and its power-packed features. Here in this blog, we are going to talk about the configuration feature of this product. The nightmare for any developer is to make the replica of their local/dev/QA/UAT instance to prod, especially when it comes to the configuration. So, now let’s see how Acquia Site Studio is immensely powerful to handle this without any hassle and that too without any code conflict.
When we export Site Studio configuration it creates one single file [project-name].package.yml with all Site Studio's settings like base styles, colours, custom styles, fonts, settings, components, templates, custom styles, etc etc. and we push the file on GitHub. Since it’s been a single configuration file, there are more chances to get a conflict for another developer and if we are thinking about resolving conflicts errors manually then it’s more hectic work because generated file data is mostly in JSON values and not easy to resolve.
So to resolve this we have another approach to manage Site Studio configuration in a modular way. It will have a single file for each individual base styles, colours, custom styles, fonts, settings, components, templates, custom styles, etc. Let’s see how we should manage this Site Studio configuration.
Before development
Sync your project with the latest code base and database.
After development
Export your Site Studio packages to commit your changes. Create a new package or edit an existing package in the admin UI.
New package
- Navigate to 'Sync packages' in the Admin UI: /admin/cohesion/sync/packages
- Click 'Add package' button: admin/cohesion/sync/packages/add
- Add a helpful title and description.
- Title: <Site Studio ITEM TYPE> <ITEM TITLE> . Example: Component One Column Layout
- Machine name: (Automatic - adjust if necessary). Example: pack_component_one_column_layout
- Description: A component for content with a 1 column layout.
- Scroll to 'Package requirements' and select the Site Studio entity to include in the package.
- Click the 'Build package' button.
- Open 'Package contents' and only include the single Site Studio item you are exporting. If you have more than one item, create or edit a package for each one.
- Click the 'Save package' button.
- Click the 'Export package as file' button beside the specific package.
- Rename the downloaded file from cohesion_sync_package_(pack_component_one_column_layout)_component-one-columnn-layout.package.yml to cohesion_component-one-columnn-layout.package.yml_. Ensure your file has the trailing underscore.
- Place your file in your Site Studio config split directory: project_root/config/site_studio_sync/
- Edit the package .yml file to verify it contains no dependencies. It should look similar to:
type: cohesion_base_styles
export:
uuid: <UID>
langcode: en
status: true
dependencies: { }
id: heading_1
label: 'Heading 1'
json_values: '{{ [json string] }}'
last_entity_update: entityupdate_0030
locked: false
modified: true
selectable: false
custom: null - Add config file(s) to git and commit.
Existing package
- Navigate to 'Sync packages' in the Admin UI: /admin/cohesion/sync/packages
- Edit the package that will contain the updated Site Studio item.
- Follow the steps above from step 7.
Site Studio item type naming convention
- All base styles can be exported as a single package with the file name cohesion_base-styles.package.yml_.
- All colours can be exported as a single package with the file name cohesion_base-styles-colors.package.yml_.
- All component categories can be exported as a single package with the file name cohesion_component-categories.package.yml_.
- Each individual component should be exported as a single package with the file naming convention cohesion_component-[component-name].package.yml_.
- Each individual content template should be exported as a single package with the file naming convention cohesion_content-template-[template-name].package.yml_.
- Each individual custom style should be exported as a single package with the file naming convention cohesion_custom-style-[custom-style-name].package.yml_.
- Each individual font library should be exported as a single package with the file naming convention cohesion_font-library-[font-name].package.yml_.
- Each individual font stack should be exported as a single package with the file naming convention cohesion_font-stack-[font-stack-name].package.yml_.
- All helper categories can be exported as a single package with the file name cohesion_helper-categories.package.yml_.
- Each individual helper should be exported as a single package with the file naming convention cohesion_helper-[helper-name].package.yml_.
- Each individual style helper should be exported as a single package with the file naming convention cohesion_style-helper-[style-helper-name].package.yml_.
- Each individual icon library should be exported as a single package with the file naming convention cohesion_icon-library-[icon-library-name].package.yml_.
- Each individual menu template should be exported as a single package with the file naming convention cohesion_menu-template-[menu-name].package.yml_.
- Each individual master template should be exported as a single package with the file naming convention cohesion_[template-name].package.yml_.
- For example: cohesion_master-template.package.yml_ and cohesion_master-template-boxed.package.yml_
- Each individual views template should be exported as a single package with the file naming convention cohesion_views-template-[views-template-name].package.yml_.
- All website settings can be exported as a single package with the file name cohesion_website-settings.package.yml_.
- (Note: Remove font stacks, colors, etc. and only export website settings.)
When you are exporting any base style, colours, custom styles, components, templates etc. that time select only that particular base style, colours, custom styles, components, templates and its related file because we are creating separate package files for every configuration.
In the below example, You can see only the Site header component is selected and its related files are selected.

This modular way of configuration management resolved the git merge conflict since there are separate files for each and every website settings, styles, components, helpers, templates, etc. etc. so there will be separate package files for each individual like the above naming convention and screenshot instead of one single file of all config.
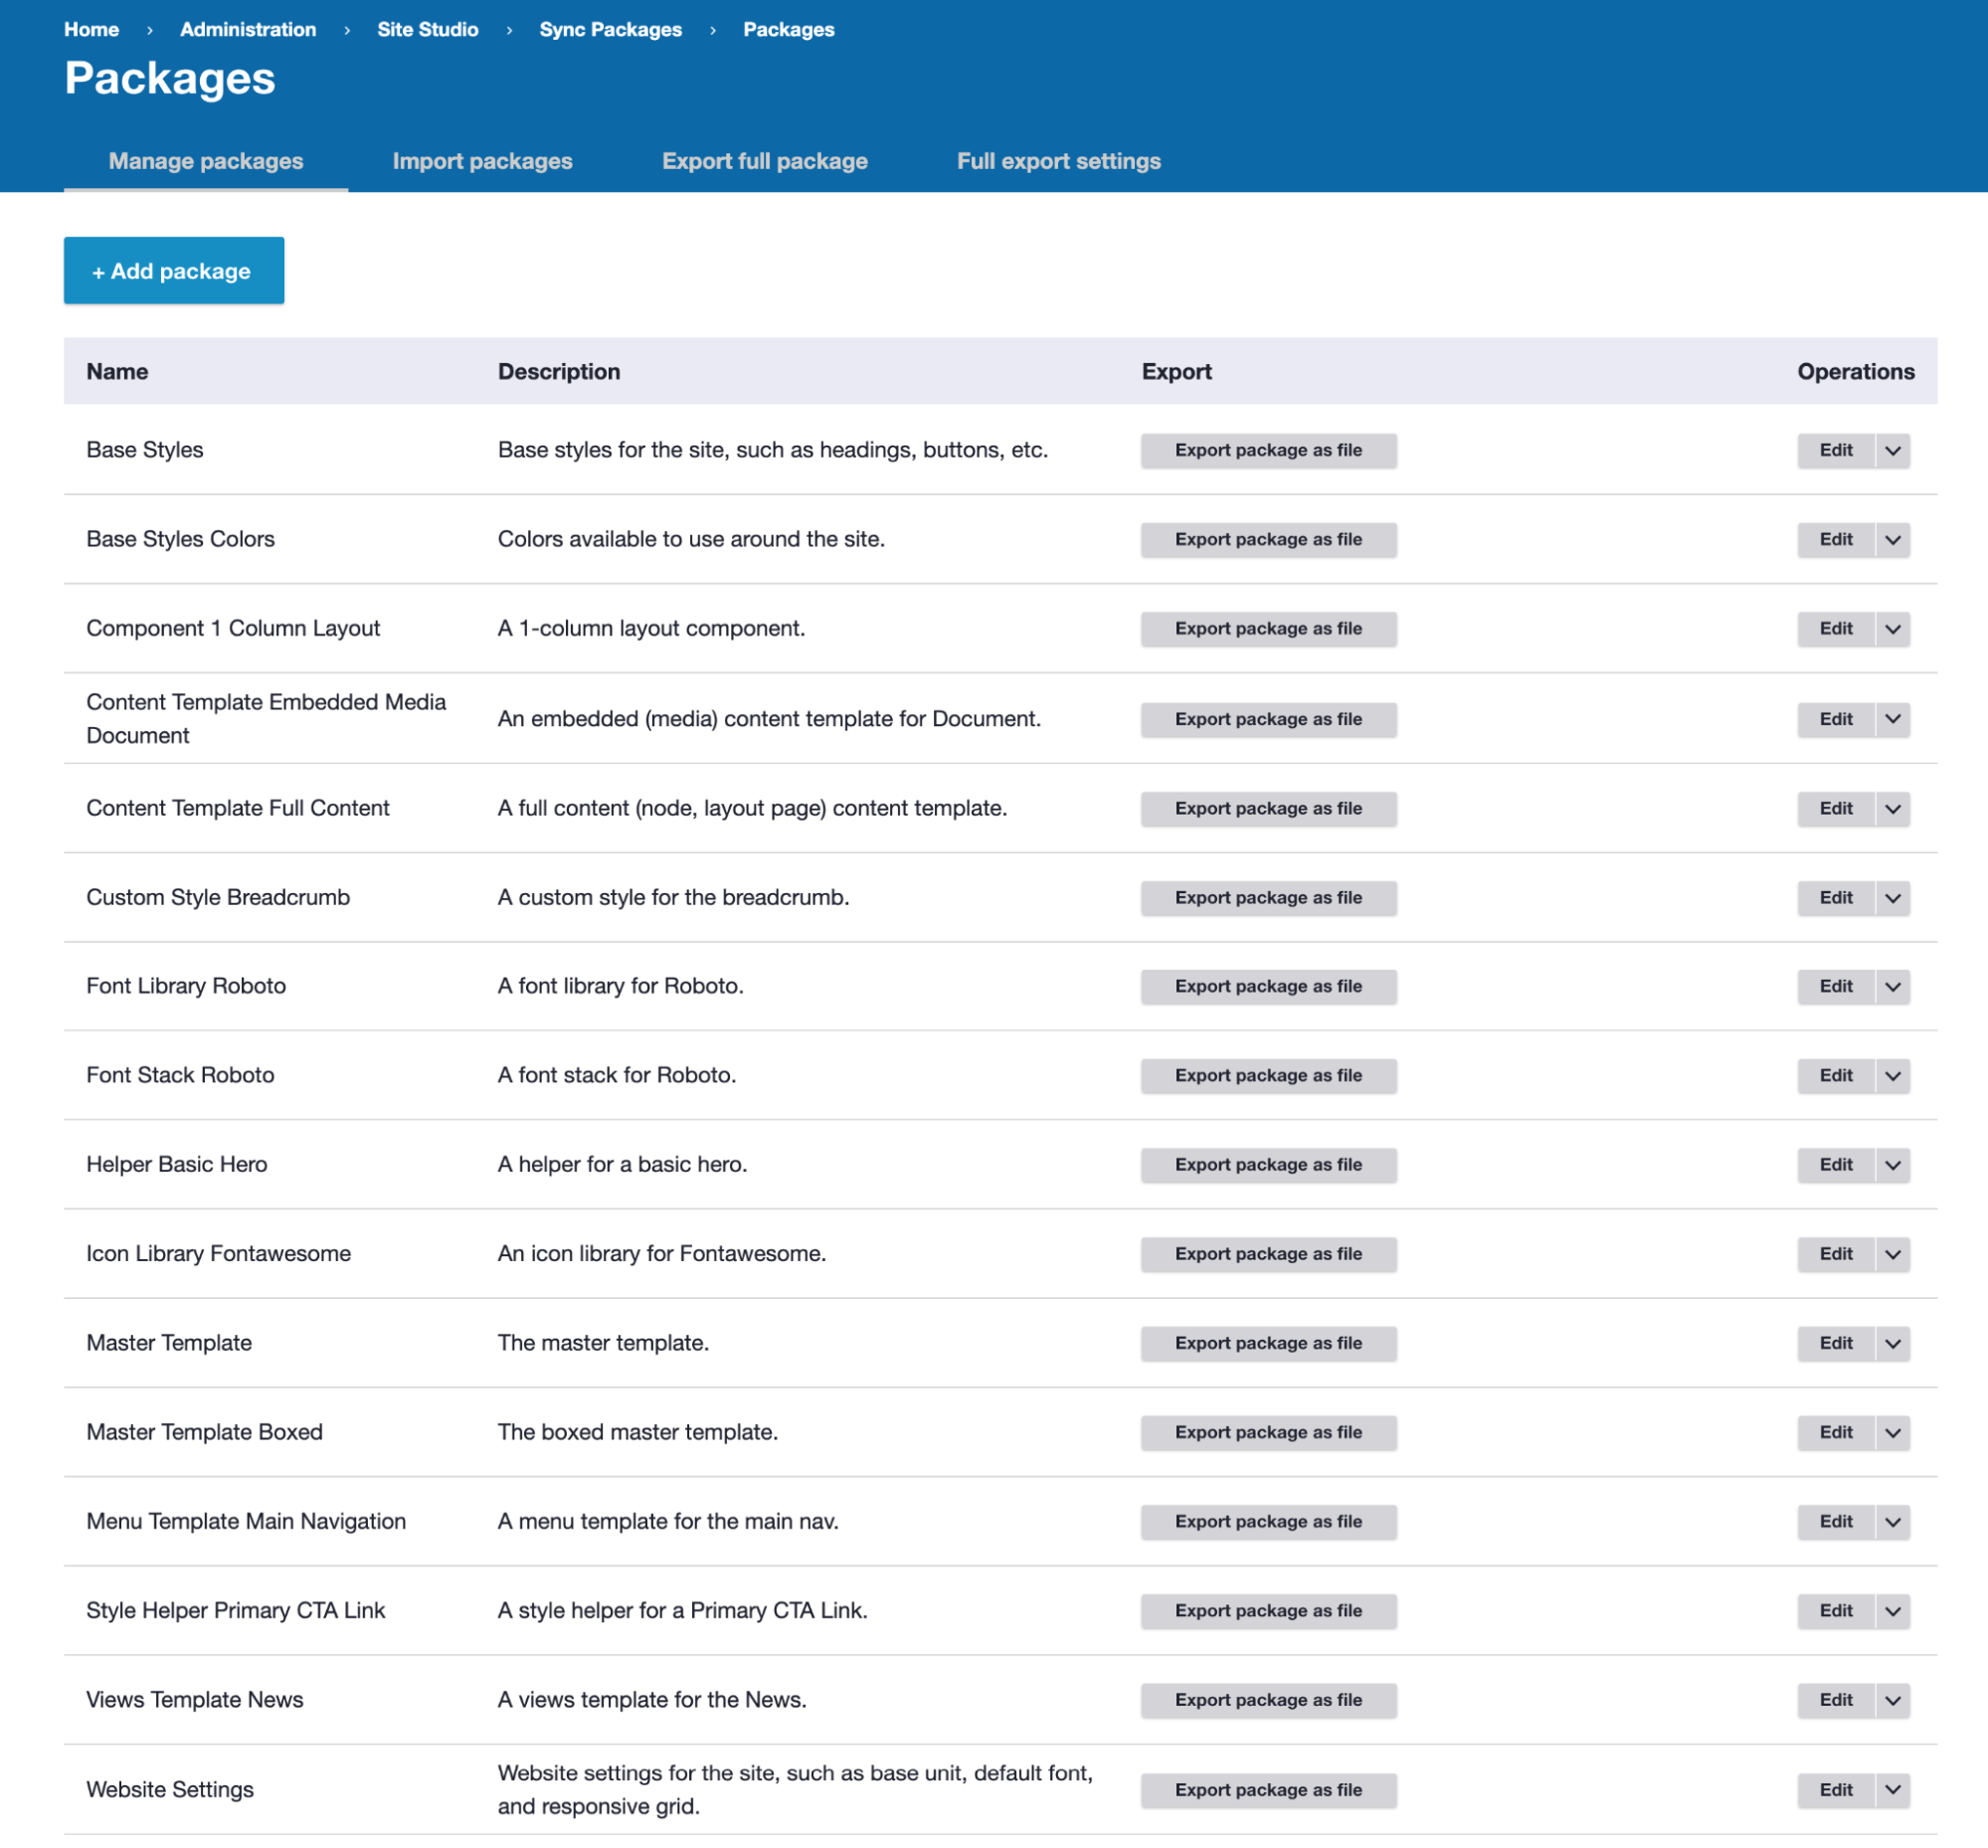
More resources
Site Studio Drush commands
All available Drush commands can be found in Cohesion docs
- drush cohesion:import - Runs an Site Studio asset import from the API, this is usually run when upgrading Site Studio
- drush cohesion:rebuild - Runs an Site Studio rebuild, this will re-save Site Studio settings, styles and templates
- drush sync:export - Exports all Site Studio configuration to the sync folder as a .yml_ file
- drush sync:export --filename-prefix=myfilenamehere - Exports all Site Studio configuration to the sync folder as a .yml_ file with a custom filename rather than using the website's name
- drush sync:import --overwrite-all - Imports all Site Studio configuration from the sync folder and overwrite existing Site Studio configuration
- drush sync:import --keep-all - Imports all Site Studio configuration from the sync folder and keeps existing Site Studio configuration and only imports new configuration
Coding standards
General rules:
- Only include numbers when using pixel values in fields -- don't include px. Site Studio will automatically convert numbers without units into rem units based on the
Site Studio > Website Settings > Base Unit Settings size. - Include the name of any added id and class(es) to the Site Studio object title. This helps everyone understand which objects house id/class-based styles. Example: Sidebar Column - .sidebar as the name of the sidebar column container.
Base Styles
Only use base styles for Global selectors and any items you do not want to include a prefix of .coh-.
Custom Styles
All custom styles will get a prefix of .coh-. You can then add this markup to templates.
Templates
Keep styles inside a template if they won't be used elsewhere. This helps with maintainability and portability.
Thank you for reading!
.avif "DrupalCon Europe 2021: Everything we’re excited about!")
DrupalCon Europe 2021: Everything we’re excited about!
Bringing together the greatest Drupal minds from all over the world on one stage, DrupalCon Europe is back again bringing much excitement to the community. Having something in store for all business verticals, the highlight of this year’s DrupalCon are the Drupal Camps which are being organized in 7 cities throughout Europe.
Scheduled to happen from October 4 till October 7, 2021, DrupalCon Europe 2021 is being hosted as a virtual event open for anyone to attend after registration. There are a total of 90 sessions scheduled to take place over the course of four days under five different tracks.
Keynote sessions of DrupalCon Europe 2021
There are a total of four keynote sessions happening on each of the four days of DrupalCon. The most eminent personalities from the tech community are the Keynote speakers of this year’s event.
Here is a list of Keynote events that you should look out for:
- Sound Ideas: Unlocking Creativity - LJ Rich, a world-renowned musician and presenter of BBC’s international technology show called BBC Click will be presenting her session on October 4, 2021. Her session will revolve around the interaction of music and technology in the AI space.
- Build vs Buy - Pfizer and Open Source - This session by Pfizer’s Richard Jones, Dick Olsson, and Jess Romeo is scheduled for October 5 2021. This session will revolve around Pfizer’s opensource journey and will throw light on how Pfizer has used Drupal to its advantage.
- Driesnote - The most awaited keynote session in DrupalCon, Driesnote is the session by the founder of Drupal itself, Dries Buytaert. In his keynote session, Dries will update the audience on the Drupal project and will also talk about the development of Drupal. His session is scheduled for October 6, 2021.
- Drupal Core Initiative Leads - One of the most informative sessions in DrupalCon, this assembly will entail everything that’s happening in and around the Drupal community. This is the third instalment of this keynote and will also have samples of Drupal community leaders and what they’re currently working on. This session is scheduled for October 7, 2021.
Let's hear it for Drupal Camps
Bringing the local Drupal Camps into the ambit of DrupalCon, this year’s convention will witness the forces of this regional and global community joining hands together to make DrupalCon a success.
The camps will benefit from increased visibility of the audience attending DrupalCon, so the participants can cherry-pick which Drupal Camps they want to travel to, next year when DrupalCon won't be virtual anymore. Furthermore, this year, DrupalJam has been made a part of DrupalCon, so the best minds of the industry will share their insights right in DrupalCon itself.
Here is a list of all the Drupal Camps:
- Drupaljam, The Netherlands
- Drupal Mountain Camp, Switzerland
- Drupal Germany
- DrupalCamp Kyiv
- DrupalCamp Finland
- DrupalCamp Belgium - Ghent 2021
- Drupal Wrocław
We’ll be there as well
Not to forget, we too will be presenting sessions at DrupalCon Europe 2021. Here is a full list of our sessions:
- How Drupal internship can help the Drupal project and your organization: Selected as a featured session, this seminar by Jay Kandhari will shed light on QED42’s journey of contributing to the Drupal talent pool. He will also discuss how training the interns with the right approach can be beneficial to your organization, not just the community.
- A Sustainable Approach Drupal Contributions: This session by Mohit Aghera and Piyuesh Kumar will focus on what has helped us plan long-term commitments to the Drupal Projects and helped build an effective contribution culture.
- Always fresh, cacheable content using Cache Tags, Purge and Akamai: This presentation by Hemant Gupta ̣and Graham Arrowsmith will focus on practices to have content that is ‘always cacheable’ using cache variations.
- A better experience for everyone - Accessibility: Bringing you an inside view of Accessibility, Nikita Aswani in her session will take us through what it really means to be accessible. Nikita in her session will also highlight the importance of empath in being accessible and how the two are interlinked to each other.
- How to empower your marketing team with a DIY Layout Builder using Paragraphs: This session by Ruchika Mohite and Abhai Sasidharan will share insights around how we enhanced the Paragraph’s module of Drupal to create a drag and drop user interface to create flexible web pages.
- Introduction to the Bug Smash Initiative: If giving back to the Drupal community is something that is on your task list, then this session is for you. A deep dive into the Bug Smash initiative, this session by Mohit and Frank will take you through the introduction, initiative, and how you can be a part of the initiative.
- Things a professional services firm should do to thrive: In this session, Abhay Kumar will take us through what makes or breaks a service firm. He will also apprise the audience of the strategies that multinationals have deployed to increase brand value, enhance delivery & sales etc.
Why you should attend DrupalCon Europe 2021
If, even after reading through this blog you’re still thinking if you should attend or not, here is one more reason for you. Being a silver sponsor of DrupalCon Europe 2021, we are thrilled to highlight that we will soon be announcing some cool live booth talks, panel discussions and exciting giveaways in our endeavour of making DrupalCon a huge success. Watch this space for more information.

How Drupal drives impact and engagement for non-profits
The internet, a repository of collective knowledge, has revolutionized nearly every aspect of human life, enabling individuals worldwide. Its reach extends far and wide, offering not only commercial opportunities but also serving as a beacon of hope for non-profit organizations.
As a non-profit organization, you are serving a major role in the society. It is pivotal for you to succeed in your mission so that all of us can succeed together.
That is why, when building a digital ecosystem, you must ensure that the backbone of your digital infrastructure is as strong as your motives. This is where Drupal outshines all other platforms out there.
Drupal isn't just a content management system; it's a powerful platform tailored to meet the unique needs of non-profit organizations. With a suite of features designed to streamline operations, enhance security, and expand reach, Drupal enables non-profits to maximize their impact in the digital landscape. Recently, Drupal also achieved recognition as a Digital Public Good which makes it the best choice for building a digital presence in the public sector, educational, and social-impact organizations as it adds a significant value.
What do Rotary International, Doctors Without Borders, Habitat for Humanity International, and World Vision International have in common, apart from the fact that they’re all non-profits? - All of them leveraged Drupal for their Digital presence.
According to Drupal Organization, “Drupal is the open-source CMS choice for some of the world’s most influential nonprofits to create, customize, and amplify their mission in order to effect real-world change.”
Benefits that make Drupal an indispensable tool for non-profits

Simplified content authoring experience: With Drupal’s CKEditor, you can efficiently organize and manage your content without any dependencies on the development teams. Drupal comes with modules that enable content moderation that prevents unauthorized or malicious publishing of content.
Accessible for all: Drupal community has provided features that make platforms built on Drupal accessible to all. Coming with a host of different accessibility modules, Drupal allows customization according to the needs of your audience amplifying your reach and impact.
Component-based UI/UX flexibility: With PHP templates replaced by Twig templates, Drupal gives the flexibility of having a component-based design that allows editors to create and update pages with a simple drag-and-drop function.
Enhances Security: Drupal brings to the table various Modules that will add a few extra layers of enhanced security measures ensuring trust within your community with robust security measures that protect your user data.
Tailored online presence: Having features like anonymous targeting, UTM targeting, and one of the most comprehensive customer data trackers, you can be assured that the experience you are offering to your audience is personalized for their consumption which enables to create awareness of the cause, and build trust.
Supports multiple languages: The amount of language data that Drupal can process is unmatched in the industry. Allowing you to communicate to a wider audience in a much more comprehensive manner. Having features like translating site interfaces and language negotiations, Drupal is built in a way that it can handle 94 different languages. Modules like content translation and interface translation add to the multi-lingual support.
Responsive designs: With as much as 92.6 percent of the global internet population accessing the web through their mobile devices, it becomes important for you to have the needed fluidity in your ecosystem. The latest versions of Drupal boast not just a mobile-friendly approach, but rather a mobile-first approach.
Cost-effective solutions: Drupal’s open-source makes it easier for developers to implement web solutions tailored to your needs by reducing development and maintenance costs.
Scalability: As your mission grows, you won’t have to switch to a different content ecosystem because Drupal is built to scale. Its scalability and flexibility functionality make it easy to add new features, functionalities, and integrations as needed ensuring sustainability.
Search Engine Optimized: Coming out of the box with some optimization tools, you can be assured that Drupal will help you spread your message to as many users as possible. This will help you reach a wider audience by optimizing your content for search engines.
Third-party integrations: Having a plethora of modules that integrate with third-party vendors, Drupal provides a holistic framework, giving you features like analytics and reporting, omnichannel marketing automation, email marketing, social media tracking, and much more.
Multisite support: Bringing multiple platforms under one umbrella, Drupal multisite allows you to run several platforms from a single platform. Allowing you to have the same core code, contributed modules, and themes. All this while lowering your cost of ownership, giving you centralized management. This also lets you have efficient upgrades throughout your ecosystem.
Drupal Migration: Upgrading to Drupal’s latest version gives you access to modern, powerful tech that's perfect for today's users. Experience reimagined content authoring, an improved UI, simpler workflows, and alignment with evolving market dynamics.
Improved brand perception: Enhancing your brand’s credibility with a user-centric design considering the unique needs of the segment.
Robust site management and maintenance: Streamlining operations and maintenance for seamless performance and reliability. Prioritizing a robust user testing and feedback process, ensuring the effectiveness of solutions.
Essential Drupal modules to elevate your digital platform’s functionality
Modules are packages of PHP files that add certain requisite functionality for your vertical. Letting you pick and choose from a vast library of custom-built solutions, you can be sure that you’ll find a module for your specific need.

Here are some basic modules you should add right away:
Menu: This module allows you to place links within the space of your platform and sort them categorically, thus providing ease of navigation for the user.
Views: This module enables the administrator to create dynamic, customized lists that can be displayed in your content.
Drupal commerce: One of the biggest revenue streams, receiving donations for your non-profit cause can be achieved with ease.
Media module: This module allows you to have your digital media repository in one place, giving you the power to manage your content with much ease.
You can also choose from several themes that come out of the box. Or you can also build one from scratch on your Drupal platform.
The advantage of Drupal distributions
Drupal distributions are pre-made packages that give you customized solutions for your specific initiative. Offering copies of Drupal-made , different distributions cater to different needs of the developer.
This lets you come up with quick, functional, and organized pre-made features ready for deployment, with additional customization.
A free and open-source Drupal distribution, OpenAid is designed to help cause-driven organizations create fully operational platforms, effectively promoting their work and mobilizing their supporters.
CityGroups is a searchable public directory, that lets the user search for communities based on location or interests.
Giving power back to the masses, Open Outreach, another stunning distribution, gives the grassroots organization a fully functional platform with tools for events, blogging, and social media solutions.
A step further from Open Outreach, there is another distribution, Watershed Now, which adds fundraising capabilities, online advocacy, and geo-mapping.
QED42’s impact on non-profit initiatives with Drupal
Overhauling the digital landscape of ADA with Drupal 10 & multisite architecture
ADA revamped its online presence using the multisite capabilities we created. Our team successfully developed cohesive and intuitive platforms for ADA and its users, incorporating cutting-edge technologies and adhering to industry-leading practices in Drupal development.
The outcomes of the project include scalability of its digital infrastructure, unique designs for its audience, centralized content management, and robust security of user data.

Building Drupal-powered knowledge management platform for UNICEF
UNICEF revolutionized its knowledge sharing and collaboration within the organization with our digital solutions. We established a robust workflow that simplifies access to information across various websites. Content authors now have the flexibility to create and update information.
The outcomes of the project include easy accessibility of resources, customized features tailored to meet specific requirements, and robust security to protect sensitive information.

We have also deployed digital solutions among other non-profits which resulted in simplified content management, data mapping, robust site management, improved brand perception, tailored online presence, and easy accessibility.
How can we help you?
With a deep understanding of the unique needs of non-profits, we specialize in creating a visually stunning, accessible, and user-friendly digital presence that inspires action and fosters connections.
Our customizable Drupal solutions facilitate content authoring & workflow, third-party integrations, moderation tools, potential cost savings, end-to-end support, data collection, and security.
From responsive design to seamless integration of donation portals, you can leverage the full potential of your online presence to make a lasting impact in your communities and beyond!
Talk to our experts to know more about how we can customize Drupal solutions that fit your needs.
.avif "QED42 named as the #1 Drupal Development Firm in Clutch Leader Matrix 2021")
QED42 named as the #1 Drupal Development Firm in Clutch Leader Matrix 2021
We’re excited to announce that Clutch has named QED42 the Market Leader in their Leader Matrix for Drupal Development Firms in India.
QED42 is recognized for its ability to deliver intelligent, relevant and efficient digital experiences with Drupal. Clutch has ranked us as the #1 Drupal Development firm in India based on our technical capabilities, market presence and direct client reviews.

Clutch Leaders Matrix provides a view of the top-performing companies in a particular industry and considers a company’s client reviews and the level of specialization the company provides in a given service.
The Clutch Leaders Matrix evaluated 15 Drupal vendors across different categories such as the ability to deliver, service focus based on independent customer reviews. This matrix helps businesses to zero in on the Drupal Development partner that is right for their requirements.
The reviews posted on our Clutch profile demonstrate the quality of service provided to our diverse range of clients spanning from non-profit organizations to leading healthcare brands. For more information please visit our Clutch profile here.

With a 4.8/5 rating on customer satisfaction; today 200+ global customers trust us for our thoughtfully designed web and mobile experiences.
Few of our marquee clients include - Nestle, World Bank, HERE Technologies, HP, Sony, Stanford Graduation School of Business, ILAO, SABMiller, Grofers, Scholastic and many more.
Conclusion
Being recognized as the #1 Drupal Development Firm in India has further motivated us to continue co-creating the future through digital transformation. Learn more about our Drupal Development services and offerings here.

Implementing Right-To-Left Styling with CSS Logical Properties
Multilingual websites or multiple-language websites are a necessity these days. Most developers are comfortable in building multilingual websites with LTR (Left-To-Right) languages however, there are certain regions across the world that speak RTL (Right-To-Left) languages as well. Converting an LTR website to RTL can be challenging at times. Let's look at the challenges and approaches to convert a Left-to-Right website into a Right-To-Left website with the help of CSS logical properties.
How to add RTL languages to a multilingual website?
It is not difficult to achieve RTL website implementation while building a multilingual website. We just need to identify the properties which could impact the conversion from LTR to RTL and the traditional techniques being followed vs the new techniques introduced.
While converting the website from LTR to RTL, the properties on the left side of the webpage will be positioned on the right and vice-versa.
For example:
LTR: padding-left
RTL: padding-right
LTR: float: left
RTL: float: right
The traditional approach for converting LTR to RTL
Developers start with writing the CSS for LTR direction and override the required property using [direction=”rtl”] attribute of HTML tags.
On the other hand, developers who are familiar with SASS/LESS preprocessors create functions that will convert the LTR properties to RTL.
For example, the below-mentioned function will be useful to convert the left property to right in the RTL direction.
Limitations of the traditional LTR - RTL conversion method
This method requires the developers to be trained on the function when they start working on a project. They will have to remember this while writing the CSS properties each time. On the contrary, if the CSS itself provides these properties, the directional logic will be handled automatically.
Logical CSS properties that automatically convert RTL to LTR
As mentioned, we need to convert Left and Right to Right and Left respectively in the RTL direction. Below are the important properties that should be used along with the new logical property name to support the RTL direction:
Property name
New Logical Property name
margin-left
margin-inline-start
margin-right
margin-inline-end
padding-left
padding-inline-start
padding-right
padding-inline-right
border-left-{size|colour|style}
border-inline-start-{size|colour|style}
border-right-{size|colour|style}
border-inline-end-{size|colour|style}
left
inset-inline-start
right
inset-inline-end
Demo: https://codesandbox.io/s/css-logical-properties-demo-kgpsc
HTML:
CSS:
Screenshot:
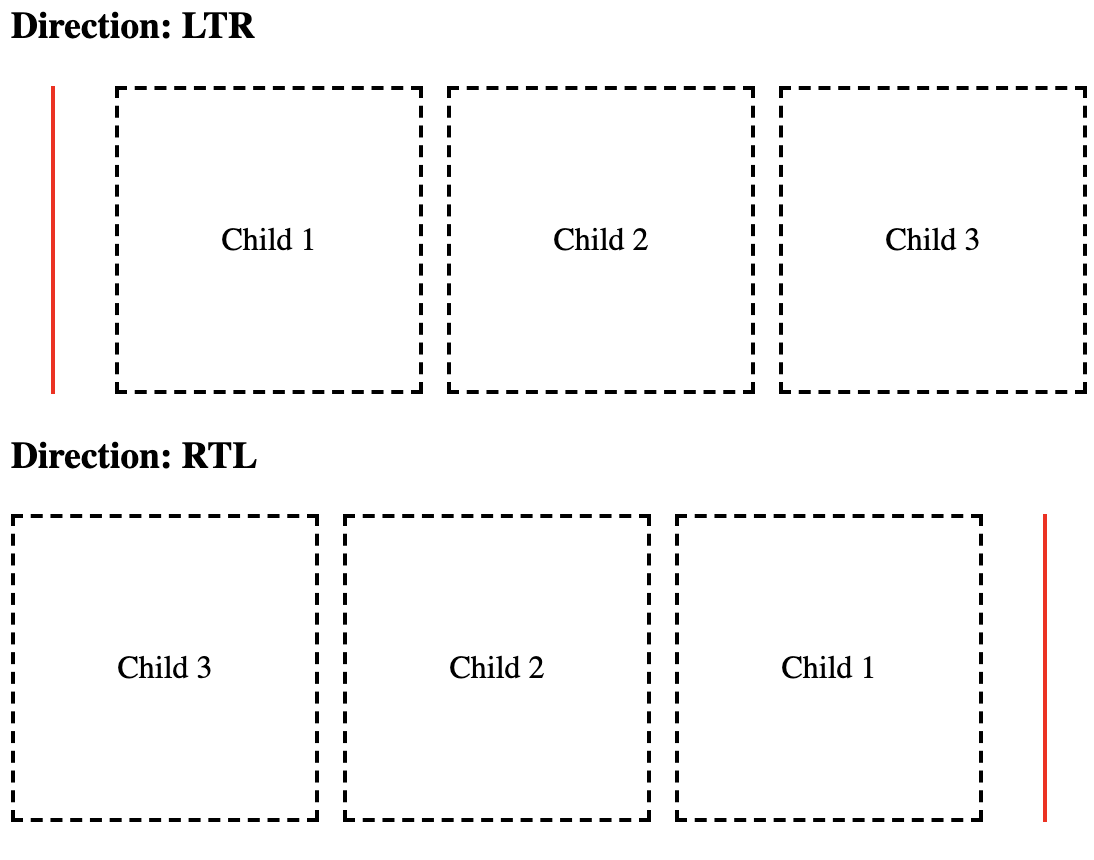
As per the above demonstration, it is visible that the CSS logical properties are working flawlessly on both LTR and RTL.
Stay tuned to know more about cool frontend features!

Decoupling Drupal Commerce with Next.js
Hoping you all are familiar with the term Headless/Decoupled Drupal, I won't be diving into the details. However, if you'd want to know more about what Headless Drupal is, you are just one click away from finding the secrets of the Headless world! Today we will demonstrate how Drupal's JSON API can be leveraged to create a Decoupled application with Next.js as our rendering layer and Drupal Commerce as the content hub.
As a starter here is what we will be covering in this blog post:
- Setting up your Drupal commerce site
- Setting up the Next.js site and fetching data from the Drupal site
- Working with the data (Create pages dynamically)
Note: We will follow this up and cover checkout functionality in another blog post.Here is a link to the starter package. This is still a work in progress but good to get you started
Set up your Drupal Commerce site
Drupal Commerce provides you with a starter project. This will make your content work easier as it provides you with some preconfigured products. Alternatively, you can set up your site from scratch by following the Commerce documentation here.
Once you are done installing the site, you need to do a few more things:
- Enable JSON API, JSON:API Resources, JSON API Hypermedia, and Commerce API module. You can also add the Simple OAuth module for authentication
- Add JSON resources cross bundle module and enable it or you can also create a custom resource for the listing of all products. (Note: The cross bundle module is not compatible with JSON API Extras.)
- Allow read and write permissions for JSON API
- Edit your services.yml file to allow cross-origin headers
Fetching data from the Drupal site
Here is a link to the starter package. This is still a work in progress but good to get you started. Go through the readme file to check how to set up your Next.js site.
This is how your homepage should look like:

Let me walk you through the folder structure and the code:
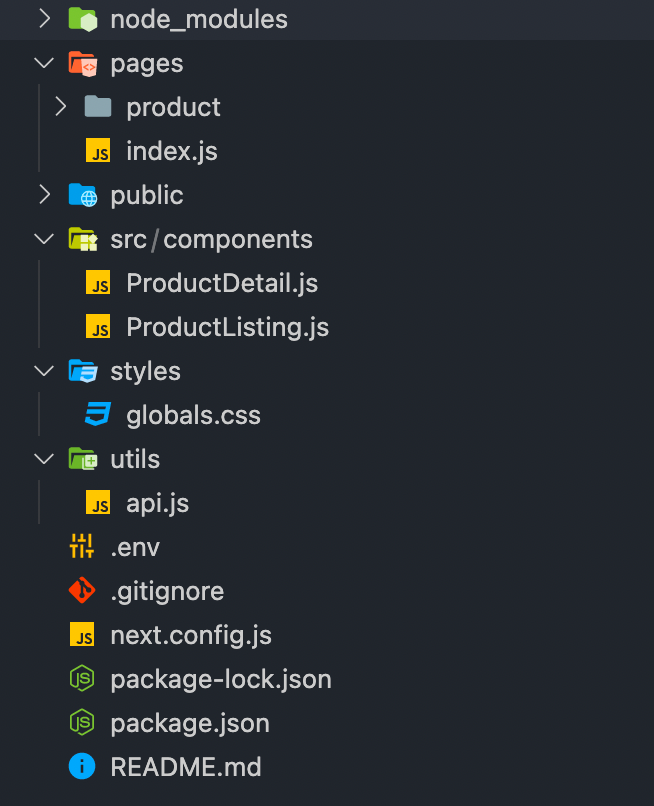
- Pages folder: As the name suggests this is where you are going to be adding your pages. Each page is associated with a route based on its file name. Next.js also supports dynamic page routing.
- Components folder: This is where we will abstract our functionality into different components.
- api.js file: This is where all the magic happens. This page contains all the code responsible for manipulating the API data.
- next.config.js: This file is not included in the browser build and is used by the server. You can read more about it here.
- .env file: This is where all your environment variables will be stored.
Creating pages
Here are some of the Next.js functions we will be using to fetch data at the build and run time.
- getStaticProps (Static Generation): Fetches data at build time
- getStaticPaths (Static Generation): Specifies dynamic routes to pre-render pages based on data
- getServerSideProps (Server-side Rendering): Fetches data on each request
- getInitialProps: Enables server-side rendering in a page and allows you to do initial data population, which means sending the page with the data already populated from the server. getInitialProps will disable Automatic Static Optimization For the initial page load, getInitialProps will run on the server only. getInitialProps will then run on the client when navigating to a different route via the next/link component or by using next/router. However, if getInitialProps is used in a custom _app.js, and the page being navigated to implements getServerSideProps, then getInitialProps will run on the server.
Creating Static Routes
As mentioned above each page in Next.js is associated with a route based on its file name. So the index.js file inside the pages folder will work as our homepage.
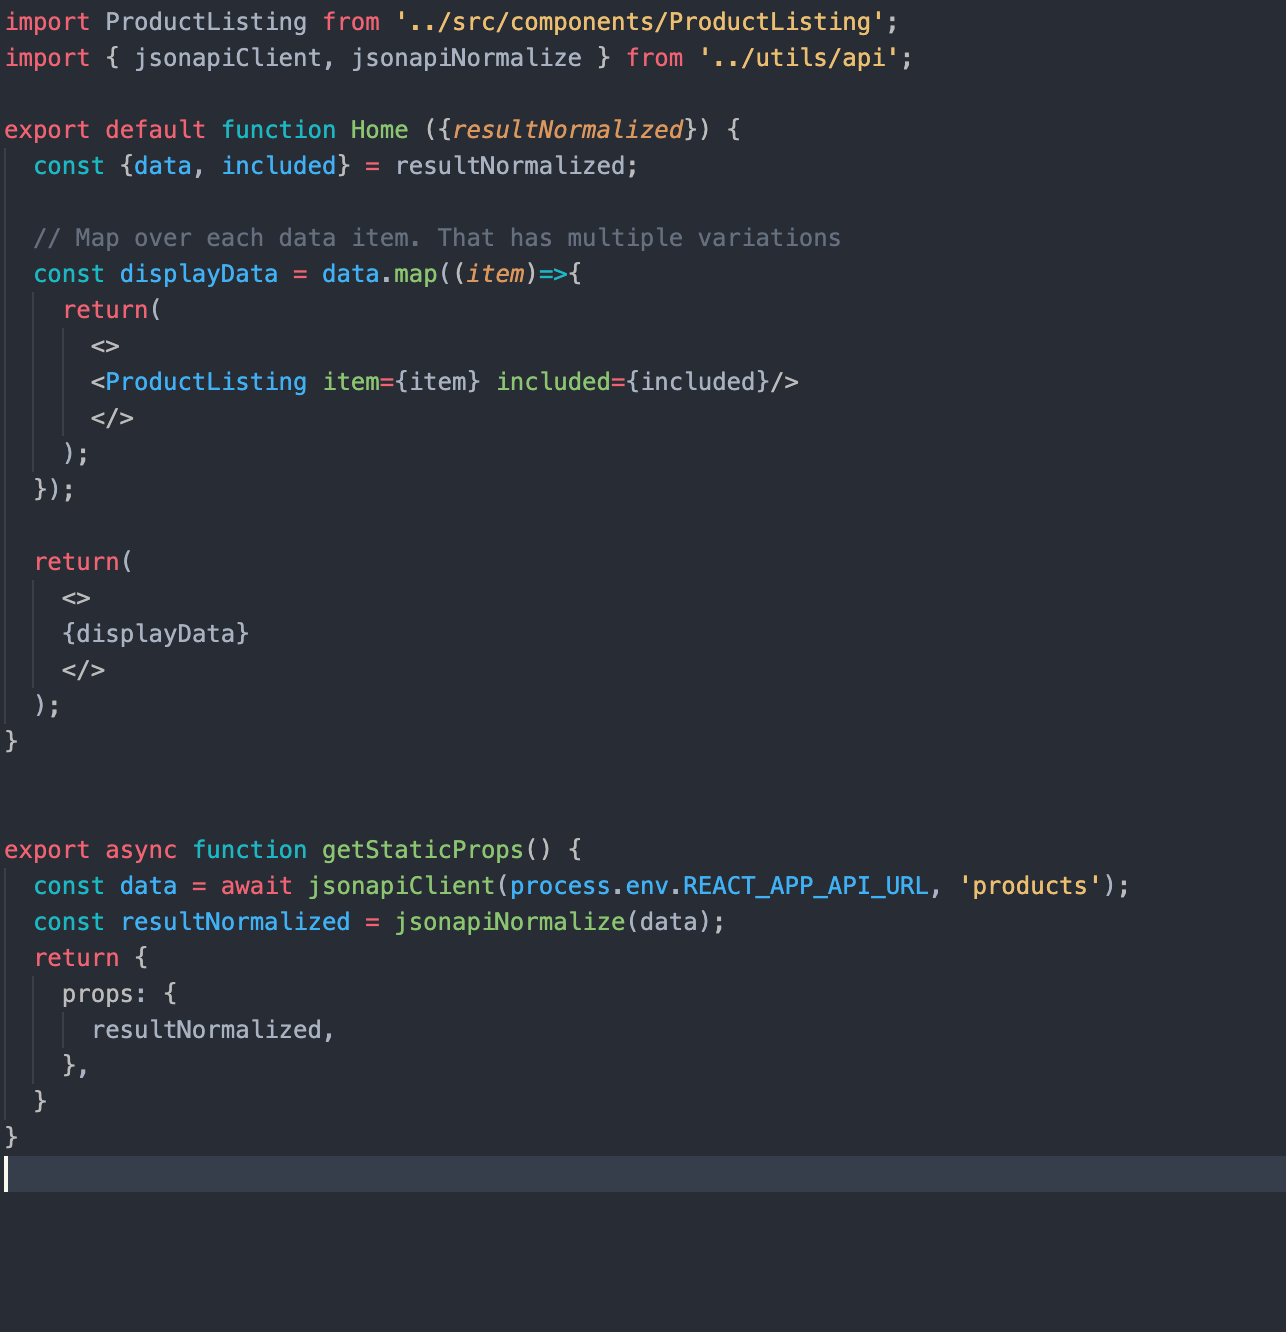
In getStaticProps, we are using our JSON:API Client (you can find the relevant code in the api.js file) to fetch the relevant data and filter it as per our needs. getStaticProps function returns the data as props to our default component which is further manipulated to get the desired result.
Creating dynamic routes
Next.js also supports dynamic page routing. In Next.js you can add brackets to a page ([param]) to create a dynamic route. Inside the product folder in the pages folder, we have created a file [id].js which will be responsible for creating our product detail pages.
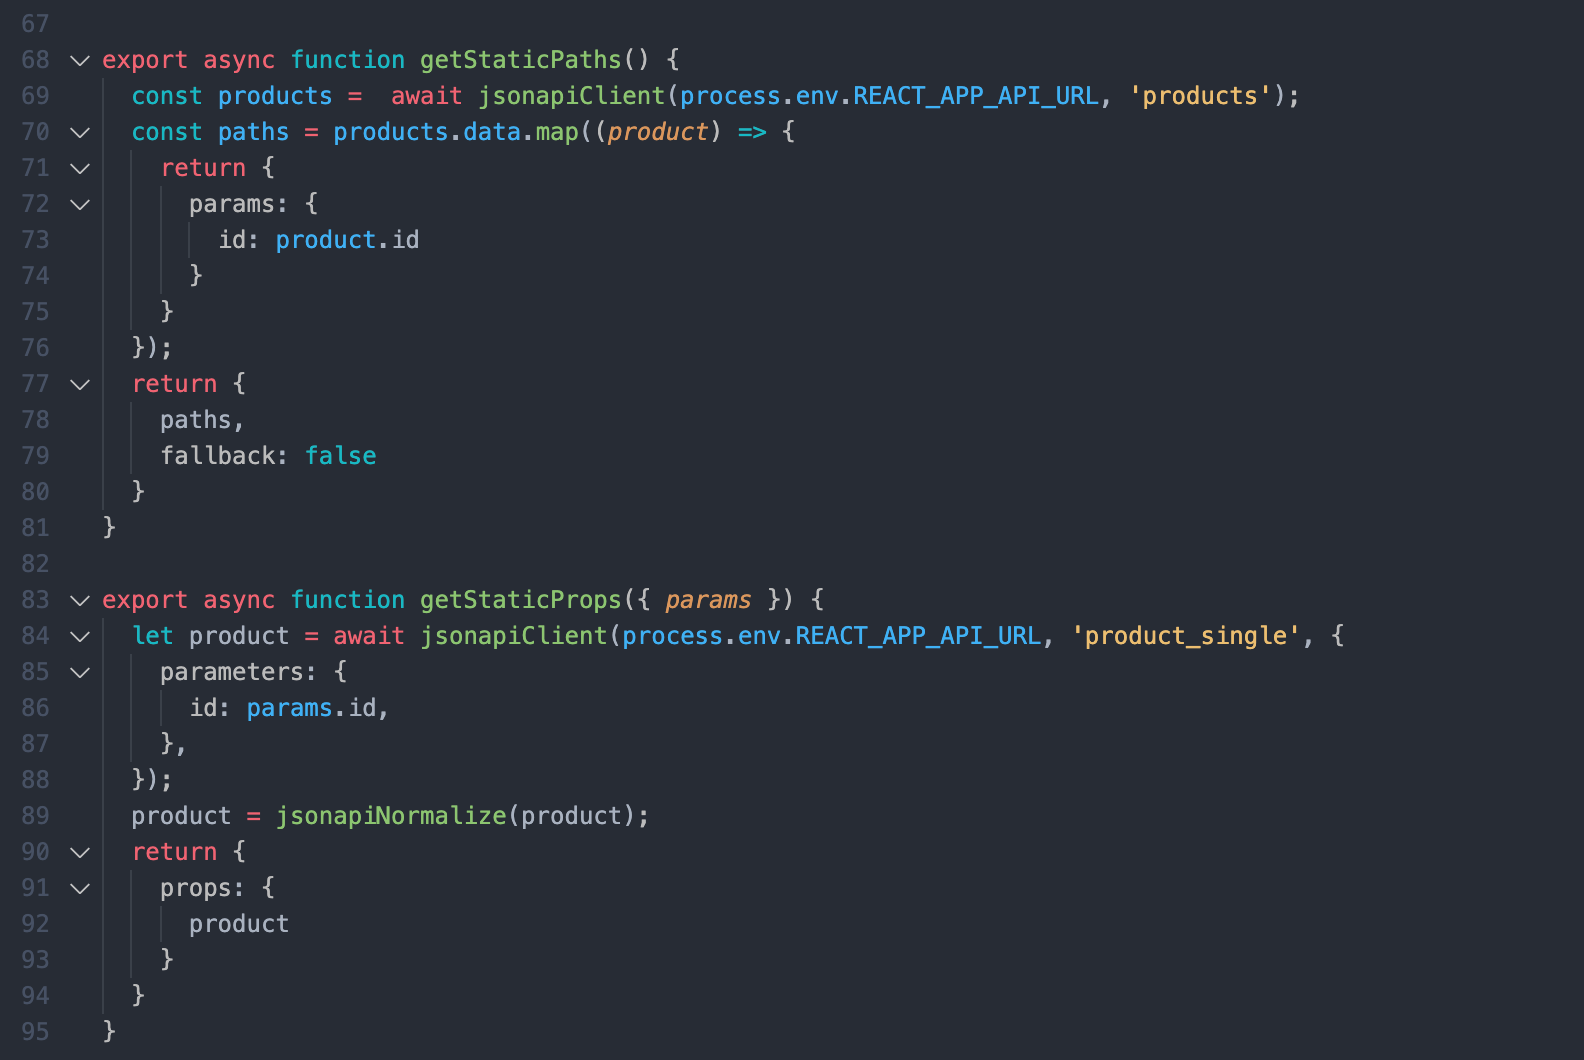
Here, getStaticPaths fetches the products id's for us and passes them as params to getStaticProps and get static props to pass the product data as props to the default product component.
Note that we are using the product id here. Because with JSON:API in Drupal you can't filter by path alias due to technical limitations. JSON:API filters translate to entity queries on field values; because Drupal path aliases aren't fields you can't use the filter query param to look up articles by their alias.
So to overcome this limitation we can use modules like:
- Decoupled Router: Which provides a new endpoint where a client can query a path for any possible JSON:API resources.
- Fieldable Path: Which provides a new entity field (and thus queryable via the filter query param) that is designed to mimic the entity's path (with Pathauto support). We will cover this in another blog post.
Another thing to note here is that for better a developer experience in development mode, getStaticProps and getStaticPaths run on every request otherwise they only run at build time.
Conclusion
This is it! You have set up a Decoupled site with a simple listing page and detail pages. As this is still a work in progress. If you face any difficulties please add your queries in the comments section below and I will be happy to answer!

Next.js for Decoupled Menus Initiative
Decoupled or Headless CMS fully or progressively decouples the frontend from the backend. In this approach, Drupal serves as a backend content vault, while one can choose a frontend technology that suits them best for a project. The Decoupled Menus initiative is a step towards exploring potential of Decoupled Drupal integration with various frameworks by making Drupal Menus as an API to be integrated with a modern JS framework such as React/Next.js. This idea has been officially launched as Drupal Core Strategic Initiative. You can find more information on this initiative here.
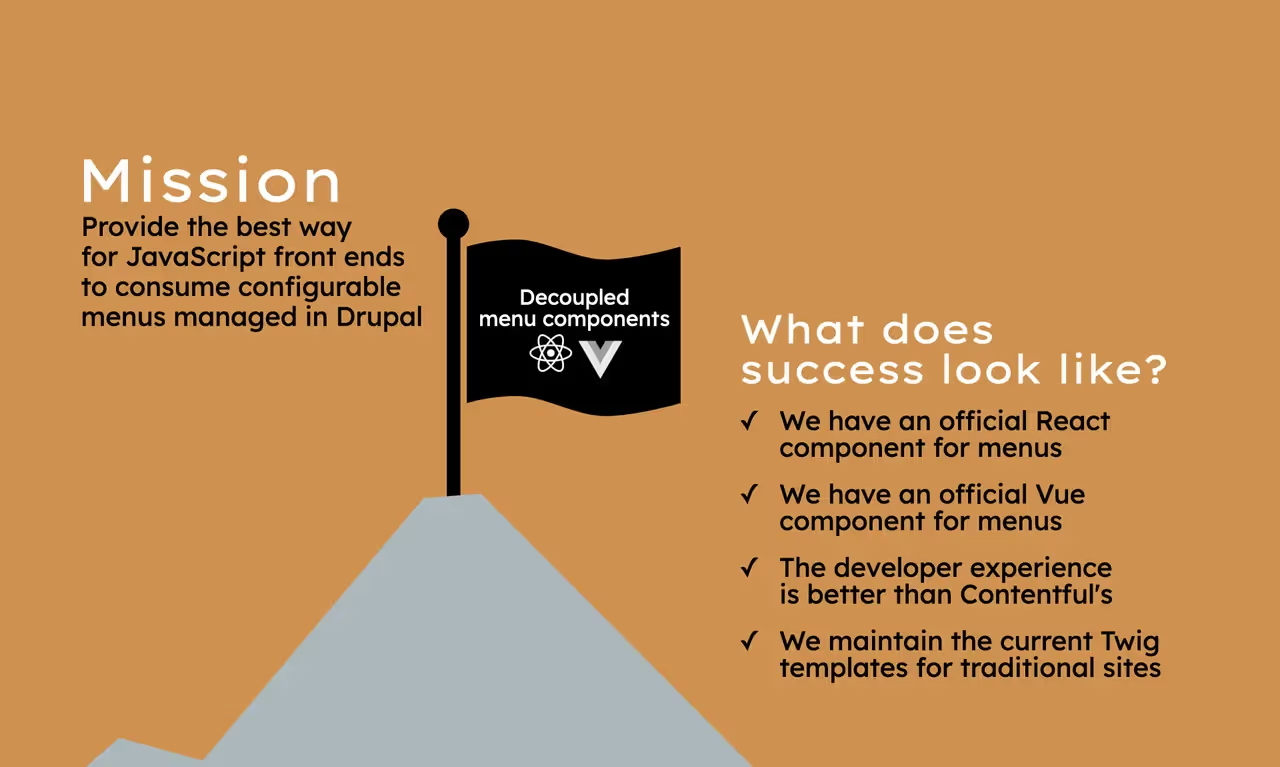
Source - Drupal.org
We, at QED42, have chosen NextJS - a Server Side Rendering and Static Generation framework of React as the frontend to pre-render the menu. Due to its features like prefetching, fast refresh, automatic routing, compilation and bundling, performance optimization, SEO, and much more.
Why do we Decouple our Menus?
Background: Every time a non-developer wants to change a menu item on the Drupal side, a developer has to get involved to implement it on the JS side. That developer must change and rebuild the code, and then deploy those changes to production. These steps may take days to complete depending on the availability of the developer, and the complexity of the deployment process.
The solution suggested by the Drupal team: By providing menu items via Drupal’s JSON:API, these deployment steps can be eliminated and a core Javascript package can reduce the lines of code that a JS developer has to write in the first place. Have a look at the Decoupled menus in Drupal Demo by Gabe Sullice for more details about the initiative, discussing the current user’s authentication status, menu hierarchies and dropdown, user-defined menu items and routing.
Other reasons are as follows –
- Recognize improvements for Headless CMS, with the menu as a use case
- Not all Drupal modules need to be modules
- Especially while updating the version of Drupal, most of these do not require the database and other features of Drupal
- Some Drupal modules do not make complete utilization of Drupal and can be built in other languages
- Shorter bandwidth to rebuild all modules in a reasonable timeframe.
- NextJS came into view because its modules are much simpler and faster to write.
- We can create features that are missing and much needed to develop.
- We do not want to create functionality that already exists.
- Make Decoupled Drupal and menus attractive to non-Drupal FE developers.
Please Note: You can join the Decoupled-menu-Initiative slack channel here. The weekly meetings take place every Tuesday at 14:00 UTC and again at 4:00 UTC at the Slack channel itself.
Our Goal
In support of this initiative, we will present you with a NextJS menu component that recursively renders the menu data provided by the Drupal API and displays it in the form of a dropdown. This can be considered Part-1 of our “NextJS for Decoupled menus” series. In this blog we will share the setup, components, prefetching and rendering of the menu. In the next part, we will be integrating this with Drupal.
Deployed on: https://nextjs-decoupled-menus.vercel.app/
A glimpse of the Drupal menu API (data)
The menu APIs provided by Drupal have JSON data stored in a linear structure rather than a hierarchical structure. Therefore, a frontend developer has to construct a tree-like hierarchy from the data to render the menu in a drop-down format. That is what we have focused on currently and have explained in the next section. Given below are the APIs, with the Drupal-menu-hierarchy key for each sub-menu, revealing its hierarchy level.
https://decoupled-menus.jsonapi.dev/system/menu/Drupal-wiki/linkset
https://decoupled-menus.jsonapi.dev/system/menu/main/linkset
What does our NextJS code do – Static Generation
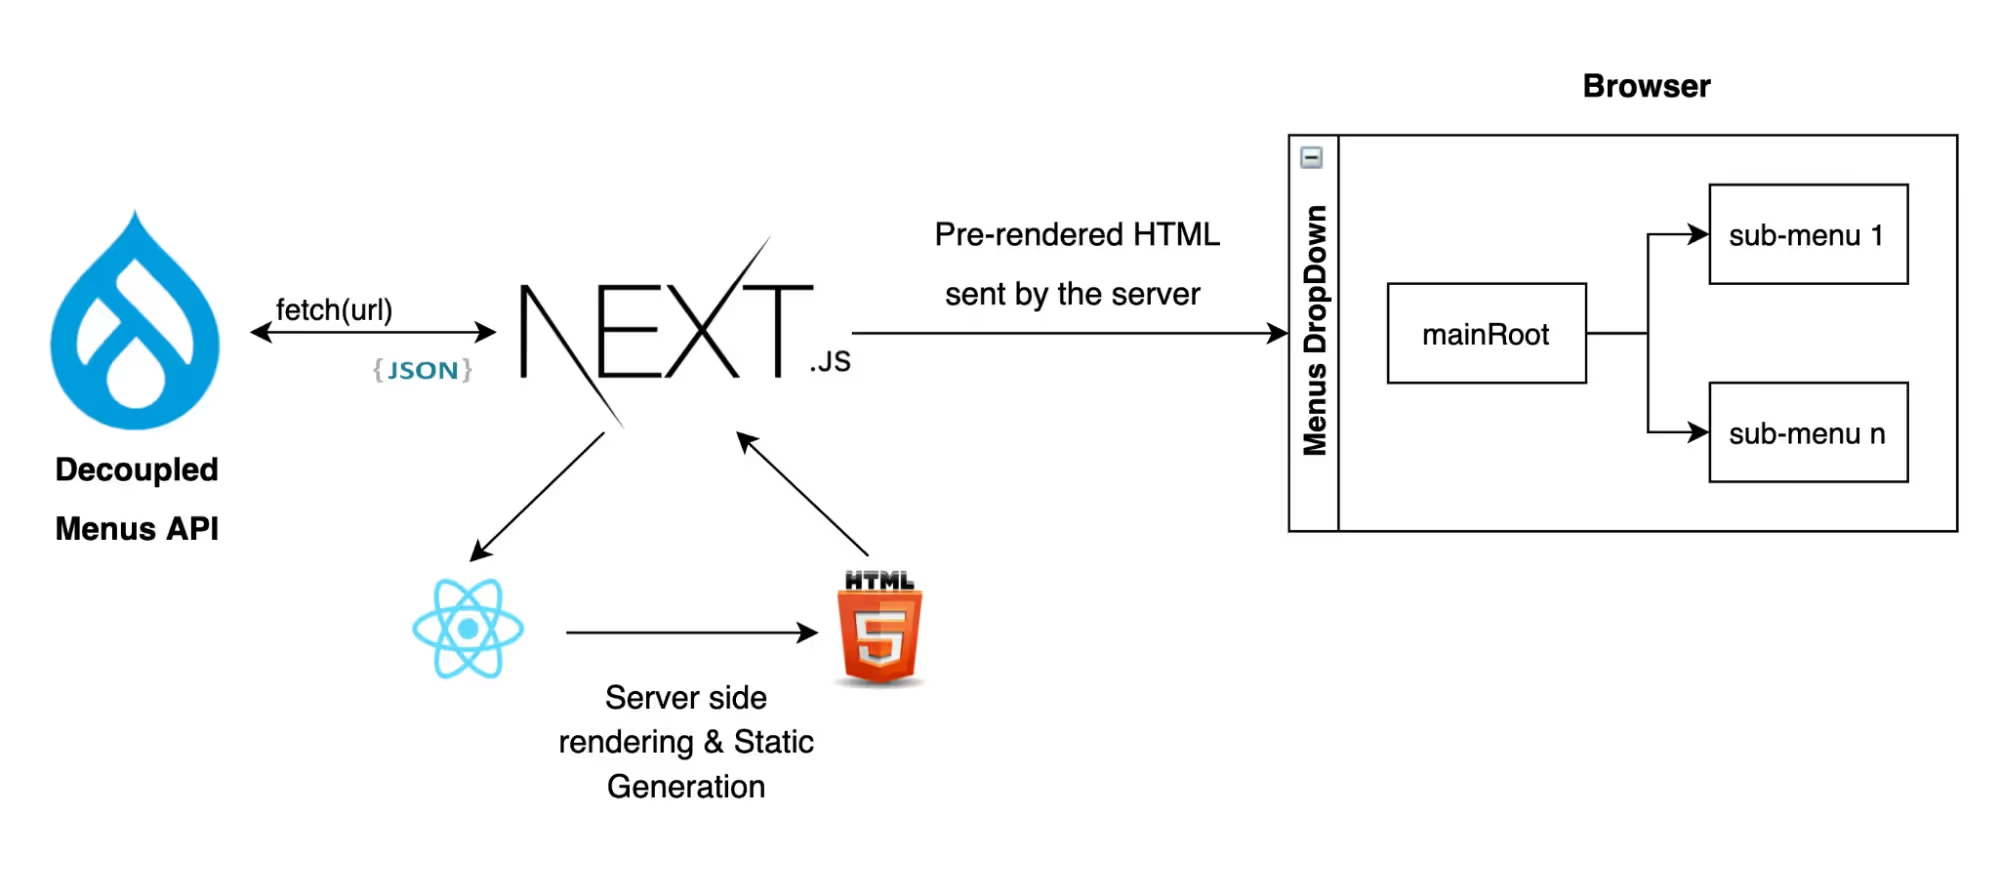
Architectural Diagram of Current Application Structure
The following steps describe the functionality of our existing application –
Step 1: The_app.js is the root file of our application. The Component returned by it is wrapped in our custom Layout component, with page properties passed as children. This file also utilizes the Head Component of NextJS as the header of a page and includes the title and all the meta-tags that are one of the reasons for our 100% SEO.
https://github.com/vertikajain/nextjs-decoupled-menus/blob/main/pages/_app.js
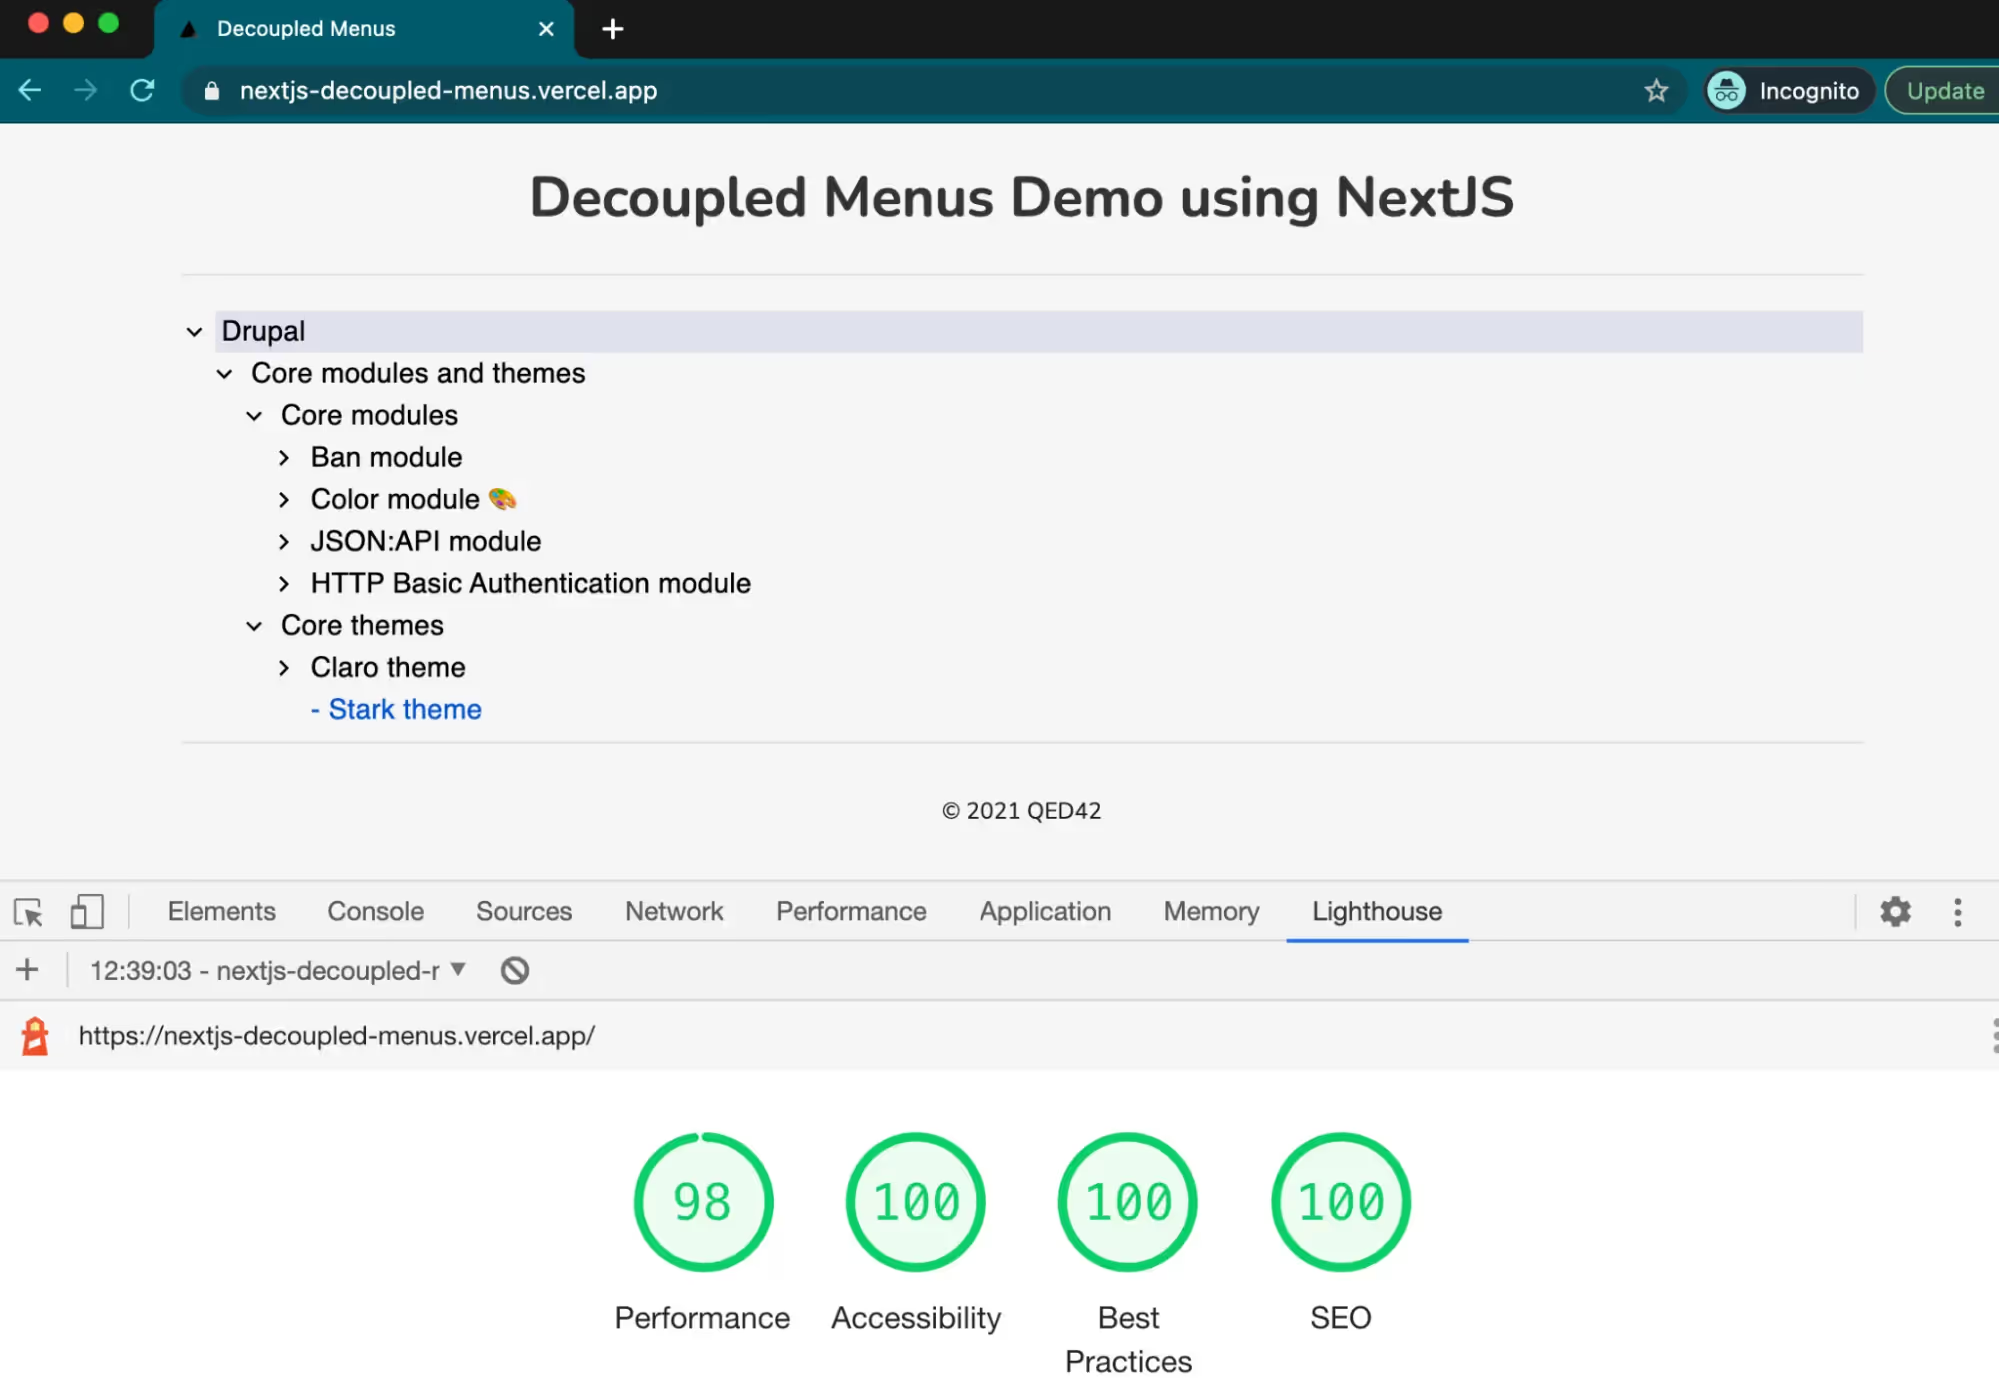
Get better performance, accessibility, SEO and much more with NextJS
Step 2:Theindex.js file is the Home page of our application. It performs like a logical component because it fetches data from the provided Drupal API using fetch()in getStaticProps()and returns the JSON data as props to _app.js.
https://github.com/vertikajain/nextjs-decoupled-menus/blob/main/pages/index.js
Step 3:The components folder, which lies outside the pages folder contains our presentational components - menuBar, Layout and Footer.
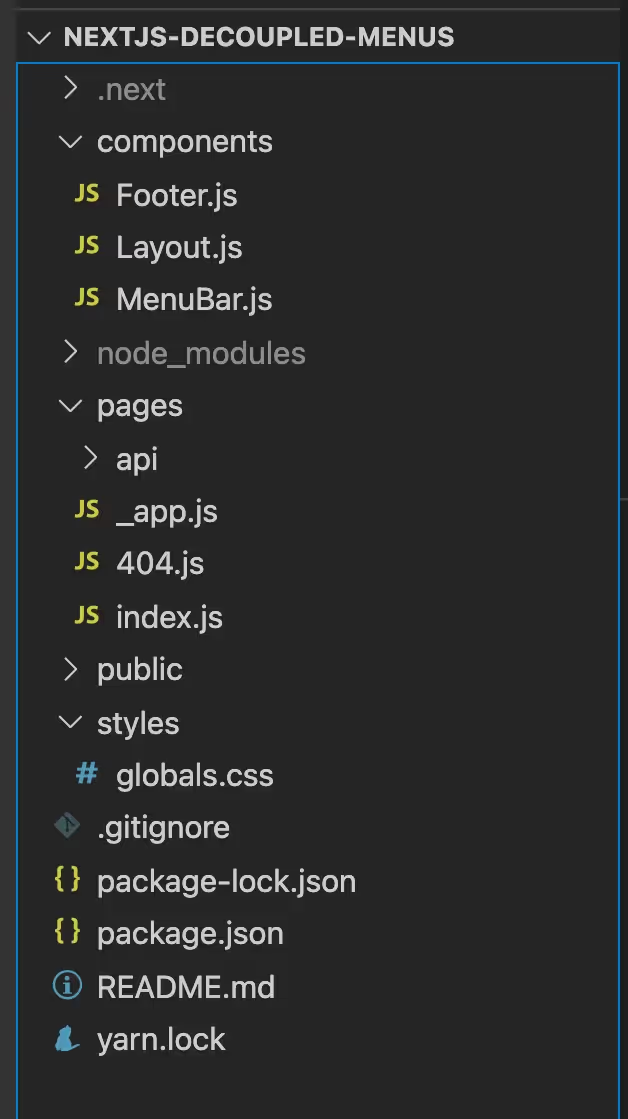
Step 4:The Layout component further passes the props-children to the menuBar, which was passed by the _app.js component. It also calls the Footer component in the end.
https://github.com/vertikajain/nextjs-decoupled-menus/blob/main/components/Layout.js
Step 5:The menuBar component makes use of the Drupal-API data passed as props to render it as a menu of our page. we have used the menuHelper utility to create a menu Tree and return it to the menuBar.
- Mapping through the menu data array, we have used the given menu-hierarchy of each menu object to add submenus to the mainRoot as children.
- We further iterate through each sub-menu to add further children until the leaf node (last menu item) is reached based on the given hierarchy.
- This creates our menu Tree in the mainRoot object using Loops.
https://github.com/VertikaJain/nextjs-decoupled-menus/blob/main/utilities/menuHelper.js
- Then, we have rendered the main level of the menu Tree using the TreeView API of Material UI.
- Lastly, the inner root levels are rendered Recursively using the TreeItem API of Material UI in the user-defined method createTreeItem(). This method checks if the menu item is the last item in its particular hierarchy. If yes, then it simply displays the content/link, else it recurses further till the last menu-item is reached.
https://github.com/vertikajain/nextjs-decoupled-menus/blob/main/components/menuBar.js
Step 6:The Footer component simply displays the Copyright content.
https://github.com/vertikajain/nextjs-decoupled-menus/blob/main/components/Footer.js
Step 7:The _document.js file enables the material UI icons to be available at the first render, avoiding unusual FOUC.
https://github.com/VertikaJain/nextjs-decoupled-menus/blob/main/pages/_document.js
Conclusion & Future Work
The purpose of this blog was to showcase how one can use the Drupal Menu API with NextJS as the frontend for pre-rendering and how it improves SEO ranking. At the moment this application is only deployed to Vercel, and has not yet been converted into a package. Stay tuned for our upcoming blog that will revolve around integrating our NextJS package with Drupal. Interested to know more about the other Drupal Initiatives? Click here to read more.

Site Studio - Theme Architecture
We are all familiar with Acquia Site Studio, a low-code tool for creating digital experience platforms. While working on Site Studio developers mostly work on the site-building part instead of writing code in the CSS or JS files. However, at times, there are cases where you can’t achieve expected things using Site Studio because there is no way to access that particular thing in Site Studio.
For instance the Drupal maintenance page can’t be themed in Site Studio because there is no access of Site Studio on these pages, another example if we require some custom things like JS/CSS, we can’t do in Site Studio using site-building because of restricted access, in such cases, we need to set up Site Studio theme architecture to achieve expected things with minimal files, code and overwrite.
Site studio theme architecture will be based on below things:
Base theme
- Site Studio minimal (machine name: cohesion-theme)
- Directory: docroot/themes/contrib/cohesion-theme
Sub-theme
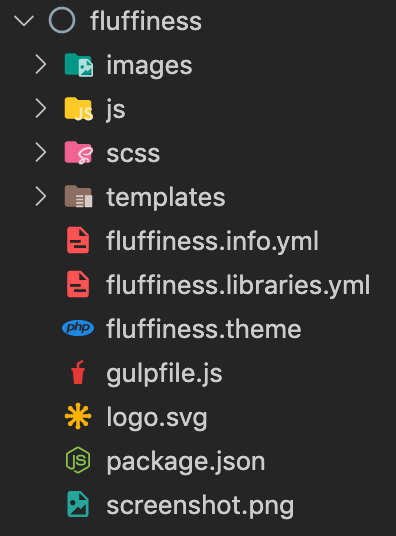
- Fluffiness (default theme) (machine name: fluffiness)
- Directory: docroot/themes/custom/fluffiness
Page regions
- Header
- Featured
- Content
- First sidebar
- Second sidebar
- Footer
- Site Studio hidden region
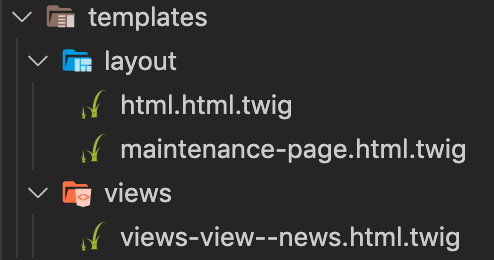
Template file naming
- Directory: docroot/themes/custom/fluffiness/templates
- Drupal standard naming convention with modular structure as per URL: https://www.drupal.org/docs/theming-drupal/twig-in-drupal/twig-template-naming-conventions
Site Studio Components
- We can also create Site Studio components from scratch by navigating URL admin/cohesion/components/components and click on +Add component
Note: The existing components which come with the UI kit can be edited as per project requirements.
CSS management (e.g. Gulp + SCSS)
- Since we are using Site Studio, we are following a component-based approach with minimal CSS overwrite.
- Directory: docroot/themes/custom/fluffiness/scss
Adding new CSS
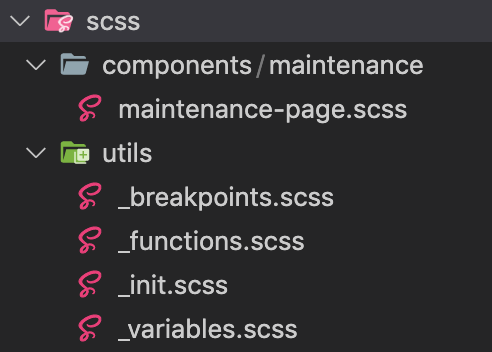
- Inside the docroot/themes/custom/fluffiness/scss/components/ directory, create a new directory as per component requirements. Inside that new directory, create a .scss file.
- Example: new directory for scss/components/maintenance with file scss/components/maintenance/maintenance-page.scss
Compiling SCSS to CSS
- Open the terminal and from project, root navigate to sub-theme directory cd /docroot/themes/custom/fluffiness
- Run npm install and then npm run build It will compile all the assets(CSS & images) to dist/directory
- To use compile CSS file from dist/directory Create library inside fluffiness.libraries.yml file like below:
- And use created library inside respective template file using
- Continuous scss file watch, npm run watch OR gulp watch
Sass Variables and Partials
The scss/utils/ directory has Sass partial files like _variable.scss, etc.
JS management
- Directory: docroot/themes/custom/fluffiness/js
- We have global custom js with minimal js requirements inside global.js
Image management
- Directory: docroot/themes/custom/fluffiness/images
- We are having a gulp task to optimise images. To run the image optimise task,
- Open the terminal and from project, root navigate to sub-theme directory cd /docroot/themes/custom/fluffiness
- Run gulp images it will optimise all the images to dist/images directory
With all minimal files and folder, your new sub-theme(fluffiness) will look like the below screenshot,
Adding Drupal Blocks to Site Studio Components
- To access blocks navigate to Admin > Structure > Block layout (/admin/structure/block).
- If you want to use any Drupal block or custom block (except menu & breadcrumb) in Site Studio component/template/views template then first you need to place that particular block in the Site Studio hidden region

- You can now add or drag & drop a particular block into Site Studio component, template, or views template using the Drupal core elements block element from the sidebar panel.
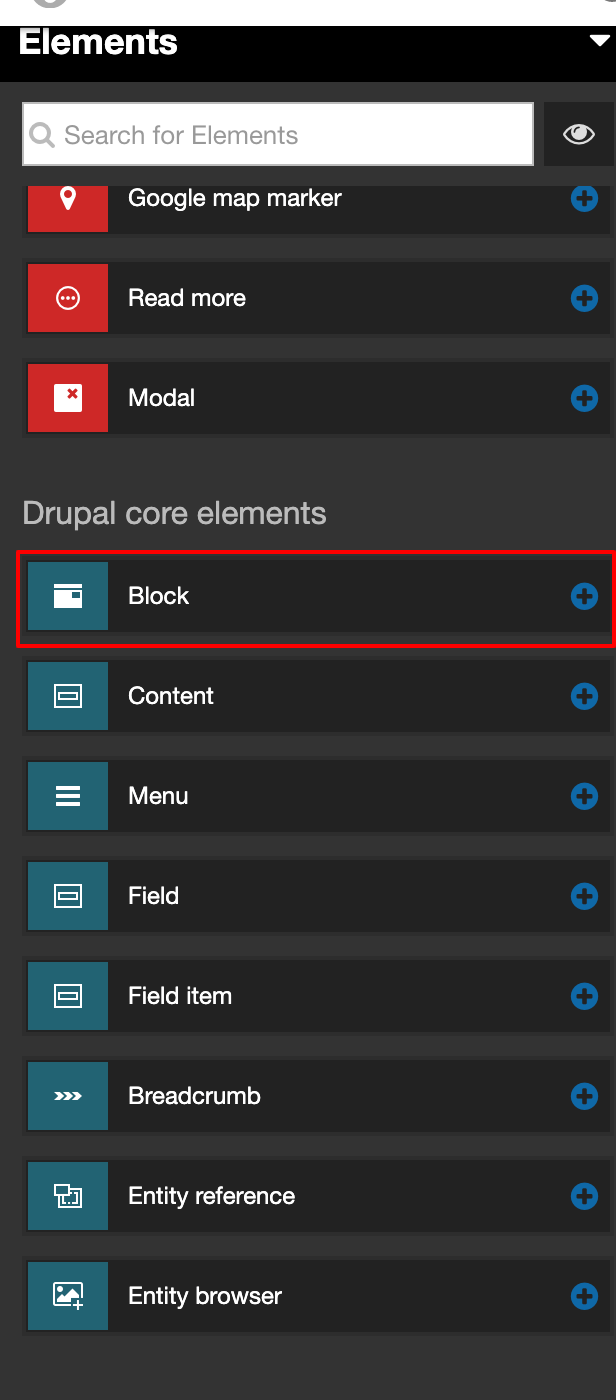
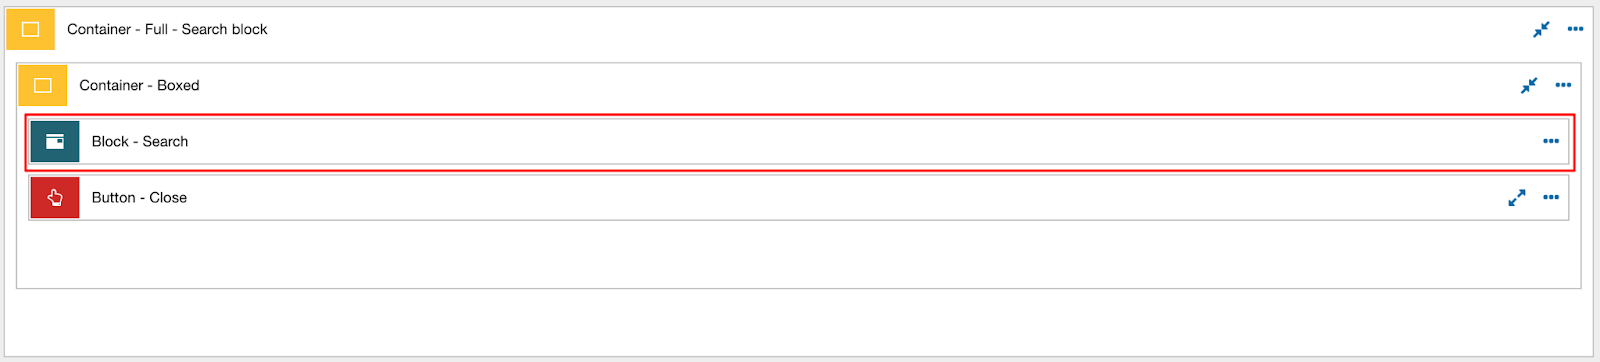
- Once the element is in the layout canvas → Double-click on it to edit.
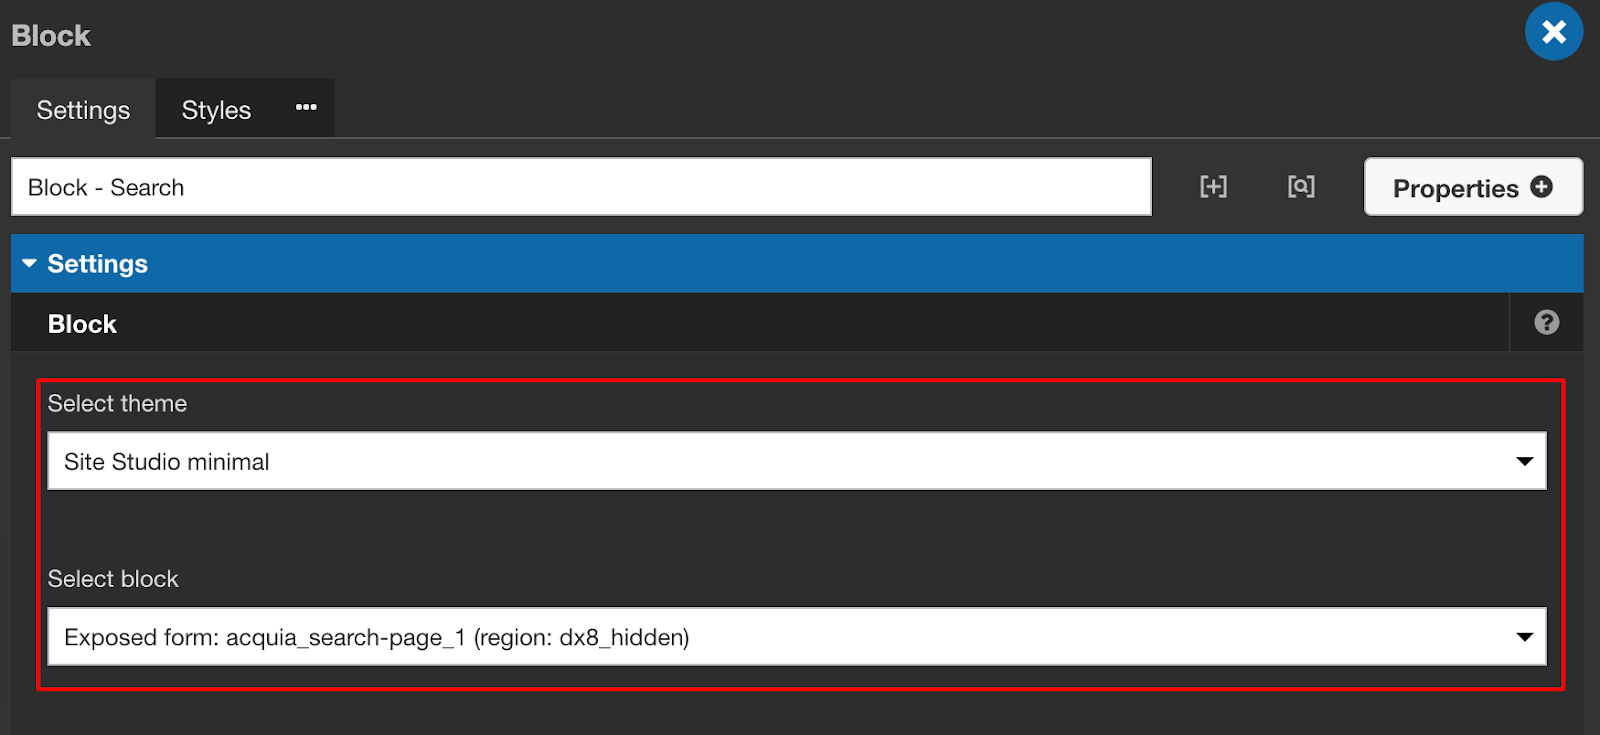
- Select your theme(sub-theme if created for example Fluffiness) and a particular block from the hidden region and save.
Thank you for reading!

Everything you need to know about CKEditor 5 integration for Drupal 9
CKEditor was added to Drupal back in 2011. While the latest version of Drupal, Drupal 9 comes with CKEditor 4’s stable version, its support will be terminated sometime in 2023, around the same time as Drupal 9’s end of life. Since replacing CKEditor 4 with the new and improved CKEditor 5 is one of the key initiatives identified for Drupal 10, let's look at CKEditor 5 for Drupal 9.
With June 2022 as the target release date of Drupal 10, it is important that contrib modules get updated much sooner as it will be a prerequisite for updating sites. The site owners will have until November 2023 to update to CKEditor5
CKEditor 5
CKEditor 5 has been rewritten in ES6, using the power of modules. Keeping user experience and modernisation a priority, enabling exciting possibilities such as real-time collaboration and commenting while creating content. This real-time collaboration feature requires the ‘CKEditor Cloud Services’ and thus will not be available as a core feature. Sites that wish to use it need to sign up with CKSource for the service.
Difference between CKEditor4 and CKEditor5
Every single aspect of CKEditor 5 is redesigned — from installation to integration, to features, to its data model and API. CKEditor5 is highly customizable, it provides all the necessary tools to easily integrate it with modern applications and technologies, like Angular, React, Node.js, npm, etc.
There is no view source button in CKEditor 5 because there is no editable source. There’s an abstract syntax tree in memory that generates clean semantic HTML when you save it. Find out more about the view source functionality here.
CKEditor 4 uses the DOM as a model. When loading data, the HTML is processed but it ends up in the DOM anyway. CKEditor 5 has a custom data model. When you load HTML into the editor, it's parsed and then features try to pick up from this HTML the pieces they understand. This is called ‘conversion’. As a result of a conversion, the content is being loaded into the custom data structure. The reverse process is executed when content needs to be rendered back to the DOM either for editing or data retrieval. This means that if you don't have a feature that handles a certain HTML tag/attribute/style/whatever then the editor will automatically drop it. But not only does it not get displayed, but it would also be lost. Thus in CKEditor 5 any HTML that does not have a CKE5 converter will result in data loss.
For more details visit - https://support.CKEditor.com/hc/en-us/articles/115005278429-What-is-different-about-CKEditor-5-compared-to-CKEditor-4-
Ways of integrating CKEditor5
Integrating existing builds
You select the plugin which you want to use and generate the bundle. Since you are using an already built editor you do not need any additional webpack configurations. In this case, CKEditor works as a ready-to-use library. Building from source.https://CKEditor.com/CKEditor-5/online-builder/
Building from source
This approach allows you to have full control over the building process of the CKEditor. In this method, you won’t be using the existing builds but you will generate the build in your project. As a result, you can control what features to be included.
DLL builds
Both of the above methods require you to recompile the CKEditor every time you add a new feature and in some scenarios, this is not the best way to integrate CKEditor5 into a project. Let’s consider Drupal as an example, where we have so many other contributed modules. With the above two approaches, it becomes difficult to add custom plugins to CKEditor. To avoid such scenarios CKEditor provides a ‘DLL builds solution’. CKEditor uses webpack DLLs to build the core and allow loading plugins by a simple JS concatenation. Webpack DLLs allow creating a global registry of modules so plugins could also import them, even if build separately. DLL build provides a way for adding new plugins to an editor build without having to rebuild (recompile) the build itself. In DLL builds the complete project is divided into multiple files.
You can find more detailed information about this at https://CKEditor.com/docs/CKEditor5/latest/builds/guides/integration/advancedsetup.html,
https://CKEditor.com/docs/CKEditor5/26.0.0/builds/guides/development/dll-builds.html
CKEditor 5 and Drupal 9
If we look at the Drupal CKEditor 4 module we have a lot of contributed modules that provide CKEditor plugin integration. To keep that option open in Drupal, the CKEditor 5 module opts for the 'DLL build solution'. So if anyone wants to add a contrib module for the CKEditor5 plugin they will have the feasibility to extend the features provided by the base module. Let’s take a look at how we can add the new CKEditor5 plugin into the module. CKEditor5 module implements a new plugin type and it uses two types of plugin discovery methods i.e YAML & annotation. Learn more about CKEditor 5 and Drupal here.
We will now walk you through the process of adding new plugins.
Adding plugin with YAML
If you are planning to add a new CKEditor plugin integration and you don’t want to provide any settings for this plugin then the YAML plugin is the best option for this. Let’s look at the example where we want to add select-all plugin integration.
Step 1
As already mentioned, Drupal uses a DLL build approach to integrate the plugin, this requires a DLL compatible js file. To generate the DLL compatible js file on the plugin follow the steps mentioned below:
The above steps will be enough if the plugin is provided by the CKEditor as they will provide you with all the required setup to generate DLL compatible files. Let’s take a look at how we can add the special characters plugin through our custom module.
Step 2
Create a new custom module in our case we will name it - ‘ckeditor5_special_characters’
Step 3
The DLL compatible file will be generated at CKEditor5/packages/your-package/build. Copy this file and place it under the js/build folder. Here the path does not have to be the same, but the CKEditor5 module uses this directory structure. Also, copy the icon file from the CKEditor5/themes/icons folder and place it in the modules icon folder. This will be the icon that will be displayed in the toolbar.
Step 4
Now to make this plugin available in CKEditor, we will have to copy the file generated at ‘packages/your-package/build’ into the {custom_module_name} js/build file. In this step, we will be creating a library for adding JS/CSS to Drupal, and we will be using this library in our next steps.
Step 5
The module YML file should be named {module_name}.ckeditor5.yml. It will be discoverable if it ends with .ckeditor5.yml. Here’s how the plugin definition will look like:
Let’s go through each of the properties to understand them better:
- library: Thee library, this plugin requires
- admin_library: The admin library this plugin provides
- plugins: The CKEditor5 plugin classes provided
- toolbar_items: List of toolbar items the plugin provides
- elements: List of elements and attributes provided, compatible with filter_html
You can find the toolbar items name on the CKEditor plugin page - https://ckeditor.com/docs/ckeditor5/latest/features/special-characters.html
Once all the above steps are completed head over to configure the text filter page. Here you should see the plugin icon in the available plugins section; drag and drop it to the active toolbar.
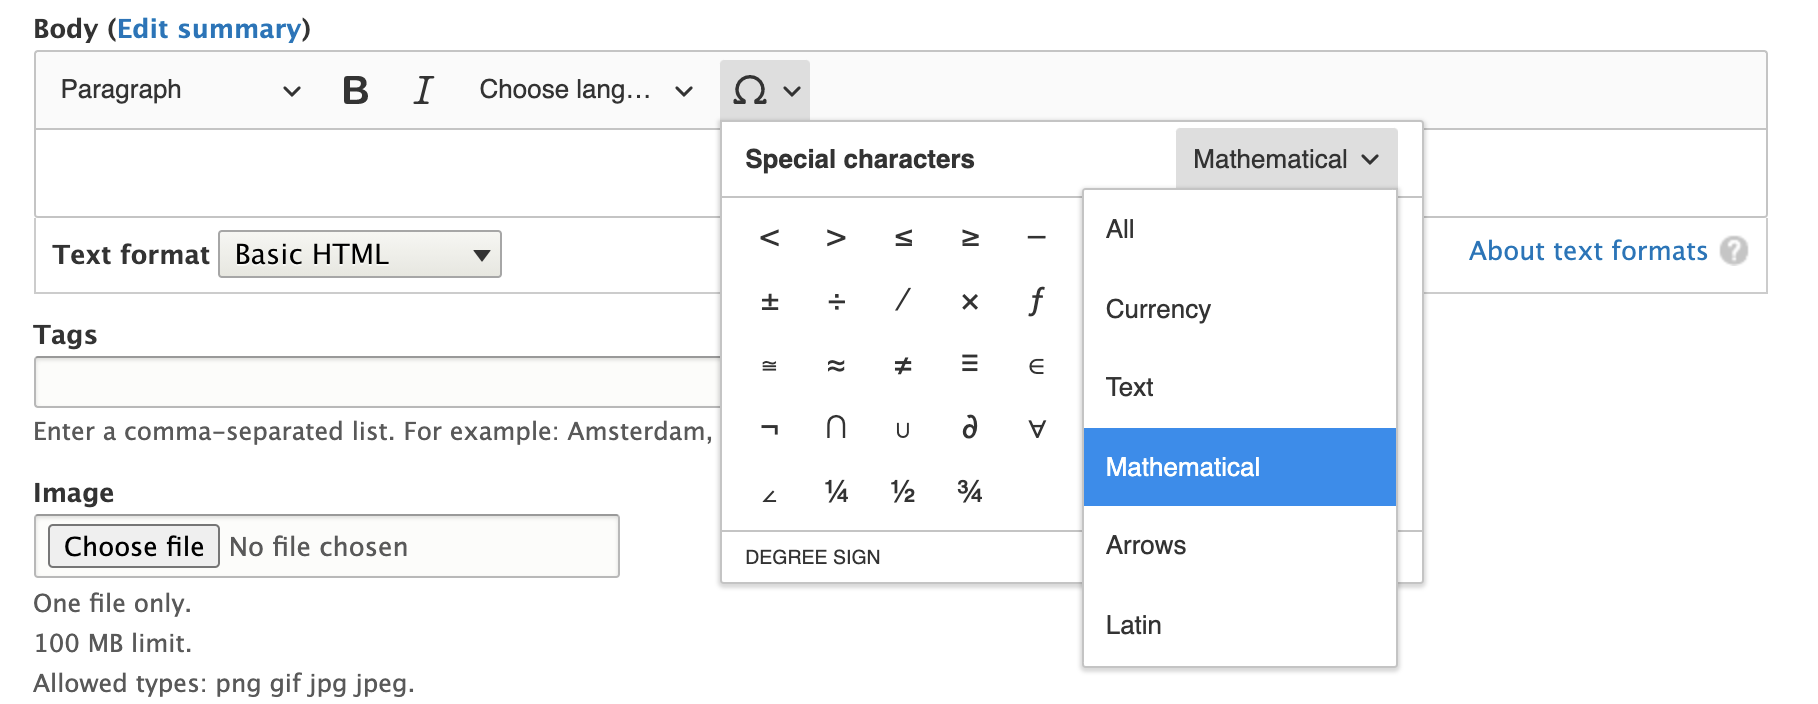
Adding plugin with PHP Class
YAML plugin definition works when you don’t have any settings or dynamic values for the plugin, but what if the plugin requires some configuration? In such cases, we can use the PHP class approach. Consider an example where we want to integrate the code blocks plugin into CKEditor5, which provides a way of inserting and editing blocks of pre-formatted code into the WYSIWYG editor. If we take a look at this plugin it provides an option to configure the languages and label and those will be available in the editor while editing content.
Step 1
Follow the first 3 steps from the Adding plugin with YAML. The implementation of this plugin will create a new custom module named ckeditor5_code_block.
Step 2
Create a CKEditor5 Drupal plugin under ckeditor5_code_block/src/Plugin/CKEditor5Plugin\CodeBlock. You can use annotation or YAML plugin definition to make the plugin discoverable by the CKEditor5 module. In case if you want to use YAML for plugin definition then you can use the “class” key in YAML definition for plugin with class:
Plugin_config: A keyed array of additional values for the CKEditor5 constructor config.
Annotation-based plugin definition:
CKEditor5 plugins have interfaces that can be implemented so that plugins are aware of what's happening on the filter page. Following are the available interfaces:
- CKEditor5PluginConfigurableInterface
This interface provides you with a way to create a ‘settings form’ for your plugin. In our case, we want to provide a useful way to enter the language name and a label for it. So we will be implementing this interface to provide a form for our plugin to accept configuration values.
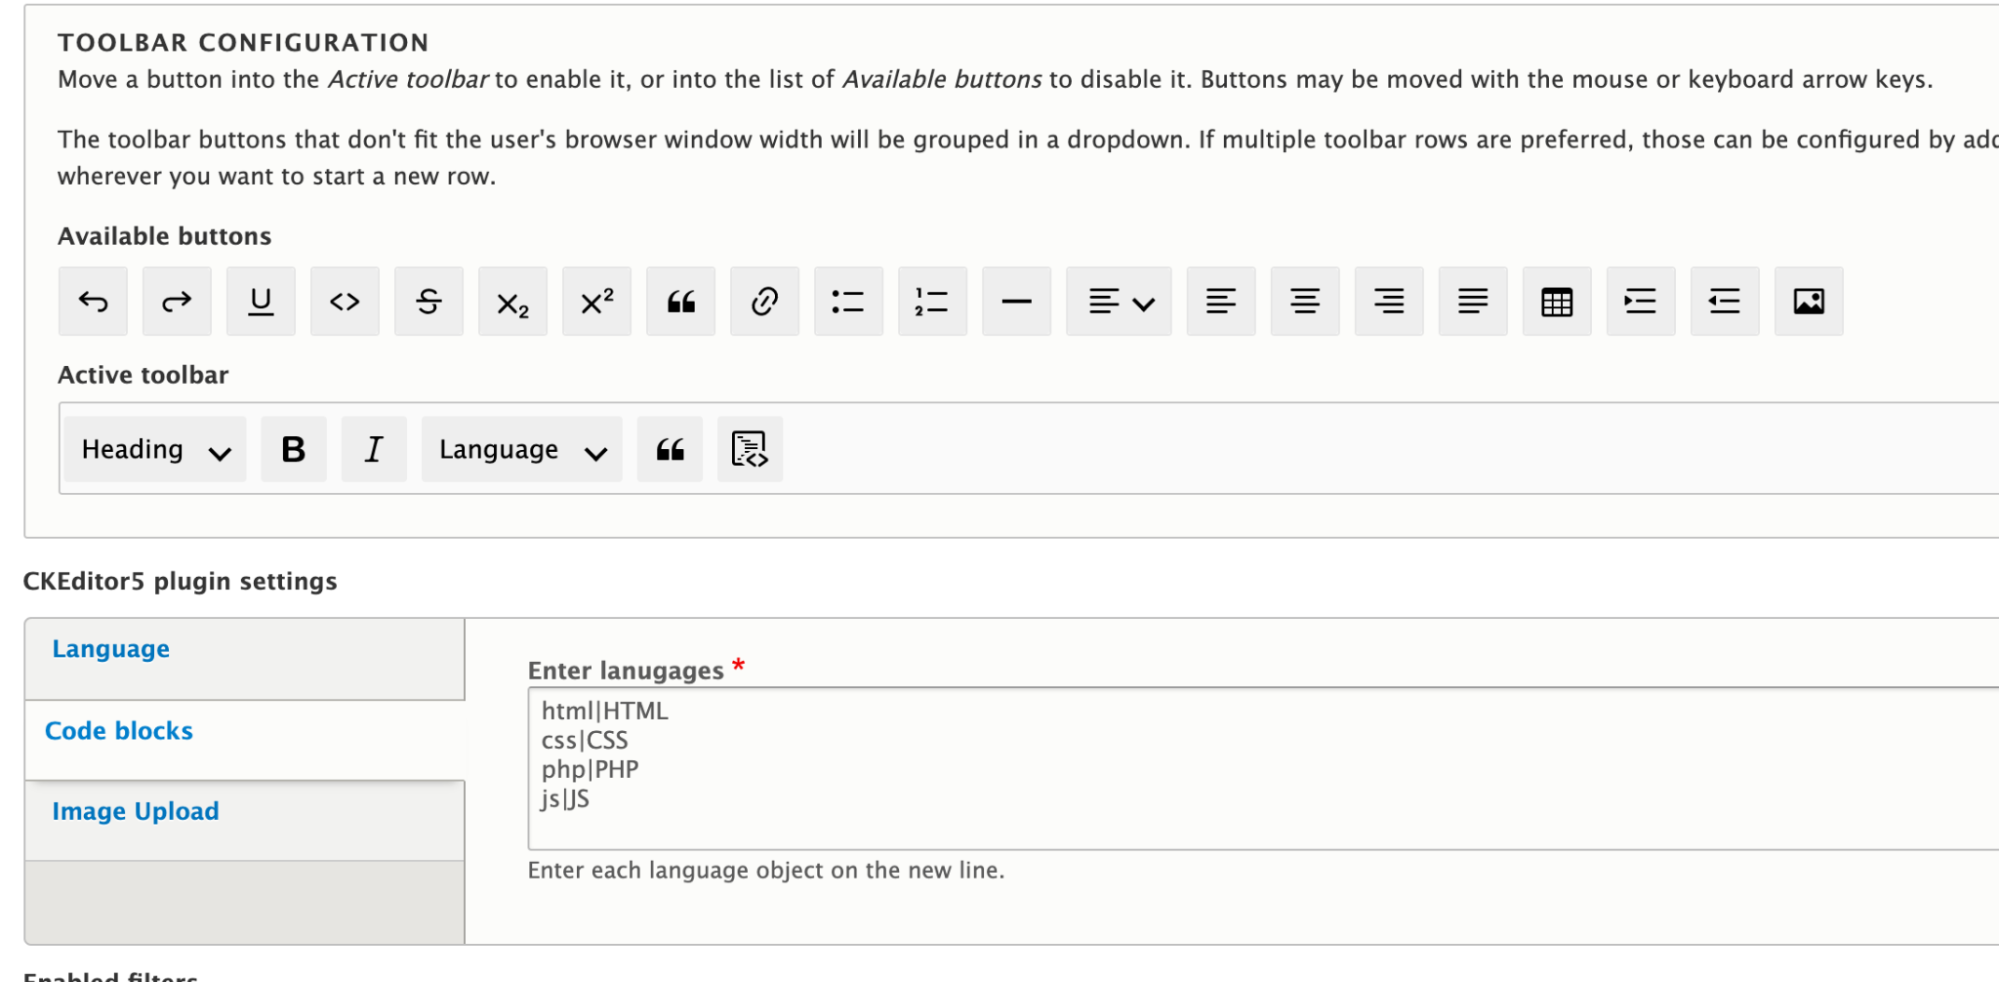
- CKEditor5PluginContextualValidationInterface
Ckeditor5 allows every plugin to validate the plugin based settings. By implementing this interface we can validate the plugin setting form. In our case we will be validating whether user-provided settings are in the required format or not, if not we can display an error message to the user.
- CKEditor5PluginInterface
Through the plugin settings form, we have received the user settings for the plugin but we want to make use of those settings while loading the CKEditor5 plugin. This method allows us to update the plugin configs. For example, in our case, we want to update the plugin configuration to languages provided by the user.
- CKEditor5PluginContextualInterface
This interface provides you with a method with which you can enable/disable the plugin based on the current editor settings.
After completing all these steps we can drag the code block plugin to the active toolbar and content editors can make use of it to add the code snippets in the content. This is how the final result will look like:
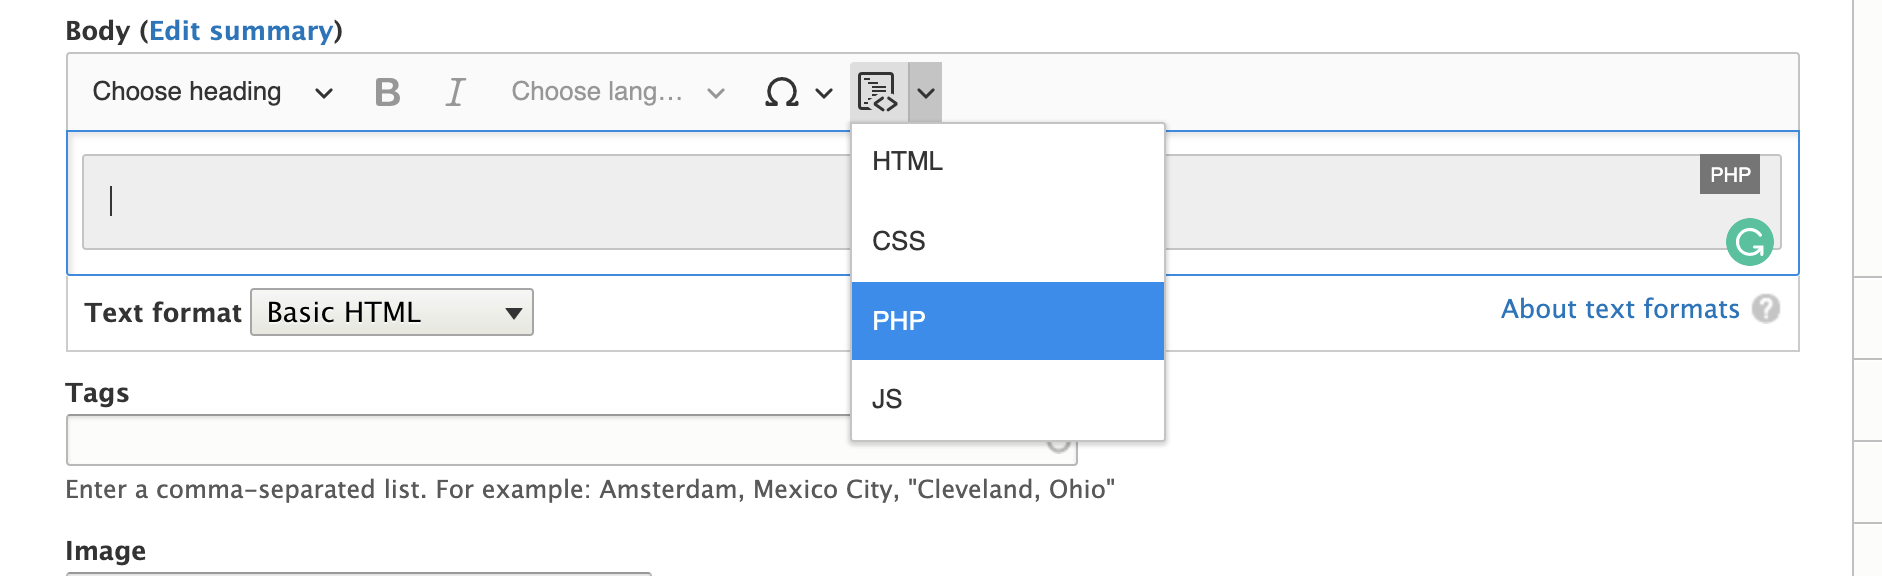
You can check the complete code of Drupal CKEditor5 plugin for code blocks here - https://github.com/anandtoshniwal/ckeditor5_code_block
CKEditor 5 - feature availability
The CKEditor 5 features are constantly growing. Most of them are included by default in CKEditor 5 builds and are available out-of-the-box. Let’s take a look at what is currently available:
- In CKEditor 4 we used to allow any tags or we used to edit the source and add HTML structure as per our needs but this is not case with CKEDitor5 if you don’t have a converter for a particular element then it will simply remove it. To make sure that you are not losing any content CKEditor team came up with a solution where you can audit if all the tags are being supported or not. It provides a Drush command for you Drush ckeditor5:audit. Which provides output as below screenshot
- The audit feature only works for limited HTML formats. For unlimited HTML, the actual pieces of content would need to be audited and that does not happen with this command. If you want to check how this works in detail you check read about it in-depth on the issue
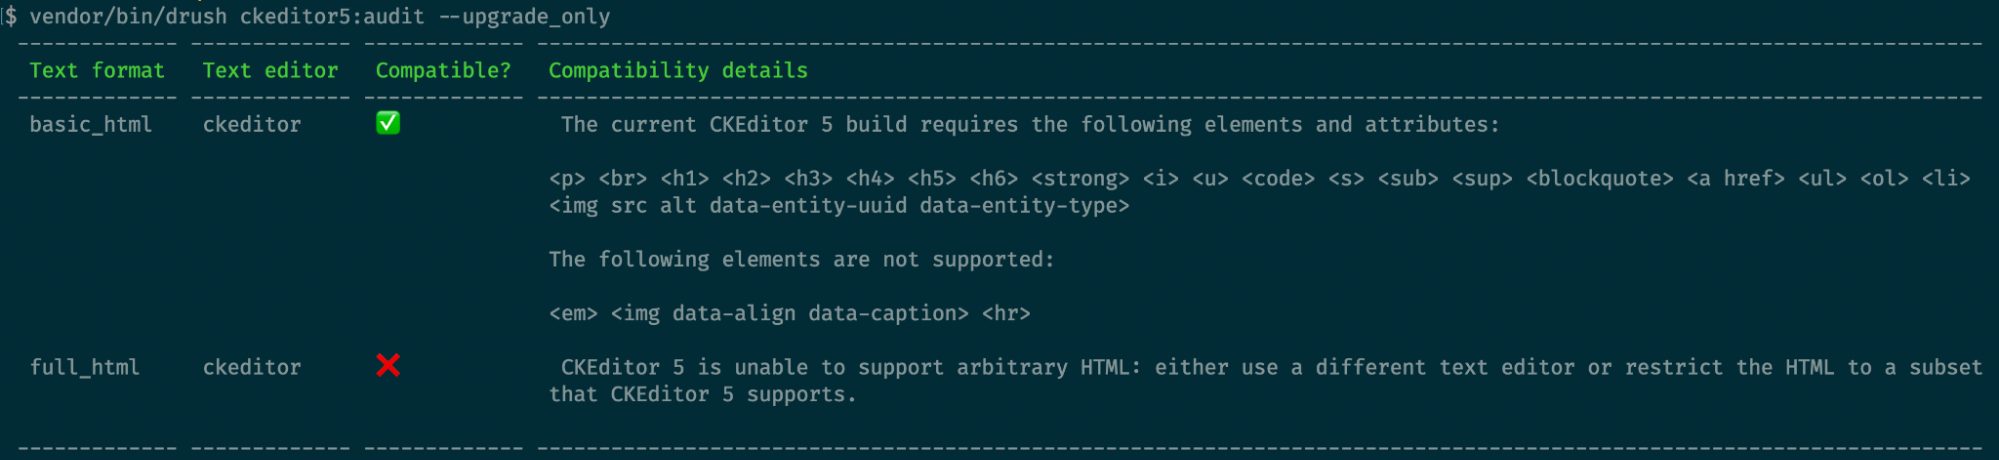
- General HTML support (GHS) CKEditor team is working on this. It will mostly consist of predefined data about what tags should be allowed by the CKEditor5. Once CKEditor includes this feature then Drupal. CKEditor 5 will be able to provide support for it. In case you want to know more about this check the links below: https://www.drupal.org/project/drupal/issues/3200413 (GHS related discussion under Arbitrary HTML update) https://www.drupal.org/project/ckeditor5/issues/3216021 - CKEditor5 issue.
- If you have custom CKEditor plugins written then you have to rewrite them as per the CKEditor5. There is another option than rewriting it.
Join the conversation
If you want to discuss anything related to CKEditor5 or participate in meetings join the #ckeditor5 channel on Drupal Slack. CKEditor 5 integration meetings are every other Thursday at 14:30 UTC in the same channel.
.avif "Driesnote - DrupalCon North America 2021")
Driesnote - DrupalCon North America 2021
DrupalCon North America 2021 has been the highlight of 2021 for the open-source community and we promise to bring you a recap of the largest Drupal event of the year. But before we do that, here's a recap of the Driesnote!
DrupalCon North America saw over 2300+ attendees, out of which 30% were newcomers! Beyond celebrating the success of Drupal 9, the keynote focused on the five strategic initiatives undertaken by the Drupal community, addressing the issue of how difficult it is to contribute, and more.
The focus areas of the Driesnote were as follows:
- An update on Drupal 9 and the plan for Drupal 10
- Falling in love with Drupal
- Getting off the island
How is Drupal 9 fairing so far?
Dries kicked off by showcasing how rapidly the world has adopted Drupal. For instance, all but one of the major COVID-19 vaccine-producing companies use Drupal and big brands like WWF, Budweiser, IBM have already moved to Drupal 9!

It’s barely been 10 months since the launch of Drupal 9 and there are thousands of ambitious digital experiences running on Drupal 9 already.
We also looked back at Drupal 7 and Drupal 8 vs Drupal 9 now; here are the statistics that Dries presented:

Comparing Drupal 9 vs the previous versions of Drupal, it took Drupal 9 merely 1 month to reach 60,000 websites making Drupal faster than ever.
One of the major factors contributing to making the Drupal 9 upgrade faster than ever was the readiness of the contributed modules. Back in 2017, 17 months after the Drupal 8 launch, only 20% of the modules were ready whereas currently, 90% of the top 50 Drupal 8 contributed modules are ready and stable. Making it easy to start upgrading!

One of the reasons why these contributed modules are now stable and ready is because of some key changes made w.r.t how Drupal is developed and released. There are no longer drastic breaks in between major versions anymore, instead, there is an upgrade path and backward compatibility.
The target release date for Drupal 10 is Summer 2022!
Dries covered the major strategic initiatives that the Drupal community is currently working on:
1. Decoupled Menus Initiative
Drupal's move to become RESTful in the core has laid down a path for Decoupled Drupal and with this initiative, Drupal is looking at a way to decouple the menu from its core's rendering.

A few highlights of this initiative are:
- JavaScript projects are now on Drupal.org
- Drupal is branching out into the world of JavaScript, as it continues to solidify Drupal as a leader in the Headless CMS arena
- This initiative aims at making Decoupled Drupal easier compared to other Headless CMS's
2. Easy Out of the Box Initiative
Here's a quick update around Claro, Media Library, and the Layout builder:
- Claro (admin theme) added as a beta now
- There has been limited progress around Media and Layout builder

3. Automated Updates Initiative
This initiative looked rather very green for the following reasons:
- Automated updates are now available for Drupal 7 & Drupal 8
- The community is taking these learnings and applying them to Drupal 9

4. Drupal 10 Readiness
To sum it up in one sentence, the Drupal 10 Readiness Initiative is a ginormous initiative and needs a lot of support from the Drupal community!

5. New Frontend Theme Initiative
This initiative is closer to the finish line with Olivero now in the Drupal core as beta.

Looking at the progress these initiatives have made so far, we do agree with Dries when he said that "Drupal 10 is closer than it appears".
Key milestones

Important dates for Drupal 7 & Drupal 8

Dries also addressed the question as to why Drupal 7 is supported longer than Drupal 8? Drupal 7 end of life is scheduled for November 2022, whereas Drupal 8's end of life is November 2021 because the upgrade from Drupal 7 to Drupal 8 to Drupal 9 is very difficult.
Falling in love with Drupal

Dries acknowledged the fact that contributing to Drupal has been tough and tricky for a lot of contributors. And that we need to give every user and contributor a reason as to why they should adopt Drupal.

Looking back at Drupal’s roots; Drupal was all about empowering site builders by being able to:
- build ambitious websites
- with low code
Unfortunately, the site builder is now the forgotten user. Drupal has completely ignored this persona while focussing on developers and content authors. Drupal’s efforts (OOP, Symphony, Composer) towards modernization have in turn added a lot of complexities for the site builder. These modernizations have helped Drupal, but have also made Drupal complex.
How do we focus on improving the site builder experience?
Dries addressed the challenges that site builders face, for instance; how difficult it is to find the right module and install it. And to top that up, Composer makes it even more difficult to install a module.

Dries proposed two ideas to make Drupal the go-to tech for site builder experience:
- Introduce a project browser
- Improve UX for configuration management, paragraphs, views, entities+fields, etc.
Getting off the island
Drupal has one of the most scalable, robust and mature development communities. With 10,000 people collaborating, Drupal had to put in place powerful collaboration tools and processes.

When Dries started the Drupal Project, tools like GitLab/Github didn't exist. They used to share patches over emails and used CVS.
It is time for Drupal to adopt more modern tools and ways of contributing. One of the steps in this direction was to merge request workflow and move to GitLab.

We then dived into the contributor experience with Matthew Grasmick who showed us how people expect to contribute vs how their contribution experience is.
Since contributing to Drupal is much tougher than contributing on GitLab, the Drupal Association is expanding the engineering team to get off the island quicker - by fully utilizing the GitLab features to improve the contribution experience!

Check out the DrupalCon North America 2021 Driesnote recording:
If you’d like to contribute toward making Drupal easier and faster, visit - https://www.drupal.org/community/contributor-guide/contribution-areas

Join QED42 at DrupalCon North America 2021
It’s time for another virtual DrupalCon!
DrupalCon North America 2021 is right around the corner, and QED42 is excited once again to be a part of the largest Drupal conference of the year. This is the third virtual Drupal conference since the pandemic and will be hosted on Hopin, a leading platform for hosting interactive and personalized virtual events. Check here, for detailed information on how to access Hopin for DrupalCon NA.
About DrupalCon
DrupalCon is a mission-centric program of the Drupal Association designed to bring people together to share thought leadership around open source and ambitious digital experiences, provide professional development opportunities, and invigorate Drupal project momentum.
Wondering why attend DrupalCon NA?
This year DrupalCon North America offers you exclusive access to insights from open source with 100+ sessions from tech industry leaders and Drupalers, 5 summits, initiative days, networking opportunities with more than 3000 attendees and more!
So whether you’re new to Drupal or a long-time enthusiast, you’ll find valuable information, skills, and connections at DrupalCon NA
DrupalCon NA introduces Initiative Days!
This year, DrupalCon NA is introducing a special focus for each day - Tuesday, Wednesday, Thursday.
Each of these days will have a special focus on Drupal Project’s Strategic Initiatives and will begin with an Initiative Keynote. Be a part of these initiative days and hear from the key members for each of these initiatives, about the goals of each initiative and how it will empower you to build better products for the future of digital experiences. Click on each initiative below for more information on what to expect each day:
Decoupled Menus Day
Keynote - April 13 | 11:00 AM UTC
The Decoupled Menus Initiative will talk about the progress the initiative has made so far, as well as its next steps and how you can be a part of this initiative. The key highlight of this initiative is the hackathon where you can build your custom menu with your preferred JS framework!

Easy Out of the Box Day
Keynote - April 14 | 11:00 AM UTC
The Easy Out of the Box Initiative is a new strategic initiative of the Drupal project.
Here is what Emilie Nouveau had to say about the initiative –
“The easy out of the box initiative is about making the editorial experience clear and empowering from the moment Drupal is installed by enabling Media, Layout Builder, and Claro (that are stable but need more work to be enabled by default) finished up for the standard profile.”
Automated Updates Day
Keynote - April 15, 11:00 AM UTC
The Automated Updates Initiative is a strategic initiative to lower the cost of ownership of Drupal, increase security, and help Drupal users stay on the leading edge of new features.
Drupal 10 Readiness Day
Keynote - April 16 | 11:00 AM UTC
Drupal 10 is planned to be released in June 2022, Drupal 10 readiness day dedicated to the Drupal 10 Readiness Initiative. Where you can learn about how the preparation is going so far, contribute to Drupal 9 and 10 readiness of contributed projects, documentation and early marketing material, and more.
Also, catch Ashish, Technical Architect - Backend, as he shares QED42’s Drupal 9 upgrade story in Gabor’s keynote!
DrupalCon North America Summits
DrupalCon NA will also have Industry Summits that will focus on the digital issues faced by each industry. These summits are scheduled throughout April and not just the DrupalCon week, enabling attendees to manage the time efficiently while networking with their peers on one on one basis during the summits. Know more about each summit by clicking on the links in the schedule below.
Community Summit - April 6, 2021
Higher Education Summit - April 20, 2021
Healthcare Summit - April 22, 2021
Nonprofit Summit - April 22, 2021
Government Summit - April 29, 2021
Keynote Sessions we are looking forward to
Every year, DrupalCon brings together industry leaders who share their insights on various topics. This year we are excited about having these main stage speakers at DrupalCon NA:
The Driesnote
Drupal project Founder, Dries Buytaert will take the main stage on 14th April for the Driesnote, where he will celebrate recent successes and detail the vision for where Drupal is going next.

Allyship - the key to unlocking the power of diversity
UK's Top Most Influential Women in Tech, Sheree Atcheson will talk about how to create inclusive environments and inclusive technology at the main stage on 12th April.
Accessibility for Deaf Beyond Video Captions & Sign Language
Did you know that over 1 billion people cannot use your product at all if it is not accessible? This DrupalCon NA learn how accessibility goes beyond captioning, sign language or interpreting with Svetlana Kouznetsova on 15 April.
Check out all the main stage speakers here
QED42 at DrupalCon North America 2021!
This DrupalCon, join us as we share our latest Higher Ed & Nonprofit implementations, along with our Drupal Migration and Decoupled Drupal expertise. Attend live talks, workshops and panel discussions, win exciting giveaways, and stand a chance to win an Apple Watch with us!
Things you shouldn’t miss at our virtual booth –
How ILAO leveraged Design Systems
A chance to interact with Gwen Daniels - Director of Product Development at ILAO (Illinois Legal Aid Organization) at our DrupalCon NA booth on 12th April, 7 PM UTC and learn more about how - Migrating to Drupal 8 and Design System has expedited their content management.

QED42’s Lightning Talk
Where: Hopin - Room 5 on 13th April at 17:35 UTC.
Join Piyuesh Kumar, our Drupal Practice lead, share how we migrated the world’s top business schools website to Drupal 8 and how we standardized their Design. Immediately post the lightning talk, hop into our virtual booth to get in-depth insights on our Higher Ed success story.

QED42 DrupalCon NA Giveaways!
DrupalCon NA Quiz
DrupalCons are not just about tech and networking, come play our DrupalCon NA Quiz and stand a chance to win QED42’s designed t-shirts or an Apple Watch.


Personalized Audits
We are also offering free personalized audits for your website! Our experts will design a completely personalized action plan for you based on your audit requirements. This DrupalCon we are offering:
- Drupal 9 Readiness Audit
- User Experience Audit
- SEO & Performance Audit

Watch out for our Intermission Programme!
As a part of the intermission programme, we are bringing you DrupalCon North America themed mixology! Make your favourite DrupalCon NA themed drink and share a picture with us (tag @qed42).
Don’t be a stranger!
We would love for you to come by our virtual booth for a chat! If you’d like to book a slot with our team click here.

Amplify your digital strategy with Drupal 9's future-focused architecture
Released on 3rd June 2020, Drupal 9 is the easiest upgrade in this decade. Drupal 9 had piqued the interest of all community members much before its release date. This unique next generation of Drupal is considered to be the most flexible content management system in the market. Drupal 9 offers intuitive solutions for enterprise owners and is focused on continuous innovation by delivering:
- Enhanced web and data security
- Faster and scalable web framework
- Accessible content for a wider audience reach
- Translation and localization
- Easy content authoring and editing
Drupal powers more than 40% of the Fortune 1000 enterprise websites of the world. Some of Drupal’s marquee clients are NASA, TESLA, The Australian Government, The Emmy Awards, etc.
Out of the total 1,738,458 websites hosted on Drupal, 300,625 websites use Drupal 7 and 267,934 websites use Drupal 8.
As of January 2021, Drupal 9 is used by a total of 13,746 websites such as FBI Jobs, Working Wales, The Prince of Wales, The Princeton School of Public and International Affairs, etc.
What will happen to D7 and D8, now that Drupal 9 is out?
With the majority of Drupal websites using Drupal 7, the community has extended its end of life to November 2021 and the community support to November 2022. Drupal 8 is reaching its end of life in November 2021, a year before Drupal 7. That’s because of D8’s dependency on Symfony 3 which is retiring at the same time too.
The community has also announced the release of Drupal 10 in June 2022.
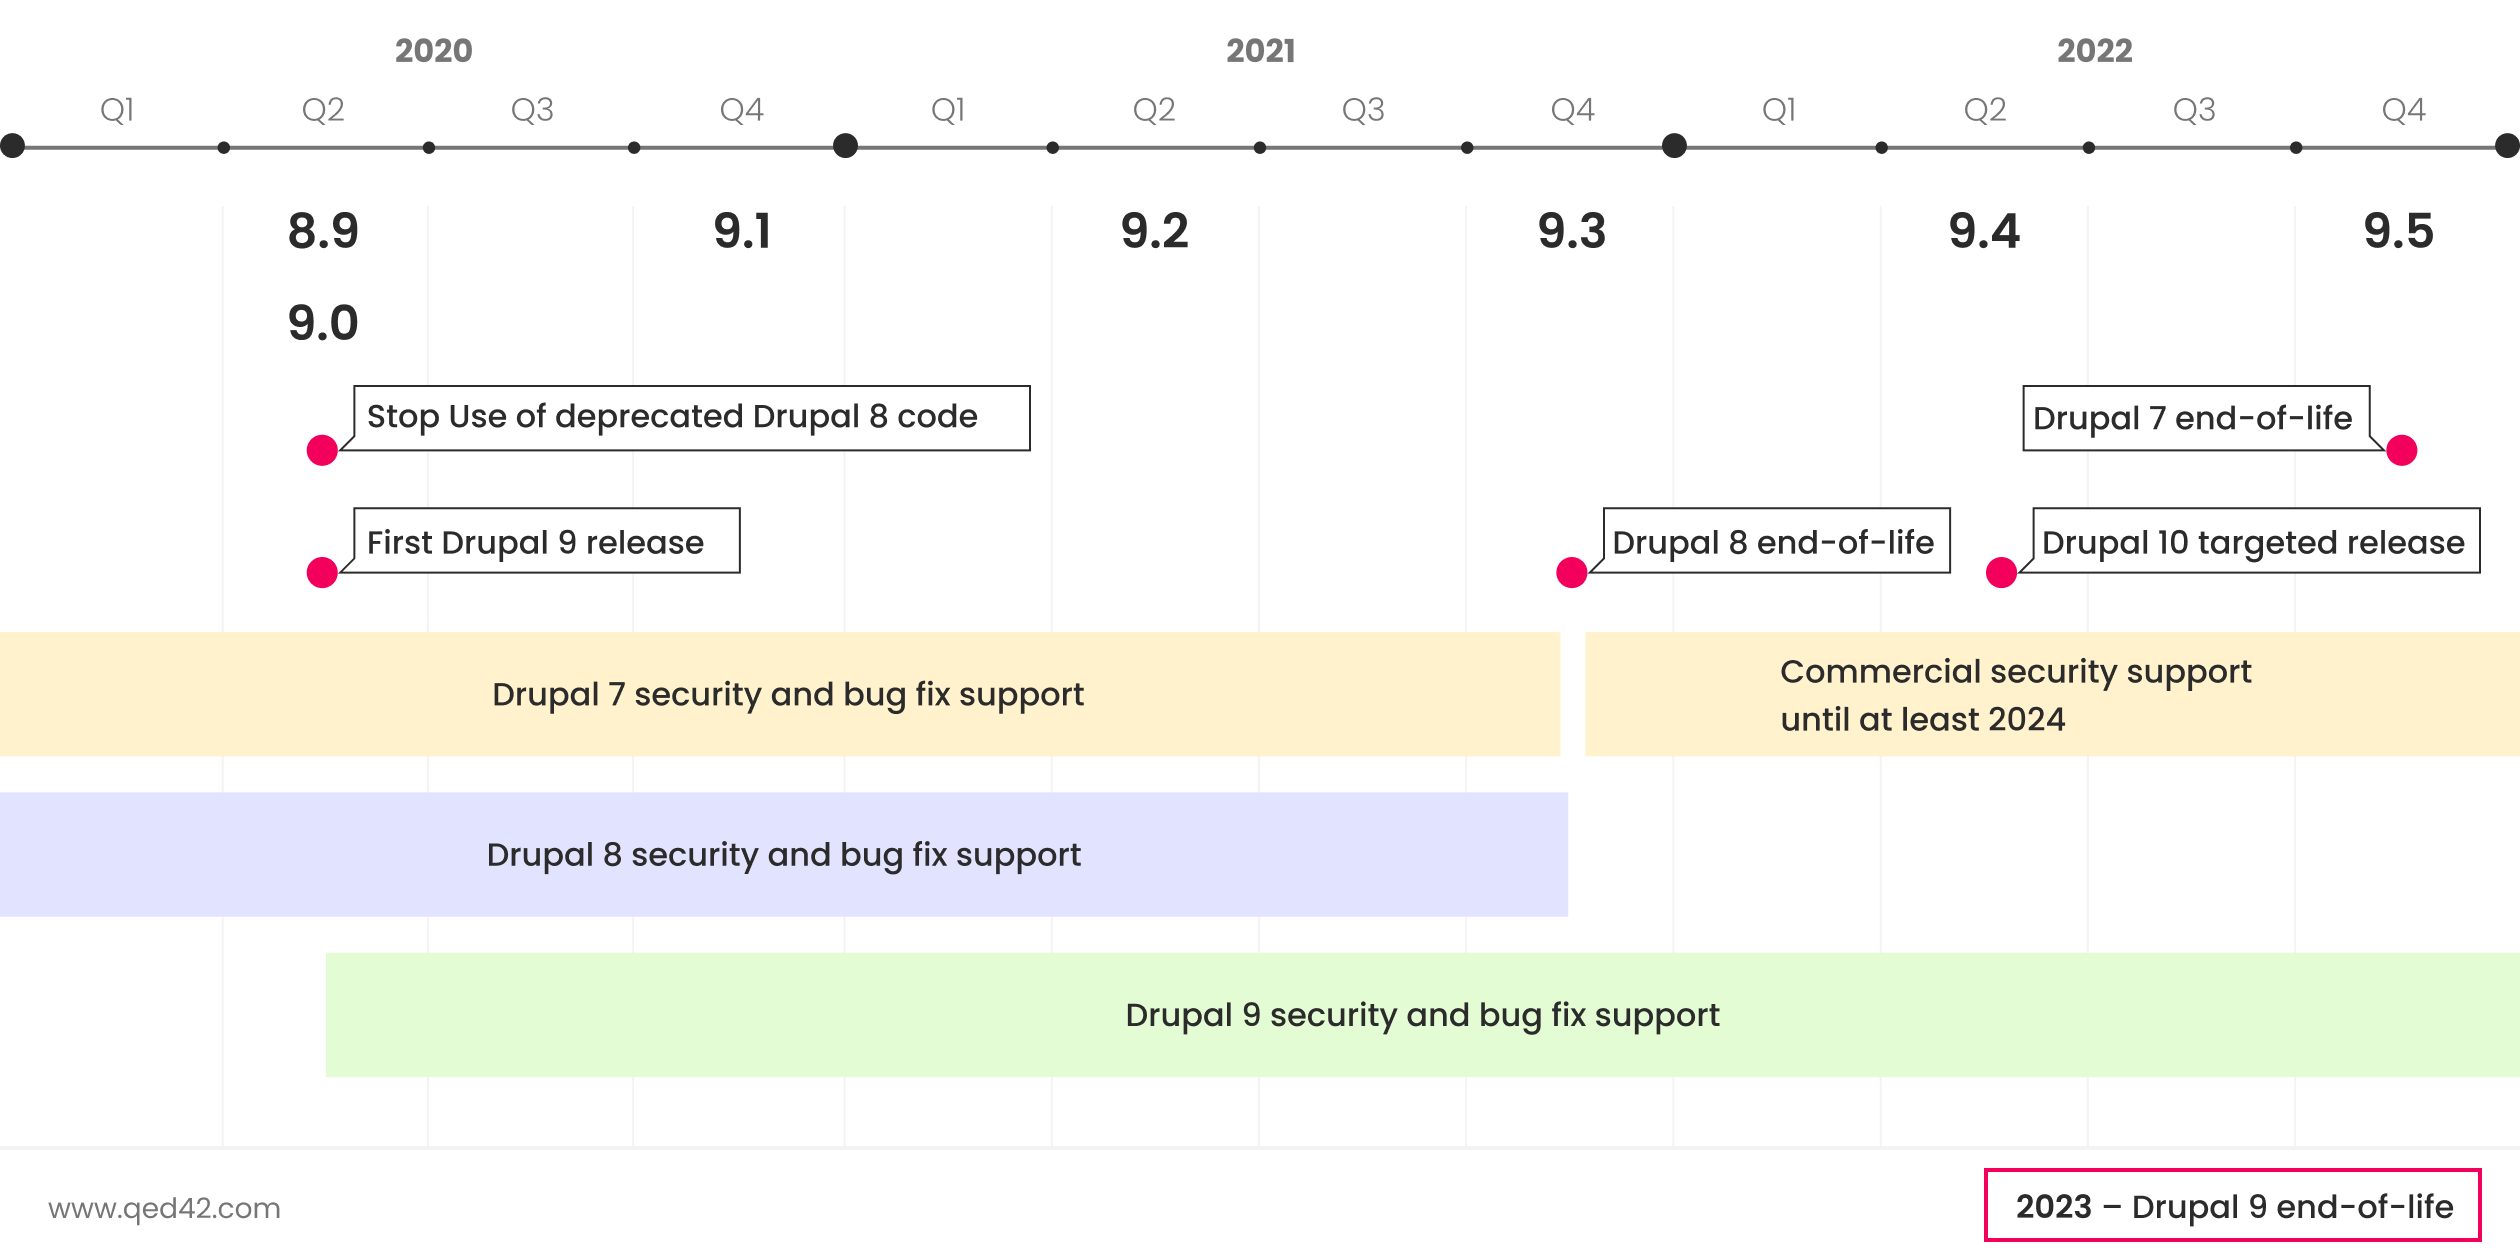
Why migrate to Drupal 9?
With D7 and D8 reaching the end of life soon, the website data and the content will get prone to security threats and outdated features will start affecting the website’s performance.
Drupal 9 is the most author-friendly and powerful version of Drupal to date.
- Dries Buytaert
Compared to its previous versions, Drupal 9 is more usable, accessible, inclusive, flexible, and scalable. Enterprises must migrate to Drupal 9 as early as possible for its powerful new features such as
- Rich media management for ingenious content
Drupal 9 allows embedding of generic media files supporting audio, video, images, etc. With Drupal 9, site owners have the power to embed content from various platforms such as youtube and Vimeo. For content-heavy websites, Drupal 9 features Media Library Module that enhances the media list with additional features to easily find and use existing media items on the webpage.
- Powerful visual design for impactful landing pages
Drupal 9 features enhanced content layout capabilities through its core module - Layout Builder. It offers a set of flexible visual design tools that enable content creators and site admins to customize the layout of a page via a powerful drag-and-drop user interface.
- Easy upgrades for future-focused architecture
Focused on innovation, Drupal 9 will have streamlined and simplified future upgrades for the continuous enhancement of features and modules. The first minor version update of Drupal 9 released in December 2020, within 6 months of the major version release date. Drupal 9.1 offered new improvements and functionalities without breaking backwards compatibility for public APIs.
- Create once, publish anywhere with decoupled architecture
Drupal 9 offers decoupled website development approach where it serves as the backend content repository. In this approach, Drupal is decoupled from the frontend technology and only communicates with it through an API. Decoupling empowers the front-end team to structure and display the data independently. There are two approaches for decoupling Drupal:
- Progressive Decoupling where the front-end team can continue using Drupal’s rendering system while using another framework to build an interactive user experience.
- Fully Decoupling where the backend and frontend technologies are segregated completely.
Read more about Decoupled Drupal here.
- Accessibility for everyone with Drupal 9’s ease of use
Technically advanced, Drupal 9 is the most user-friendly version to date. Drupal 9 offers improved usability features for a flawless user experience. For instance, the Drupal 9 Content Moderation Module gives complete flexibility to content editors and marketing teams to manage their editorial workflows effortlessly. Drupal 9 and its future releases enable continuous innovation and effortless experience for all content managers, developers and designers. Read about how Drupal 9 can reinvent your website here.
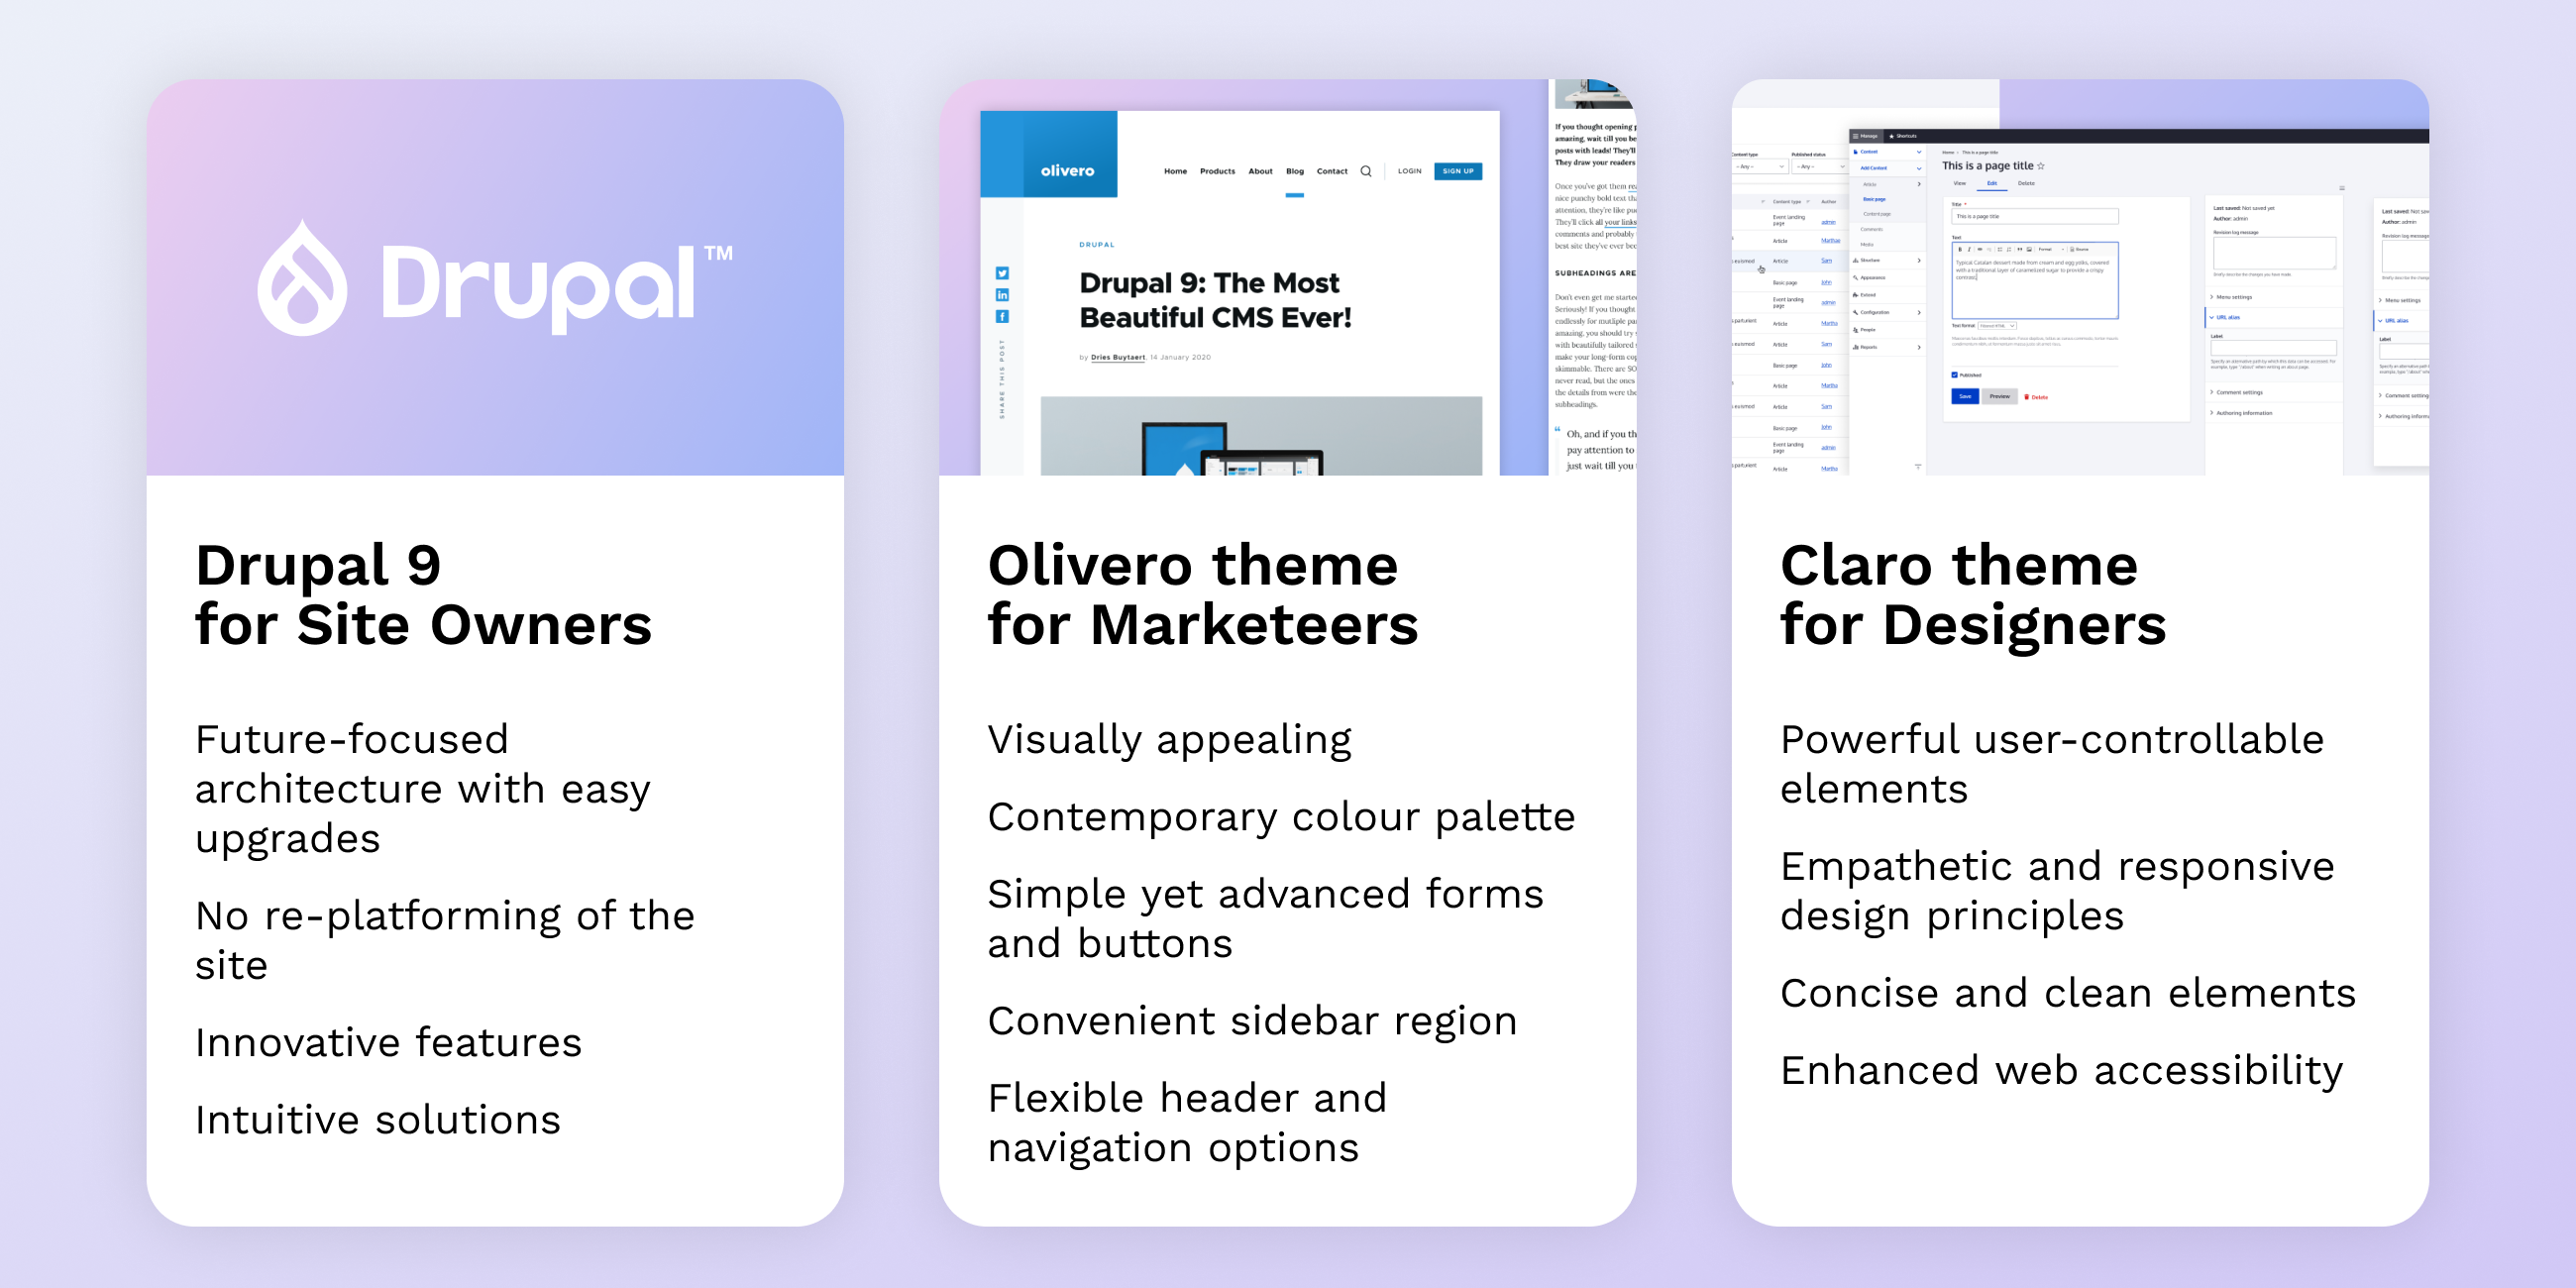
What’s new in Drupal 9?
There are significant new features in Drupal 9 such as:
- Backwards compatibility
Unlike the previous versions, the backwards compatibility in Drupal 9 enables it to use the data, modules and configurations from Drupal 8 sites. The community has focused on breaking the code and not the data, which empowers site owners to re-use the efforts put into creating the website.
- Faster website performance
Drupal 9 offers the margin for scalability and maintains the website performance even while deploying the most complex workflows. Below are some efficient and scalable modules of Drupal 9 for workflows.
- Bigpipe expedites the website’s initial page loading by caching the metadata.
- Dynamic Page Cache for caching the dynamic content and webpage.
- Internal Page Cache module caches the webpage for anonymous visitors.
- Blazy module provides integration with third-party API to lazy load and multi-serve images.
- Clean code
Drupal 9 keeps the code clean by removing the deprecated code from modules in Drupal 8. The code marked as deprecated is eliminated as the D8 modules are imported by Drupal 9, thus increasing the website’s performance.
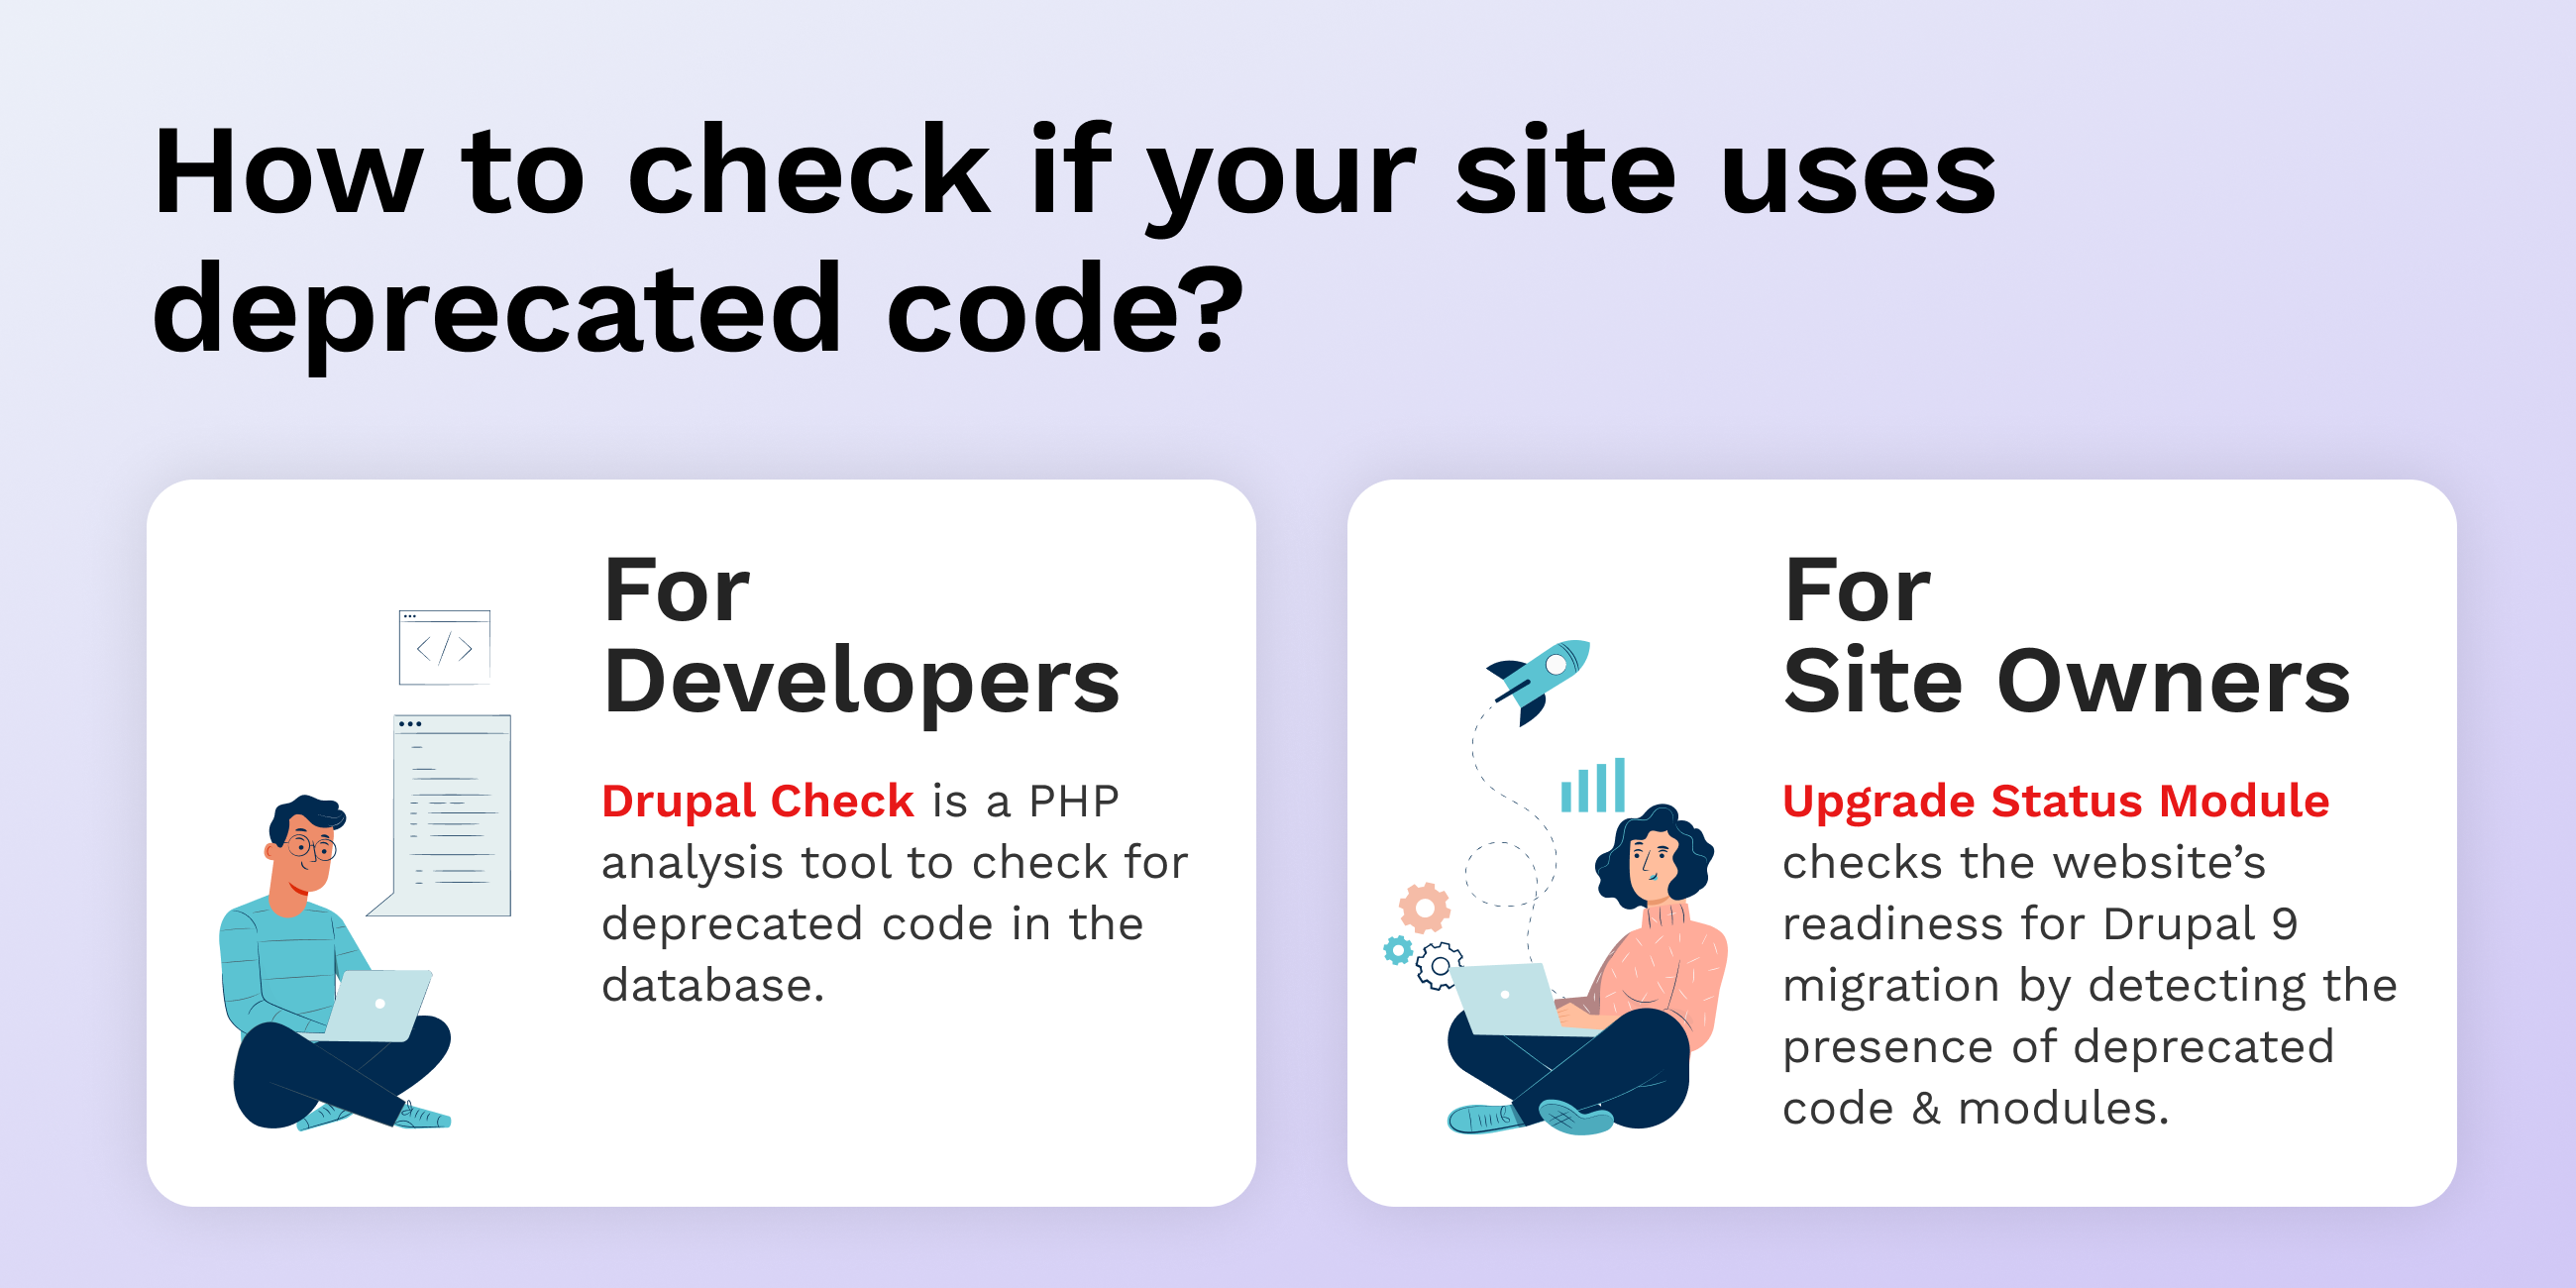
- The latest version of Symfony
With Symfony 3 reaching the end of life in November 2021, Drupal 9 is compatible with Symfony 4 and 5. This upgrade empowers an enhanced website performance and security and improves the developer experience.
- Enhanced security
The removal of deprecated code in Drupal 9 also results in the elimination of bugs and security loopholes from the database. With fewer security threats and updated third-party dependencies, Drupal 9 is the most secure version to date. The community will be releasing regular security patches and updates for Drupal 9 starting from November 2021.
What are the disadvantages of stalling the Drupal 9 upgrade?
If you are still running your site on Drupal 7 or Drupal 8, now is the right time to migrate your website to Drupal 9. With all the innovative benefits and advanced features, Drupal 9 is much more secure and technically stable as compared to its predecessor with extended support. The disadvantages of stalling the Drupal 9 upgrade are as follows:
- Security threat - With Drupal 7 and 8 reaching their end of life soon, the community will eventually stop releasing security patches and updates for it, leaving the website prone to multiple cyber threats.
- Technical disadvantage - The community will eventually stop working on the bug fixes and technical updates for the websites hosted on Drupal 6, 7 and 8. As a result, the features and functionality of the website will get outdated.
- Expensive maintenance - With no community support and outdated technology, the maintenance of the website’s features and functionality will get expensive.
- Server update issues - Websites running on Drupal 7 and 8 will have compatibility issues with mandatory server updates and affect the website’s scalability.
- Less time to prepare for the upgrade - The more an enterprise will stall the Drupal 9 migration, the lesser time they will have to prepare their site for the upgrade.
How is Drupal 9 better than other CMS?
Drupal is the most preferred content management system in the world because of its flexibility, powerful content creation tools and efficient workflows for a remarkable user experience. Drupal 9 is an innovative and technically advanced version of Drupal with low development and support costs.
Drupal is used by a total of 1.7 million websites, and 3.24% of the top 1 million websites in the world.
- Hosting Tribunal
Some advantages of Drupal over other CMS are listed below:
- Community support for security and technical advancements
The support and passion of the Drupal community encourage continuous innovation and improvements in Drupal’s features and modules. An expert team of highly skilled developers and designers work around the clock towards the security and advancement of Drupal.
- Tools for remarkable user-experience
Empowered by Drupal 9’s digital experience platform, developers and marketeers create a memorable user experience for website visitors. Drupal 9 has prioritized user experience with the help of user interface enhancements such as Layout Builder, Claro Administrative Theme and Mobile Responsive Web Features.
- Scalability for consistent website performance
A Drupal-powered website is future-ready with the scope of scaling as per the business requirements. Drupal’s flexible API architecture empowers website for content growth and handling a sudden spike in user traffic. Drupal 9 enables site admins to manage the website’s performance and scalability through Blazy, Content Delivery Network, Server Scaling, and various Site Monitoring Tools.
How and when to migrate from Drupal 7 to Drupal 9?
Drupal 7 has a larger user base with more than 65% of websites still running on it. Moreover, the global coronavirus pandemic pushed Drupal 7’s end of life to November 2021 and the extended support to November 2022. With that said, the community will eventually stop providing updates, security fixes, and enhancements for Drupal 7 sites, making them vulnerable to security threats. Hence, now is the right time to migrate your Drupal 7 site to Drupal 9.
Site administrators can choose to either upgrade their Drupal 7 sites via Drupal 8 or directly to Drupal 9. In either case, there will be a major re-platforming effort involved. It is similar to crossing one big hurdle before the smooth ride of easy future upgrades. For re-platforming assistance, get in touch with our team of Drupal migration experts here.
How and when to migrate Drupal 8 sites to Drupal 9?
Drupal 8 is reaching its end of life in November 2021, a year before Drupal 7. That’s because of D8’s dependency on Symfony 3 which is retiring at the same time too. Hence, now would be the right time for site administrators to migrate their Drupal 8 site to Drupal 9.
But is it migration, or just an upgrade?
If your Drupal 8 site is upgraded to the most recent version release i.e. Drupal 8.9.12, then you are already several steps ahead in the Drupal 9 migration. The only differences between Drupal 8.9 and Drupal 9 are the removal of some deprecated APIs and the inclusion of updated third-party dependencies, such as Symfony and Twig.
Check out our Drupal 8 to Drupal 9 migration story here.
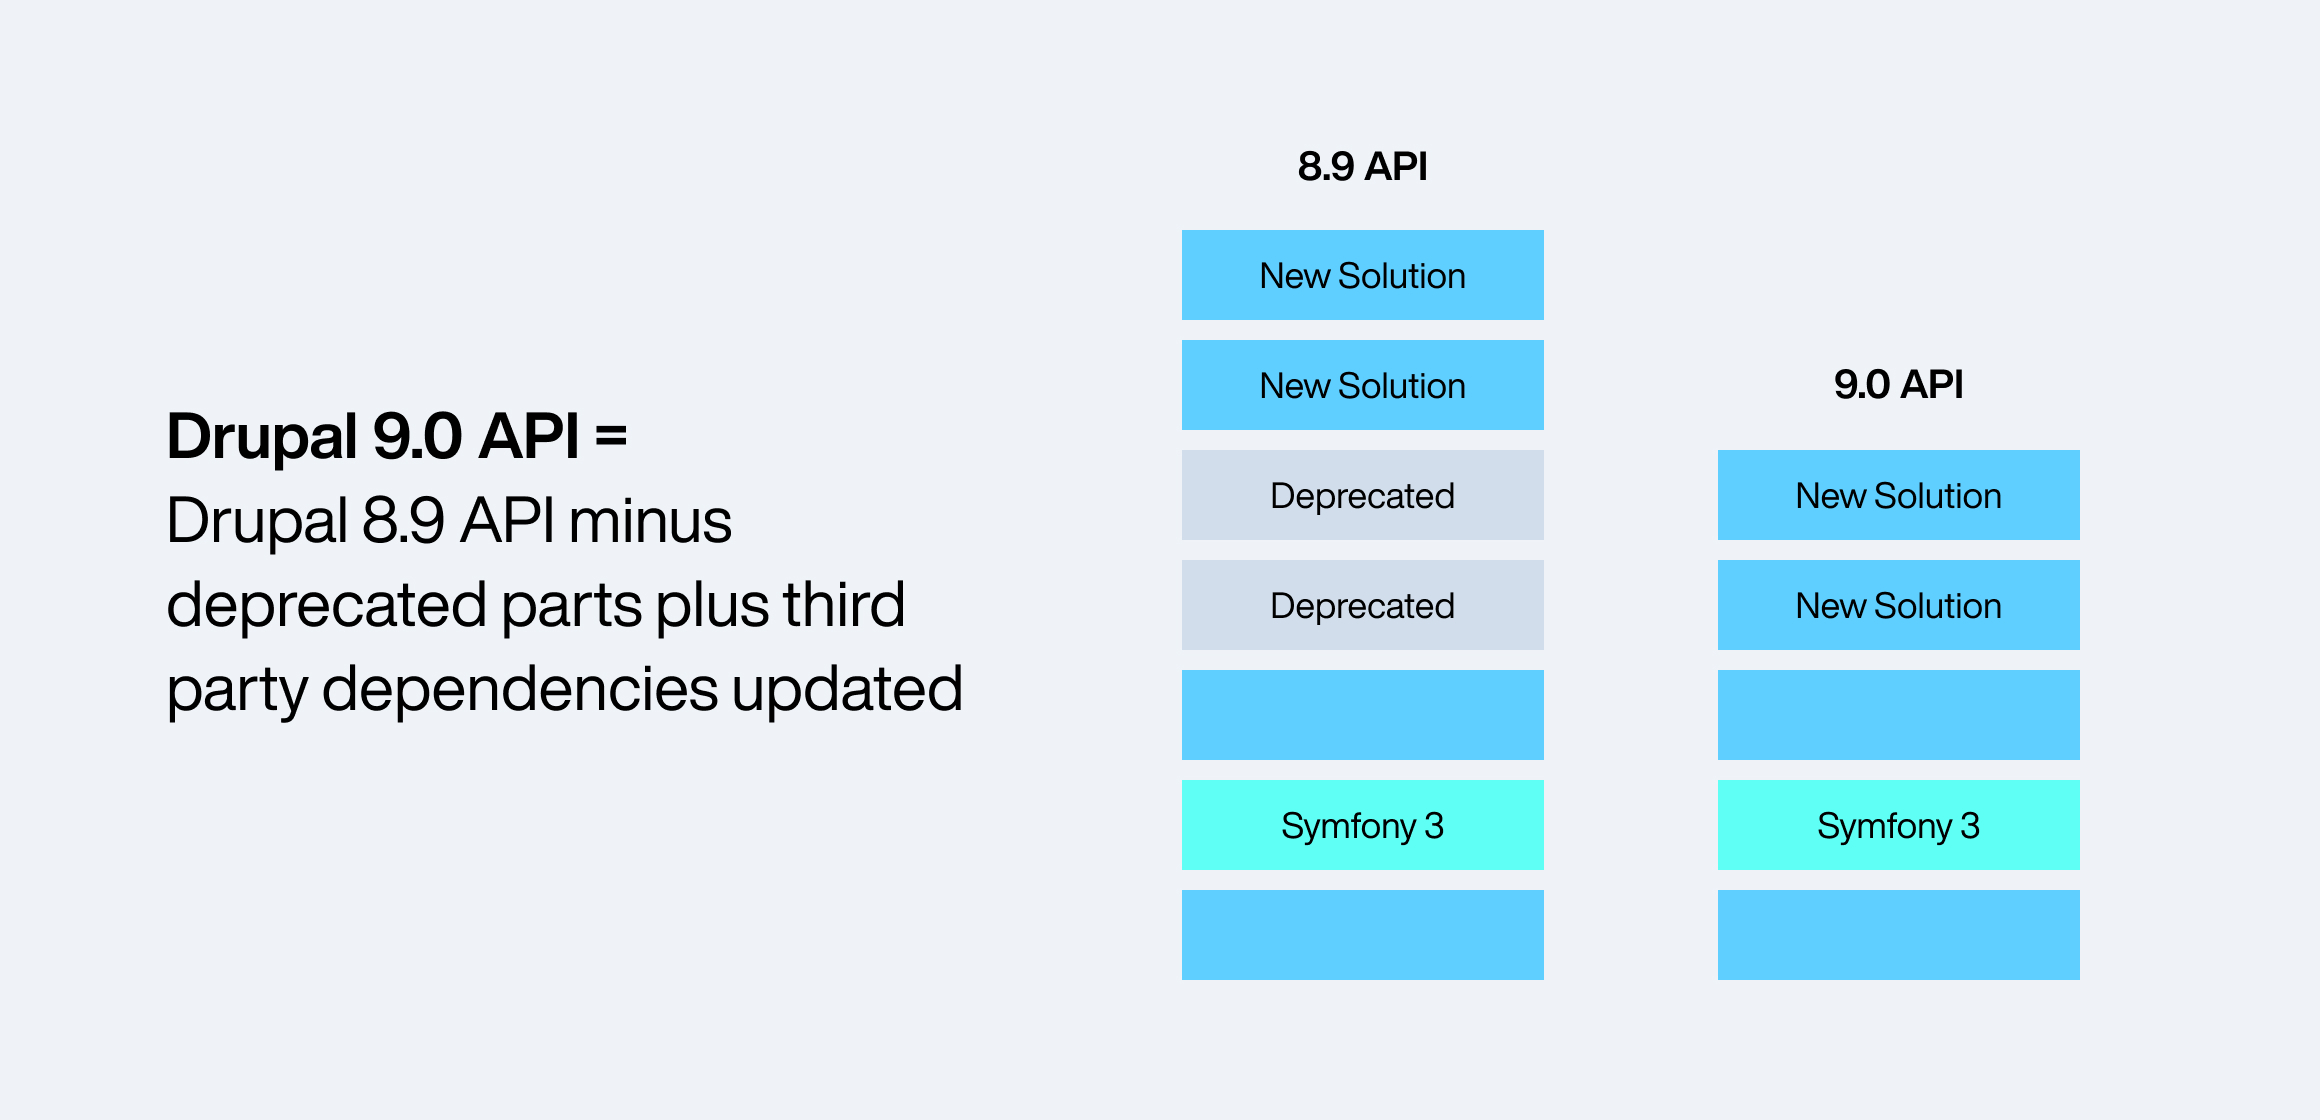
How can I prepare my Drupal 8 site for the upgrade?
Even though it’s an easy upgrade to Drupal 9, this is how you can prepare your Drupal 8 site for a smooth upgrade:
- Ensure that the site, along with its contributed modules, is upgraded to the latest minor version of Drupal 8.
- Install and run the Upgrade Status module on your Drupal 8 site. This module audits the system requirements and compatibility of contributed modules with Drupal 9.
- For any compatibility issues with the contributed modules, check for possible solutions on Drupal.org.
- The third-party libraries and APIs will most likely be deprecated, you may check for any custom modules available for retaining them.
These steps will ensure that your Drupal 8 site is ready to be migrated to Drupal 9. Need assistance with your Drupal 8 site? Reach out to us here.
What are the system requirements for Drupal 9?
The system requirements for running Drupal 9 efficiently are as follows:
Technology Version Requirement Apache 2.4.7 PHP 7.3 and above Drush 10 MySQL or Percona 5.7.8 and above MariaDB 10.3.7 and above SQLite 3.26 and above PostgreSQL 10 with pg_trgm
What is next after Drupal 9?
With Drupal 9’s release in June 2020, the community guaranteed continuous improvements with regular minor version release bi-annually. The first minor version of Drupal 9 released in December 2020, within 6 months of the major version release date. The tentative release date of the next minor version is June 2021.
With Symfony 4 retiring in November 2023, Drupal 9 is estimated to reach its end of life around the same time however, the security support for D9 will continue till 2024. The estimated release date for Drupal 10 is June 2022, more than a year before Drupal 9’s end of life.
Conclusion
Drupal 9 offers more accessible, inclusive and scalable features as compared to Drupal 7 or 8 for enhanced website performance and better user experience. Now is the time to upgrade your Drupal 7/8 sites to Drupal 9 and enjoy its business benefits.
If you still have questions regarding the Drupal 9 upgrade, check out our Drupal 9 migration services. If you are looking for technical assistance in migrating your Drupal site, you can get in touch with our team of migration experts here.

DXPs - Rethinking the Digital Experience
Brands need to provide content experiences outside a website, justifying the shift from web content management to DXPs. Digital Experience Platform's empower brands to craft individualized experiences in real-time, delivering this consistent experience anywhere, each time!
What is a DXP?
Digital Experience Platform (DXP) is an integrated software framework for servicing and engaging various segments of global audiences, across a broad array of digital touchpoints, through the entire service/product or individuals’ lifecycle.

DXPs are preferred by brands today because they allow organizations to control the technology (and hence the experience) from a lifecycle/touchpoints perspective. Brands can build, deploy and continually improve (CI/CD) various digital assets like websites, portals, mobile apps, other digital experiences, and at the same time control the entire ecosystem centrally. This means more power to the brand by being closer to the customers and in control of all touchpoints.
Summarizing. DXPs provide unprecedented power to brands over their customers and prospects by:
- Allowing multiple integrated technologies to work together in tandem to service a wide span of customer touchpoints.
- Providing a unique vantage point and control by one central platform to see, learn, tweak, add and evolve this advanced digital experience.
Evolution of DXP
All the digital systems - CMS, WEM, and DXP are all intended to enable a superior experience and interaction between a brand and its consumer. However, their evolution tells us the story in steps.

Benefits of DXPs
For Brands -
- Control over all touchpoints
- Consistency over all channels
- Open architecture for CI / CD
- Power of all Digital Assets in one
- Campaigns - Connected with business
For Consumers -
- Useful insights - actionable and comprehensive
- Customer orientation - adapt to customers
- Best of technology - in sync with users’ devices
- Everything, anywhere - integrated into 1
- Reduced customer effort and increased satisfaction
Building an ecosystem
DXPs control and coordinate various applications. From a utility perspective, DXPs operate as a set of integrated services offering: User experience, platform and architecture.

User Experience
DXPs provide the users and creators with a superior experience for usage and creation. Be it navigation through the apps on the front-end or parsing through information on the back end. Powering an easy to use and yet the comprehensive experience is central to a DXP. they enable the following:
Personalized Interaction: Personalized access to relevant data, services, and powering applications.
Navigation: Search, Discovery, Sharing using dynamic navigation and multiple search engines/functions.
Collaboration: Seamless knowledge management and collaboration on docs, tasks, calendars and projects.
Customization: Empowering users to customize their own experiences - layouts, notifications, saved items, subscriptions, dashboard etc.
Presentation: DXPs enable brands to craft a digital experience unique to their brand by leveraging the best UI technologies. Various tech elements clubbed with a responsive web design and a progressive web app development, enable DXPs to add richness in the look and feel.
Platform Management
DXPs allow us to create, control and improve the digital experience by tweaking or enhancing the digital ecosystem. Because of their unique architecture - users and the creator can effectively manage all components, as individual pieces and as Integrated whole. Elements of platform management include:
Content Management: efficiently control content and assets across websites, mobile apps, portals etc, in addition to creating, organizing and publishing different types of content across channels
Aggregate: Integrate various applications, aggregate data control over touchpoints, leverage third-party systems for robust services.
Optimization: Analyzing the journey leveraging various integrated components, visualize for actionable decision making, optimizing the experience, and Learning forever!.
Workflow/Process Management: create, adapt, and tweak processes for greater control and rendering right services at the right time - impacting better control over daily work.
eCommerce: DXPs can create your entire Commerce platform and service it, or it could simply integrate as well to manage transactions, logistics, payments and wallets.
Glocalization: Translation and localization made easy, automatic application and learning, ability to shape preferences!
Omni-channel publishing: Attending to the customer on all channels, by publishing synchronous content/data using consistent design, thereby reducing confusion and effort at the customer end, and reducing publishing efforts at the support end.
Architecture
DXPs unique architecture allows having a central technical foundation upon which the numerous components are built. Building on DXP / Connecting components with DXP - allows the business to control and enable and draw a smooth path where a user can shift from one component to another for a seamless experience. Components include
Third-party integrations
Customer Data Management: Talk about CDP / GDPR - DXPs allows collection, unification and synchronization of customer data from all components (digital and analogue channels) to improve customer experiences.
Cloud Enablement: DXP services efficiently run in a cloud-based environment, at a platform level with multi-tenancy, and all third-party infrastructure service providers allow that!
Mobility: build mobile applications, notification, mobile SDK, voice interaction, and under the sun that your brands desire with mobility
Security Administration: impeccable security provided by controlling the data flow centrally throughout the ecosystem
Some platforms that enable us to deliver Digital Experience Platforms are:

Automated Data Migration testing for Drupal
Migration testing is to ensure that your application gets migrated from one system to another without affecting the legacy data and the functionalities. While the migration is in process, the testing team needs to ensure the integrity of the system is intact and that there is no data loss while migrating the data.
Data loss is the most common issue we come across in Migration Testing, and when we have huge data to be migrated we cannot completely depend on manual testing. Because it becomes impossible to verify content and compare it with the source data. If we have automation in place to check the vast amount of data, it will help us find data loss in less time and will give us more confidence in the migrated system.
Drupal 7 to Drupal 8 Migration
Let me share an example, we had a requirement to migrate a university site from Drupal 7 to Drupal 8. Since it was a university site it had heavy data/content including various courses, programs, staff, faculty, events etc. and we needed to ensure that all the data gets migrated with no data loss.
We had around 24 content types and each content type having thousands of nodes. It was impossible to verify this number of nodes manually. So we created an automation framework that helped us verify all nodes.
Our Tool Selection
We started exploring various options using existing functional tools like Behat, Selenium, Cypress, etc. but we wanted to avoid the browser interaction in this data verification process because visiting node pages and verifying data would require a lot of time and when it comes to 1000+ nodes it could take hours. Choosing functional tools which use browsers never suffice our needs when it comes to large amounts of data.
We Chose Drupal
Our source (D7) and destination (D8) were in MySql DB format, so we decided to create a custom tool to verify the data migration. We created a Drupal module having a custom Drush, command that would verify the migrated data. Helping us execute test fasters and at the same time utilise the existing drupal functionalities and its framework in our tool.
Our Approach
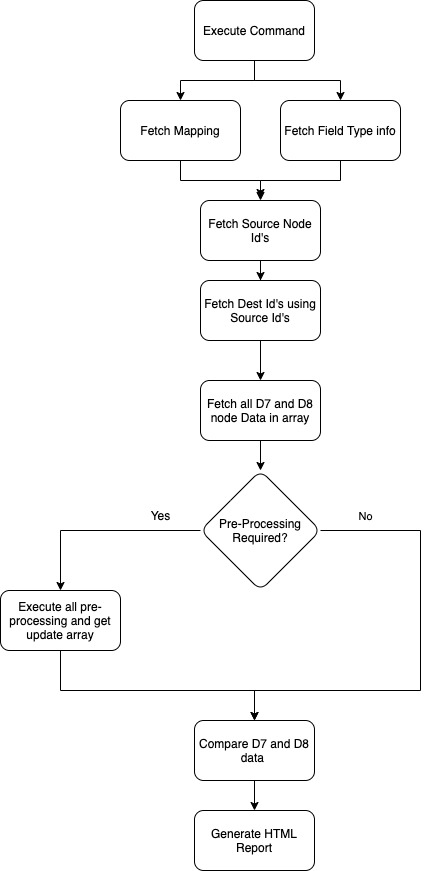
Creating Drush Command and Managing DB connections
We created the custom Drush 9 command - “drush migration:test <content_type_machine_name>”
The Drush command accepts two parameters - a content type name and the number of nodes to check, by default it would check all nodes.
Apart from this, we maintained two DB connections in the Settings.php file by adding another array for D7 - DB connection.
- Mapping Files
We required a few inputs before running the migration tests - we needed the information of each content type and its field mapping in D8. This helped us compare the data with the exact node and data inside each field.
We then created Mapping files in YAML format, each of these files was named in <content_type_machine_name>.yml format, each file had the following format:
The Fields array holds all the information about the fields from D7 to its corresponding D8 field and the Drush command uses these YAMLs as a source of input before querying the DB’s.
- Field Types Configurations
Each field type has specific columns in DB, and those particular columns were used to verify the data.
For example, each field having type text (we get this field type from a mapping file) will have a field table with column name as - <field_machine_name_value> as a column that will hold the actual data. We created field_type.yml which holds all the column information of each field type that will be used to fetch specific data for comparison.
Here the {fieldname} will get replaced with the actual field name from the mapping file. We had to maintain field type for D7 and D8 both because in D8 few column names were updated.
- Fetching all D7 and D8 Node values
To get the node data from the DB, we created a custom function that will dynamically create SQL queries based on mapping and config files for both D7 and D8 databases and fetch the values.
Since we have different naming conventions for tables in D7 and D8 we require to maintain the version name and change the prefix of the field table based on a version like D8 store field values in node_<field_name> and D7 stores in field_data_<field_name> same goes for storing node values D8 uses node_field_data table where D7 uses node table.
We used the fields option for mapping files and for each field, we use the field config file mentioned above to fetch the column of respective fields. Once all the tables and columns are collected we Command-Line built and executed the query on the respective database.
- Comparing Data and Generating HTML Report
Once the data for both D7 and D8 is fetched, both the sets of arrays were compared and failed nodes were logged in the reporter which then generated the HTML report after comparing all the nodes.
Reports
Reporting was important so all stakeholders could understand the reports and identify the issues mentioned in the reports. We created reports in 2 formats:
- Command Line - This was easy to understand and see the progress of test execution. It gives an overview of the number of tests that failed and passed and also provides a link to the HTML. report
- HTML Report - The HTML report had a detailed analysis of the test run, with all the information of failures and passed test cases.
- The Test Information section provided the basic information of the test and content under the test like content name, migration table, mapping file, etc.
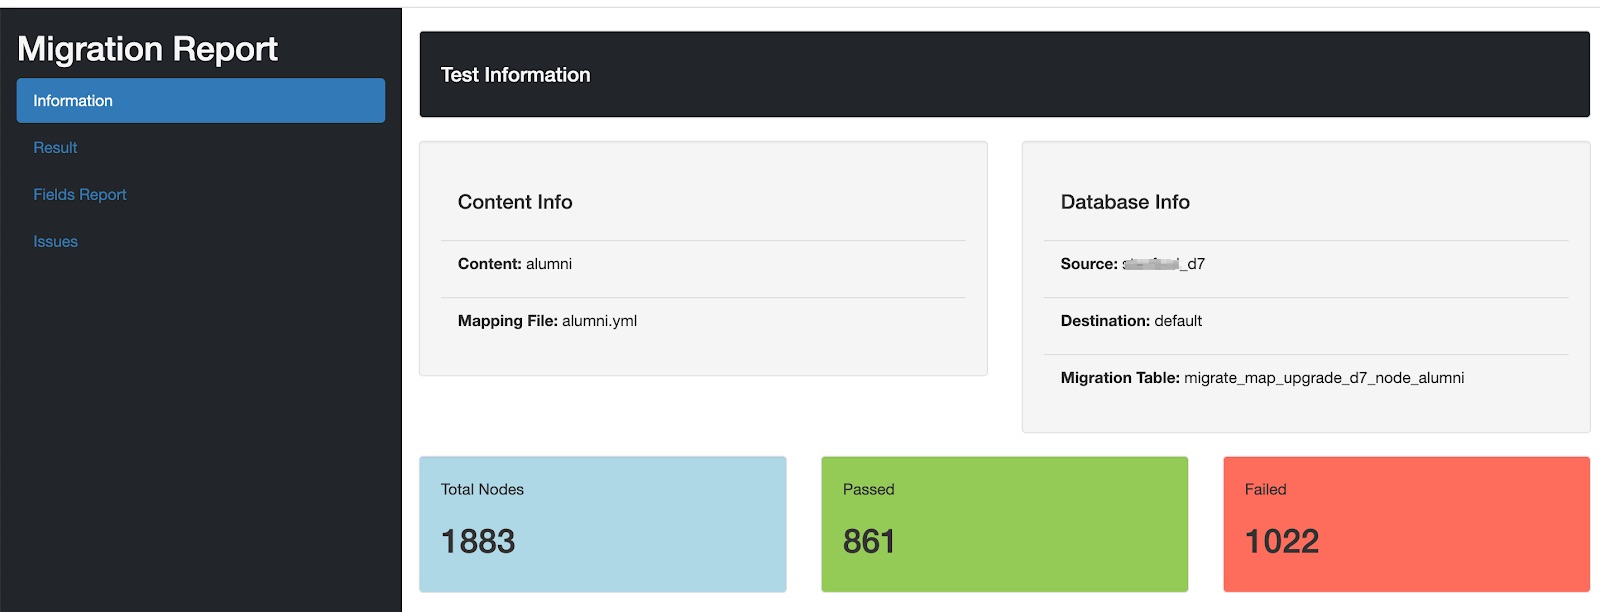
- The Result Section provided a pie chart with the exact number of pass and failures.
- The Fields Report Section highlights the fields’ columns that failed for a particular number of nodes.
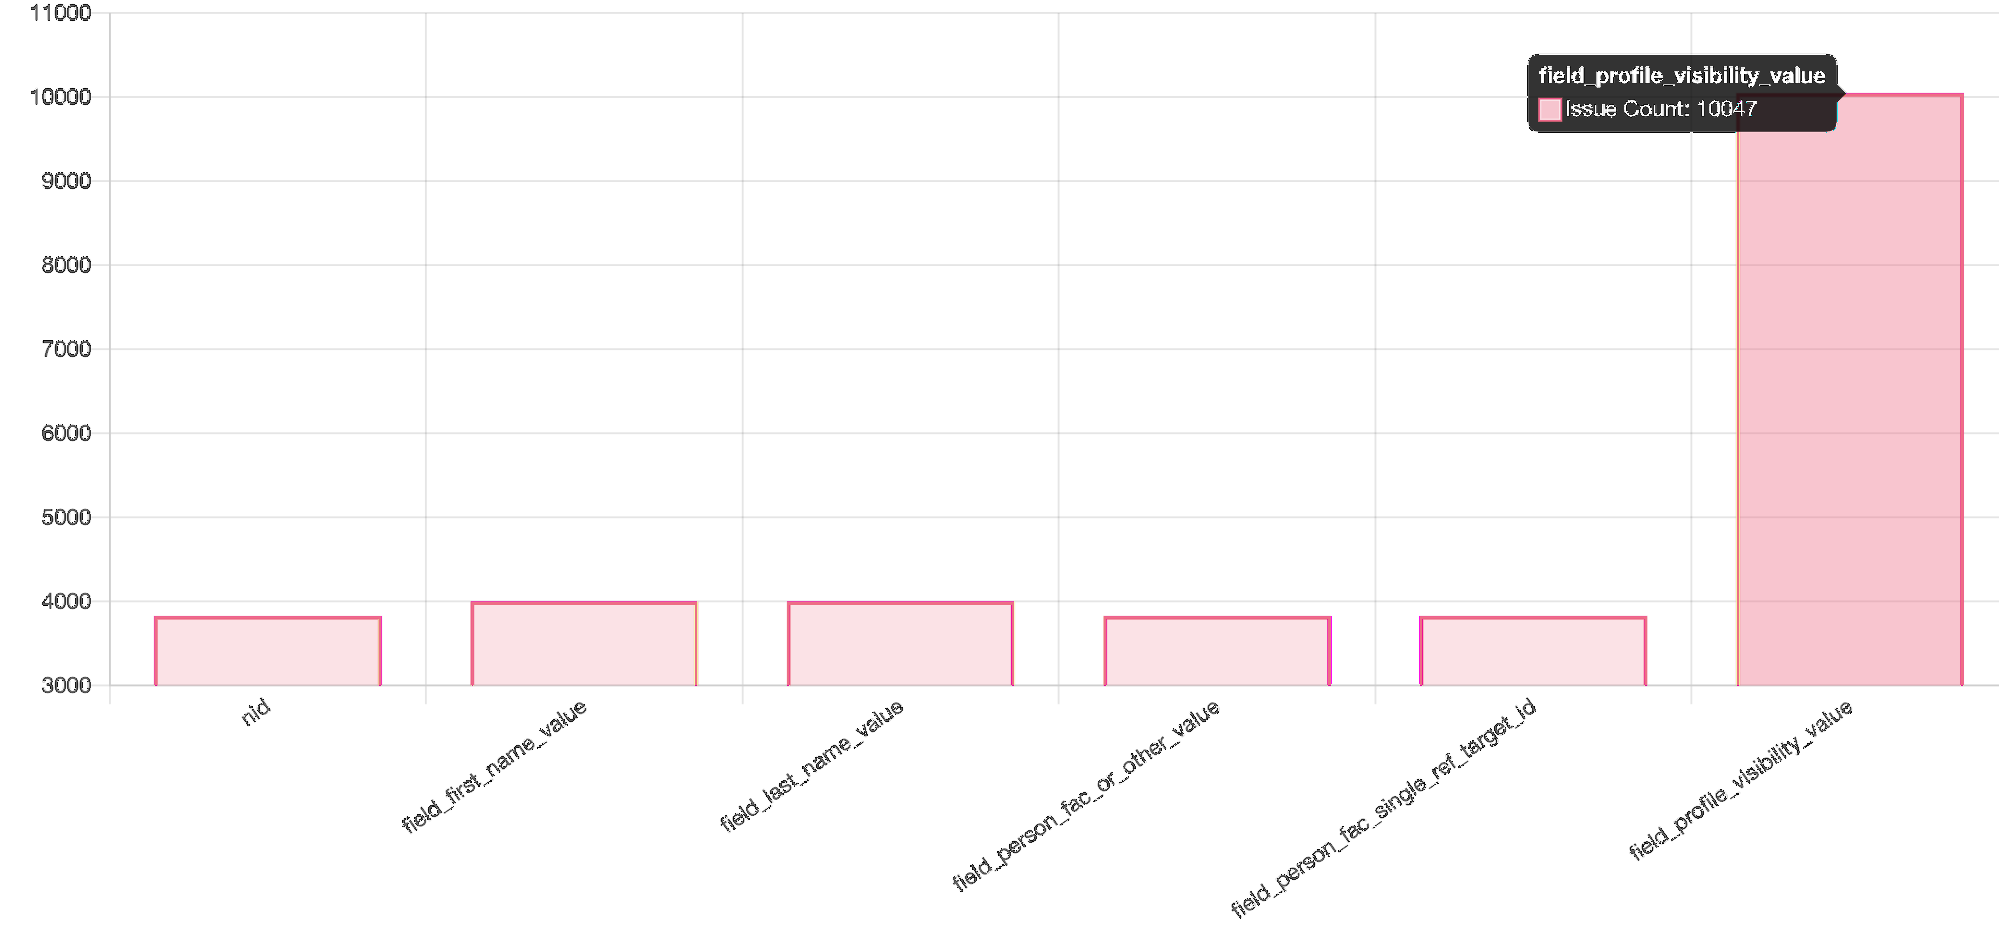
As shown in the above image, the profile visibility field has seen issues with around 10000+ nodes.
- Issues section - This shows the values that are missing or are not matching with the D8 migrated data.
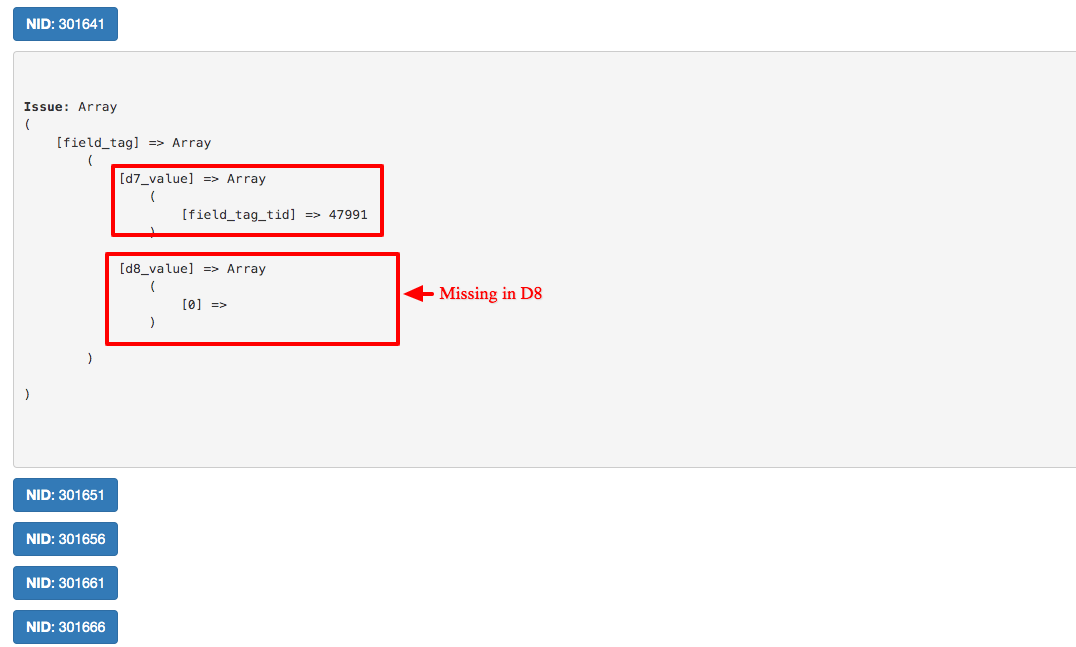
Referring to the above images - we can go through each node and verify the issue and compare the D7 and D8 values that are seen after migration. For example in the above image for field_tags, the tid is missing in D8 which means this tag was missing in the node after migrating it to D8.
Challenges
- False Positives
Because of the client requirements and changes in data format, there were various false positives. There were fields from D7 which were stored in different formats in D8. Following are a few examples:
- Boolean values 0 and 1 changed to true and false
- Date UTC timestamp got changed to other Date formats
- URL was prefixed in D8 as “internal:/”
- The Name field was getting divided into 2 fields First Name and Last Name
- Multiple fields were merged into 1 field
To handle such false positive scenarios we added one more step of preprocessing before comparing the D7 and D8 data. Prepossessing functions were called based on the field type, field name or content type.
The prepossessing class had all preprocessing functions based on the specific field type, field name or content type. These preprocessors updated the D8 data as per changes required and returned the values of the updated array.
Here’s an example of Link Preprocessing for one field:
- Field Collections to Paragraph Migration
D7 had a list of field collections that were used in nodes, these field collections were going to get merged as paragraphs in D8 and had around 44 types of field collections, which were directly mapped to paragraph fields. To handle this separately we directly verified field collections data with paragraphs using different Drush commands because the structure and way of storing data in field collections and paragraphs were different from normal fields.
So we created 2 YAML fields which stored a list of field collections fields and another for paragraph fields.
An example of FieldCollection.yml:
Example for ParagraphType.yml
As shown above, each field collection type had a paragraph type mapped and every field in field collection was mapped to fields in paragraph type. The rest of the process was the same as for nodes; only table and column prefix would be changed.
Demo
Outcomes
- We were able to find and fix more than 5000+ migration issues, which was difficult to find as part of manual testing.
- The creation of the test case was easy and quick, the user had to only create a mapping YAML file.
- Test execution was fast, we were able to test around 5000+ nodes in less than 10secs.
- Reduced the testing efforts and time is taken for testing.
- Good and readable reports helped all stakeholders to understand the issues.
- Dev-testing was easy and quick for developers, they were able to execute tests and identify bugs before passing them to the testing team.
- This framework can be reused and implemented for various content like taxonomy migrations, user migrations etc.
- Improved confidence of stakeholders in delivering huge data migration without data loss.