All blogs
Thank you! Your submission has been received!
Oops! Something went wrong while submitting the form.

Category Items
Gatekeeping your code using git hooks
Explore Git hooks and their role in Android app development. Prevent coding standard violations and syntax errors with pre-commit checks.
5 min read
Git-hooks are scripts that Git runs after/before events like: commit, push and pull. These come in bundled with git itself. So, no need to download any package to use them. Couple of interesting git hooks from a developers perspective are:
- pre-commit: Check for the line of code thats getting committed. This is something i will be explaining in detail in this article.
- pre-receive: Checks for the code that is getting pushed to git-repo. Invoked before the line of code gets pushed to git repo.
- post-receive: Gets triggered once the code is merged to the remote git repo. A simple usecase could be to notify other team members by sending an email with commit link and the commit message or to deploy the committed code to production
All of these hooks are there in the disabled state by default in any project that we clone on our local instance. You might be wondering why haven't i seen them yet!! Let me show you where these files are:
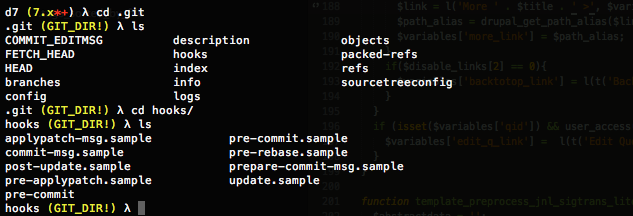
So, these files reside in hooks under the .git folder which gets created while initializing a git repo.
Being a Drupal developer and code reviewer, i have noticed people commiting code which lacks coding standard and at times they have syntactical errors as well. This used to waste a lot of my time as well as the developers leading to obvious problems towards the end of the Projects. So, i started looking for a way in which the code that comes to me for review is clean of these two problems at least, so that i can concentrate on reviewing the code for logic and best practices. This is when i found git-hooks and started playing around with it. Right now i have a pre-commit hook that tests the files for coding standards and syntactical errors before them getting committed and reaching to me. The following code in the pre-commit file takes care of parsing any file thats getting committed against Drupalcoding standards using PHP_Codesniffer and then parsing them against php lint.
One thing to note here is, for your pre-commit hook to work, it should be executable. So,
Php lint comes packaged with php.You can run it for a specific file using
To install PHP_Codesniffer, follow the following:
This should install PHP_CodeSniffer on your machine. In case that doesn't work for you, download a copy of PHP_Codesniffer from here.
Our next step is to get the Drupal Coding standards rule-set so that phpcs can evaluate files against them.
To test phpcs, use the following with a drupal file
Now, your machine would not let you send any commit that is either syntactically wrong or doesn't honor Drupal coding standards. Though most contributed modules follow coding standards; in your project you might end up encountering a contrib module which doesn't adhere to drupal coding standard or stricter checks. To commit those without verification you can bypass this ckeck using --no-verify switch.
Another tip that would save a lot of time setting pre-commit hooks for all projects that you clone on your machine:
Place the git hooks at /usr/local/git/share/git-core/templates/hooks/ and next time whenever you clone a project, all the hooks from here will get copied into the project's git folder.
Keep forgetting JIRA ID in your commit message?
If you use JIRA and for you to track commits against a JIRA issue, developers would need to indicate JIRA ID in their commit message. But well, developers are humans and they forget; fret no more, git commit message hooks are for rescue. A simple script can remind you to enter JIRA ID for each commit message. Just Replace the project_key variable with your project's key.

Git hooks are not specific to any programming language as you can see the pre-commit hook is using PHP while my commit-msg hook is using a bash script. You might be a python guy, so write a hook in python.
Why stop git checks at coding standards and semantics, if you have been checking in lot of drunk code which doesn't make sense -- do check out the video below.
Category Items
Porting access callbacks to Drupal 8
Discover the process of migrating access callbacks from Drupal 7 to Drupal 8, enhancing access control through routing.yml files.
5 min read
Menu system in Drupal 8 has been changed completely. One of the biggest changes being removal of hook_menu(). Now the menu items, its page callbacks/access callbacks... are all defined in yml files(*.routing.yml). There has been a shift in terminology as well from path -> routes.
What are access Callbacks?
Access callbacks are functions returning TRUE if the user has access rights to this menu item, and FALSE if not. Most of the access control can be achieved using Drupal permission system itself, but cases wherein we need to control the access to a menu link dynamically, access callbacks come into play.
e.g., Consider a case where in we need to allow the access to a menu only if it has a CSRF token attached with it.
How do we create access Callbacks in Drupal 7
The example below will validate for CSRF token in the url attached as ?token=<token_value>. If the token is valid, the requesting user will be granted access else not.
How to port it to Drupal 8
- Convert menu into routes
- Create a service for custom access check
- Create access callback class defined in the service.
Covert menu into routes
The menu definition goes completely into d8_demo.routing.yml as shown below.
What is _access_check_token here?
We will take a look at it in the next step.
Details on the attributes used above:
path: Drupal 8 has replaced the use of path over route names. So, wherever in a module a path was being used, it has been replaced with route names. The index for the items array in hook_menu() moves under path attribute. Dynamic paths like d8-demo/% get replaced as d8-demo/{arg}. For entity paths like node/%nodewhich covert the entity id into the object before passing it to the page callback, it becomes node/{node}.
defaults: Page callbacks are converted into controllers now. These controllers could be of type _content, _controller, _form, _entity_view, _entity_list or _entity_form. For more details on which type of controller should be used where check the documentation here.
requirements: Determines what conditions must be met in order to grant access to the route. For more details, check the documentation here. We will be talking about_access here.
options (optional): Additional options on how the route should interact. For more details, check the documentation here.
Create a service for custom access check
arguments: injects other services that this custom service requires. In our case, since we need to validate CSRF token in the path, we need to usecsrf_token service.
For details on rest of these attributes mean here, read my previous blog post on porting hook_init().
Adding access callback
The access callback class declared above in services.yml, needs to be implementAccessInterface.
AccessInterface requires us to define our logic into access(Route $route, Request $request, AccountInterface $account). In our case since we need to validate the csrf_token, we injected csrf_token service into our custom access check. Hence, its available in the constructor for the class. For those who are not familiar with the term dependency injection, watch this excellent video on how its done in Drupal8.
Conclusion
In this post, we touchbased on how to replace hook_menu() with a *.routing.yml file. We also learned on how to declare access callbacks in Drupal8 and then moving the code for access callback into access Controllers.
Next article, we’ll have a look at How to port Blocks to Drupal 8.
Category Items
Porting blocks to Drupal 8 plugins
Learn how Drupal 8's plugin system revolutionizes the way you manage blocks. Explore the step-by-step process of porting blocks into flexible plugins.
5 min read
Plugins in Drupal 8 might sound as a new term for those who have not worked with pluggable entities like ctools in Drupal 7. As the name states Plug + in, its something that can be attached & removed easily, can fit into any context.
Drupal 8 has a nice ecosystem built around plugins now. Those intereseted in knowing more about Drupal 8 Plugin system, here is an interesting video from Drupalcon Portland:
In this article, we are going to talk about only one kind of Plugin which is Block. You couldn't place a block into multiple regions in Drupal 7(without using a contrib module). With blocks being pluggable now, this is solved right in the core.
For Drupal system to recognize a block, in Drupal 7 we had hook_block_info().This has been replaced with annotation-based discovery method in Drupal 8. Lets go through the porting process step by step. The major steps involved while writing a custom block plugin are as follows:
Directory Structure & where should the code be placed?:

Annotation Based Discovery:
Read the complete deabte & detail on why use annotation based-discovery & the performance gains: https://www.drupal.org/node/1882526.
Extending Blockbase Class:
With OOPs in Drupal8, there is a base class that core provides for creating a custom block plugin on top of it. Details on Api available at https://api.drupal.org/api/drupal/core!lib!Drupal!Core!Block!BlockBase.php/class/BlockBase/8
Setting Default Configuration:
Controlling Access:
Block Configuration Form:
Block render callback:
NOTE: Build function must return an array that can be passed to render function to generate HTML. You cannot renturn a static string from build function.
Category Items
Porting hook_init() to Drupal8
Discover how Drupal 8 utilizes Symfony kernel and events for request handling. Learn about essential kernel events and how to create an Event Subscriber for seamless integration.
5 min read
D8 beta is launched and its time to port modules from Drupal 7 to Drupal 8. One of the very widely used hooks hook_init() has been removed from Drupal 8. This has been replaced in favor of Symfony Kernel and events. Hook_init() was was a system level hook defined at core module system/system.api.php.
What hook_init() does?
This hook is run at the beginning of the page request. It is typically used to set up global parameters that are needed later in the request. When this hook is called, the theme and all modules are already loaded in memory.
How does it work in Drupal 8 now?
Drupal 8 has adopted symfony as a part of its core. It uses Symfony kernel and events to do the same now. List of kernel events available in Drupal 8 are as follows:
- KernelEvents::CONTROLLER
The CONTROLLER event occurs once a controller was found for handling a request.
- KernelEvents::EXCEPTION
The EXCEPTION event occurs when an uncaught exception appears.
- KernelEvents::FINISH_REQUEST
The FINISH_REQUEST event occurs when a response was generated for a request.
- KernelEvents::REQUEST
The REQUEST event occurs at the very beginning of request dispatching.
- KernelEvents::RESPONSE
The RESPONSE event occurs once a response was created for replying to a request.
- KernelEvents::TERMINATE
The TERMINATE event occurs once a response was sent.
- KernelEvents::VIEW
The VIEW event occurs when the return value of a controller is not a Response instance.
Drupal 8 provides a way to subscribe to all these events and attach callbacks to be executed when these events occur. If our module needs to perform changes on the request/response object very early to the request an event subscriber should be used listening to the KernelEvents::REQUEST event. Same goes for the other events as well.
How to create an Event Subscriber?
The example below shows a Drupal 7 hook_init() implementation which appends Access-Control-Allow-Origin to the response headers to allow CORS(Cross Origin Resource Sharing).
Steps to convert hook_init into an event subscriber in Drupal 8
- Create a new Service for Event Subscriber
- Attach a callback to the KernelEvents::RESPONSE event in Event Subscriber Class.
- Port the above code inside the attached callback function.
Creating a new service
Create a yml file named <module_name>.services.yml as follows:
class: defines the class implementing EventSubscriberInterface.
tags: Parsing these services is an expensive task for Drupal. It parses all the services.yml files and stores the service definitions in a cached PHP file. These tags help categorize the services.
Attach a callback to the KernelEvents::RESPONSE event
EventSubscriberInterface provides a static function which can be used to attach callable functions to the above mentioned kernel events as shown in the below example.
Porting the logic inside hook_init to the callback function attached to KernelEvents::RESPONSE
Conclusion
In this post, we learned how to replace hook_init() with event subscriber & how symfony kernel events play with event subscribers. We have a better understanding on how Kernel events & callbacks work in Drupal8.
Next article, we’ll have a look at how to port routing access Callbacks to Drupal 8.
Category Items
BigPipe in Drupal 8
Discover the inner workings of BigPipe and how it improves perceived performance by delivering web page sections in parallel, even with complex dynamic content.
5 min read
BigPipe was conceived at facebook as a solution to load dynamic pages quickly. Its a way of loading various sections of your web-page in parallel so end-users don't have to wait for the DOM to be completely ready to start interacting with the website. In this article, we will be talking about the architectural changes that allowed this kind of rendering & dive into big_pipe module to see how it works.
P.S: A common misconception with bigpipe is that it increases the performance of the webserver stack to return pages faster. The reality is that the load time for a page stays the same, the advantage being that a user can start interacting with a section of the page as soon as its ready (ala Perceived performance).

In the screenshot above, the request completion time is the same for both: big_pipe enabled & disabled. However, the page is ready for user-interaction at 44 ms in case of big_pipe enabled, while for the disabled case, its 964 ms.
To understand Bigpipe caching strategy, lets first look at how caching works in Drupal 7 and Drupal 8
Caching in Drupal 7

Caching in Drupal 8

To understand the above examples better, lets take a look at the data being rendered in different regions.
- Header: Menu & Banner. These are mostly static & are not going to change frequently. (Good candidate for caching)
- Footer: Menu, Legal text etc. Again mostly static content (Good candidate for caching)
- Content: Content of node with nid:1. This is not going to change until an update to the node. (Good candidate for caching with proper cache invalidation)
- Sidebar 1: User info block. Supposed to be different for each user. (Can't be cached)
- Sidebar 2: Search block. The layout would stay the same. (Good candidate for caching)
Now, if we were talking about Drupal 7, the complete page would be cacheable for anonymous user. But, there would be no caching for authenticated user, even though there are parts of the page that can be cached. For authenticated requests in Drupal 7, one could use the modules like authcache to have better performance.
However in Drupal 8 core, this is doable using the dynamic page cache module in the core. Drupal 8 core has support for cacheability metadata, that aids dynamic page cache module. To enable the module, go to admin/modules -> select dynamic page cache & save the configuration.
(Stay tuned for our next post to read about Authcache Vs Dynamic page cache)

Cacheability metadata: Cache Tags & cache contexts
The background concept that brought dynamic page cache module in core was introduction of cacheablility metadata:Cache tags & Cache contexts.
Auto-Placeholdering
One major way in which Facebook or any general implementation of BigPipe varies from the one in Drupal is its ability to identify regions that can benefit from BigPipe delivery.
When we talk about caching sections of a page, there could be sections that cannot be cached or caching them is an overhead. Drupal can now identify such sections of the page based on a few conditions(explained below) automatically. These sections are replaced by placeholders by Drupal core. So now while preparing the HTML response, Drupal doesn't need to wait for these non-cached(uncacheable) parts to pull fresh data. Rather, it can send out the skeleton markup with the non-cached parts of the page rendered as placeholders. The processing of these placeholders can be done via placeholder strategies defined. Drupal core has only one placeholder strategy called as single flush. But, it also provides a way for contrib modules to create their own strategies(This is where big_pipe module hooks in).

- High Cardinality: Some content that can have a lot of variations. e.g., a block that needs to change per user.
- High Invalidation rate: If the content of a block is going to change frequently.
- Low max-age: Again cached content with low max age point to the high invalidation rate.
While rendering a page, all such blocks are identified & automatically replaced with placeholders. Drupal 8 core uses the following critera for placeholdering:
- max-age: 0 - Render array with max-age set to 0 cannot be cached. This makes them a perfect candidate for auto-placeholdering.
- contexts: ['session', 'user'] - Render array with session & user contexts will have a very high cardinality. This makes caching them an overhead.
- tags: [] - Render array that don't have a cache tag are again not cacheable, making them a perfect candidate for auto-placeholdering.
Caching is performed once the DOM is ready with cached content + placeholders. The next step is to flush these sections of the page with content (Single-flush strategy). Core provides only with single flush strategy wherein the complete page(with unchanged placeholders) is sent to Drupal\Core\EventSubscriber\HtmlResponsePlaceholderStrategySubscriber where placeholders are flushed out at once to replace them with actual content. Drupal 8 core allows contrib modules to define their own flush strategies leading to the support for BigPipe, ESI etc.
To read more about the cacheablility metadata & auto-placeholdering, I would recommend going through:
P.S: The flush strategies & placholdering is only applicable for HTML response.
Enter Big Pipe Module
At a high level, BigPipe sends a HTML response in chunks:
- one chunk: everything just before </body> — this contains BigPipe placeholders for the personalized parts of the page. Let's call it The Skeleton.
- n chunks: a <script> tag per BigPipe placeholder in The Skeleton.
- one chunk: </body> and everything after it.
The major way in which Drupal's implementation differs from Facebook's implementation (and others) is in its ability to automatically figure out which parts of the page can benefit from BigPipe-style delivery using auto-placeholdering.
BigPipe can only work if JavaScript is enabled. BigPipe module in Drupal also allows to replace placeholders without JavaScript. Technically its not BigPipe, but use of multiple flushes termed as 'no-JS BigPipe'.
This allows us to use both no-JS BigPipe and "classic" BigPipe in the same response to maximize the amount of content we can send as early as possible.
Getting deeper into implementation:
- BigPipe placeholders: 1 HtmlResponse + N embedded AjaxResponses.
- BigPipe does not use multiple AJAX requests/responses. It uses a single HTML response. But it is a long-lived one: The Skeleton is sent first, the closing </body> tag is not yet sent, and the connection is kept open. Whenever another BigPipe Placeholder is rendered, Drupal sends (and so actually appends to the already-sent HTML) something like <script type="application/json">[{"command":"settings","settings":{…}}, {"command":…}.</pre>
- The <script> tag above is same as that of an Ajax response. The BigPipe module has JavaScript that listens for these and applies them. It is termed as Embedded AJAX Response (since it is embedded in the HTML response).
- No-JS BigPipe placeholders: 1 HtmlResponse + N embedded HtmlResponses.
- The Skeleton is split into multiple parts, the separators are where the no-JS BigPipe placeholders used to be. Whenever another no-JS BigPipe placeholder is rendered, Drupal sends (and so actually appends to the already-sent HTML) something like <link rel="stylesheet" …><script …><content>.
- For every no-JS BigPipe placeholders, the associated CSS & JS is sent alongside(if it has not been already sent viadrupalSettings.ajaxPageState.libraries). This is termed as embedded HTMLResponses.
Combining all of the above, when using both BigPipe placeholders and no-JS BigPipe placeholders, BigPipe sends: 1 HtmlResponse + M Embedded HTML Responses + N Embedded AJAX Responses.

Disclaimer: The module is under active development now. Things you see below might change going forward. The section below will focus on diving into the code chunks from BigPipe module to see how it plays with the core. I have tried to put down parts of the module detailing how the module is hooking into the core.
How does the module hook into the core's placeholder strategy?
The module actually doesn't hook into the core's placholdering strategy, but defines a new one.
ChainedPlaceholderStrategy in core looks at the available placeholder strategies. These should be tagged with placeholder_strategy.
How does the module create placholders?
BigPipe module defines its own placeholder strategy Drupal\big_pipe\Render\Placeholder\BigPipeStrategy which implements PlaceholderStrategyInterface.
- This strategy is activated only if the current request is associated with a session. Without a session, it is assumed this response is not actually dynamic & can be handled using internal page cache.
- The strategy also defines 2 sub-strategies to handle the 2 cases defined in the big_pipe_flow image defined above:
- with JavaScript enabled: #attached[big_pipe_js_placeholders]
- with JavaScript disabled: #attached[big_pipe_nojs_placeholders]
HtmlResponseAttachmentsProcessor doesn't know about BigPipe placeholders?
BigPipe module creates another service html_response.attachments_processor.big_pipe to override the the processing of attachments with the request.
BigPipeResponseAttachmentsProcessor
extends HtmlResponseAttachmentsProcessor overriding function processAttachments to do the following:
- Remove BigPipe placeholders from attachments
- Process the attachments that HtmlResponseAttachmentsProcessor understands
- Attach back the BigPipe placeholders
Drupal core responds <html> using HTMLResponse which uses single flush. How to respond using n-flush strategy provided by BigPipe?
BigPipe module provides with BigPipeResponse which extends HtmlResponse. BigPipe module defines its own EventSubscriber to handle response using BigPipeResponse.
- Class BigPipeResponse overrides sendContent function to make use of bigPipe service(which is actually responsible for sending data in chunks).
Where does BigPipe do the heavy-lifting of chunked response?
BigPipe defines another service to handle this big_pipe.
This service is actually responsible for the heavy lifting needed for chunk-ed response. The control is passed down to this service from BigPipeResponse class we discussed int he above section. Its responsible for:
- Breaking down the content being rendered into parts: preBody, placeholders, postBody
- Collecting all the assets in drupalSettings.ajaxPageState.libraries & attach them with each response.
Helper functions:
- sendPreBody(): Sends everything until just before </body>.
- sendPlaceholders(): Sends no-JS BigPipe placeholders' replacements as embedded HTML responses.
- sendPlaceholders(): Sends BigPipe placeholders' replacements as embedded AJAX responses.
- sendPostBody(): Sends </body> and everything after it.
Where are the AJAX commands set in the BigPipe placeholders processed?
BigPipe defines its own library for handling assets & defines big_pipe.js in it.
Javascript is responsible for:
- Processing all the scrip tags in between script[data-big-pipe-event="start"] & script[data-big-pipe-event="stop"
- Executes Ajax commands included in the script tag
The complete magic recipe for rendering the blocks in parallel is above.
Thats pretty much it from my end. I'd really like to thank Wim Leers, Fabianx and others who worked really hard on bringing this caching strategy to Drupal 8 and working on getting it into core with 8.1 release.

Category Items
Fetch all the results of a View | Drupal Views
Optimising Drupal Views to retrieve complete, accurate datasets while maintaining performance.
5 min read
There are scenarios when outside of a view we need to fetch results of any particular view. This is a very specific case when we just want the records compiled by Drupal Views. In that case obviously views api or views hooks are of no use, as we are not looking for event driven activities. It’s just the results needs to be fetched using views because of the complexity of the criterion on which these results are computed.
We won’t go for this approach when we want simple results like all the nodes of a specific content type sorted alphabetically. In that case, simply db_select would be better choice again depending on various project specific factors. In general, we can’t actually tag any approach as the best or optimal for general purpose as these are scenario specifics.
In our case, the scenario is we have a very complex view having good amount of filters or simply i would say the corresponding sql query is complex. Now in that case outside of the view we have two options to get results:
- Function views_get_view_result()
- Executing corresponding SQL Query
Approach 1: Function views_get_view_result():
This looks promising, provided by views module. Accepts views name and display_id as parameter and simply fetches you the result. What we wanted is accomplished.
Limitation: In case of pagination, probably we want to get all the results and this approach fails there. We cannot fetch all the results if the corresponding view limits results to specific number per page. So, what should we do next!
Let’s look at our second approach, would that be useful in our case?
Approach 2: Executing corresponding SQL Query:
We can directly execute static sql query, which is a good solution for this scenario. But when we want to enjoy further flexibilities of this approach, say we want to change the query a bit then what? It is possible with this approach but the method is not recommendable. Infact best way to proceed further using this approach is to convert static query into dynamic drupal query which is a tedious process. So, how to achieve this?
Final Solution:
Looking at how the views work, we got a very promising structured way of solving all our related problems. Views provide several methods for views object which can be used to get all the results with/without customization of a particular view. Let’s see how:
So, we finally have all the results of a view. As far as the above implementation is concerned, we basically are fetching a view, then building a specific display of that view and after customization we are finally executing it to get the results. In simple language, we are creating a similar temporary instance to get the desired results.
Hope this helps you
Category Items
Art of writing template files - Drupal 8
Drupal 8 Theming best practices to be followed for writing better template files to improve performance and efficiency
5 min read
When it comes to Drupal 8 theming layer, there is a lot Drupal 8 offers. Few concepts that come to mind while thinking of Drupal 8 theme layer include Renderable Array, Cacheabilty, Cache Context, Cache Tags, Twig and Preprocessors. Some of these are improvements of old concepts, while others are new introduction in Drupal 8. In this post, I'll share my experience on how to best utilise these concepts for a robust and performant frontend with Drupal 8.
To get best out of this post, you should be comfortable with:
- Drupal 8 #cache
- Twig Debug
- Preprocessor functions
We will focus on the following concepts:
Renderable array caching, walk through Drupal 8 caching power and Cache contexts
Drupal 8 comes with a lot of changes and almost all of us are even familiar with these changes. So, now it’s high time we start exploiting these to get best out of Drupal 8. It’s very important to understand how Drupal 8 caching works. Go through drupal.org documentation besides implementing the same once thoroughly on a vanilla Drupal instance. At the end have an answer to all these questions:
- What is a renderable array?
- Understand that every renderable array is cacheable.
- One Renderable array can consist of other renderable arrays (nesting):
So it’s like, a page is a renderable array which actually consists of other renderable arrays: region (renderable) arrays and in a region, we can have block (renderable array). The main point to understand here is hierarchy and nesting and the caching among this.
Reference: https://www.drupal.org/docs/8/api/render-api/cacheability-of-render-arrays - Making use of cache context:
A general mistake I have seen many of us perform is using
There come few scenarios where we cannot use direct caching but that particular array can be cached on per user/URL basis. Especially for those cases, we have cache contexts. It’s very easy concept and you would love once you start using this, there are several other bases on which you can decide cache-ability of a renderable array.
Reference: https://www.drupal.org/docs/8/api/cache-api/cache-contexts
Selection of template files/preprocessor functions and placement of the same.
With great flexibility, comes responsibility. Most of the time, we come across scenarios where we need to do tweaks to field output based on certain requirements. Drupal provides us handful of ways to do so, an important point here is to know and analyze what will be the best way to achieve expected results for the case. So, generally, we follow the following rule for customizations:
Hence, when we have to do some custom work where we have to alter data conditionally, we make use of preprocessor functions. Consider overriding display of date field value based on certain conditions. In that case, a general approach we may take is to write hook_preprocess_field. But we need to consider that this preprocessor will run for all fields, which will definitely affect the performance. In this case, writing a specific preprocessor for date field makes more sense.
One more important thing regarding hook_preprocess_HOOK:
Consider a scenario, where we are using node.html.twig for node and then we have to do some alteration for a specific content type teaser view.

In that case creating specific twig and then using the specific preprocessor (node__content_type__teaser) for alteration is an extra step, instead, we can directly use the preprocessor hook_node__content_type__teaser without writing the specific twig file. So, for a generic twig, we can make use of specific hooks as suggested by twig debug too which definitely gives better performance.
Regarding placement of these preprocessors, it is completely based on the project requirement and usage. We place them in the module, in case the functionality to be provided should work on a modular approach. Placement of Preprocessors will work both in module and theme, while for twig files placing them in the module may need hook_theme_registery_alter based on the twig file we are overriding.
Use of Drupal Attributes
It’s not recommended to hardcode drupal attributes (HTML attributes like id, class) in twig files and the reason for this is: there are several modules which perform alteration of drupal attributes and make use of Drupal attributes and will no longer work if we hard code this. One example I can think of is Schema.org module which provides RDF mapping through attributes only.
Moreover, I would always suggest doing styling based on default classes provided by Drupal. Drupal by default provides appropriate classes both generic and specific and id for better styling. It is our duty, to make better use of them by understanding Drupal way. It also helps in saving project time and cost especially when we are following best practices and Drupal way of doing things. Drupal Core and Contrib are the best examples of how to proceed further on this. Also, following a proper structure makes possible use of styling written in Drupal core itself.
Logic in template/twig files - Yes/No?
In Drupal 7 To speed up the output process, it’s always recommended to avoid writing logic in template files. Instead, as discussed earlier consider writing preprocessors for this purpose. But with Drupal 8 adopting Twig Theme Engine things are different now. Doing tradeoff among the twig and preprocess (PHP) is mainly centric over performance concerns. We basically need our site to be faster. Drupal 7 PHP Engine used PHP theme engine and hence we recommended avoiding logic in template files, but in D8 with twig into effect, we have a faster theme engine with several twig filters, functions to be used. So, here we categorize our logic in 2 ways based on the type of work to be accomplished: soft logic and hard logic.
Soft Logic: Consider a scenario where we need to display comma separated values. Now, in this case, instead of writing a preprocessor for altering data we should use available twig filter "safe_join". It is definitely faster than the traditional way of using PHP preprocessor.
Hard Logic: In the above case, let's say if the value is taxonomy term and we need to print all the parent taxonomy term too. Then we need to load parent terms and we can then join them for final display, then this preprocessing should go in preprocessor only.
Frontend / Backend Collaboration
One more important thing I’ve observed is, it is very important to have a good collaboration between frontend and backend developers during the project. Sometimes as a frontend developer we come across weird requirements, in that case, it is very important to sit together to understand requirements and get the things done in the Drupal way to achieve best out of Drupal.
Also, go through this official guide to understand best practices for Drupal theming: https://www.drupal.org/docs/8/theming/twig/twig-best-practices-preprocess-functions-and-templates
Category Items
Sublime -- awesome sauce for Drupal
Explore essential Sublime Text plugins for Drupal development. Autocompletions, coding standards, and fast searching made simple.
5 min read
Those of you, who have been living under the rock and "Sublime Text" is alien, please refer the following blog posts:
How many times have your system got struck using various memory-sucking Heavy IDEs? I am sure most of us want to use a lot of features that an IDE could provide us. But at the same time, we think about how much of memory would it take to have this feature up and running. Will my system be able to sustain it or no?
Sublime text is a really light-weight editor which solves all these problems for us. I have tried various editors like eclipse/phpstorm/comodo and many more but the performance that I get with sublime is not comparable with them. Being a Drupal developer, my needs are pretty simple. The few things that I want my editor to do for me are:
- Easy Autocompletion for various API functions
- Easy way for Doxygen style commenting
- Ability to check for Coding standards
- Fast searching
If you have or are using any IDE right now for drupal development, you would have already started counting the plugins like Xdebug, Codesniffer and various other plugins that you would need to have these features up and running. Sublime makes it really simple to set these up with its extensive list of plugins and a simple plugin manager called as package manager. If you haven't yet installed package manager, i would suggest getting it setup (makes it really easy to install the plugins)
In this article lets go through the plugins that sublime offers for the first 3 basic features mentioned above:
Drupal Autocompletions/De-oxygen style Commenting
Drupal-sublimetext provides us with autocompletions, deoxygen style commenting for functions and snippets for drupal hook suggestions. Installing this is pretty simple.
For linux/Windows:
Type ctrl+shift+p and type install. This will bring up a list of options. SelectPackage Control : Install Package. This will bring up a list of sublime plugins installable via package manager.
For Mac OS X;
Use cmd+shift+p

Type in Drupal and press enter.

Ability to evaluate code against Drupal Coding Standards(Drupalcs)
Instead of evaluating your module using coder, you can now do it right in your editor. Sublime has this cool plugin DrupalCodingStandard. Setting it up is pretty easy:
copy DrupalCodingStandard.sublime-build into Packages/User directory. On Mac OS X, ~/Library/Application Support/Sublime Text 2/Packages/User
Now, you need to install PHP Code Sniffer which this plugin makes uses to evaluate your code. Follow the steps here to install phpcs and ad Drupalcs. To evaluate your code in sublime,
Select Tools > Build System > DrupalCodingStandard
Open a Drupal file and press
ctrl + B (on linux/windows)Orcmd + B (on Mac OS X)

Easy Searching(ctags)
Sublime makes it easy searching for functions across a project by using ctags. Install it using package control(Search for Ctags). To configure ctags on your machine,
This package expects ctags to be installed on your dev machine. Having trouble setting up ctags on your machine, take a look at the instructions here.
Ctags doesn't know that .module and .inc files are php files to be indexed. To add these to mappings as well,
Now goto your project root folder and run ctags command.
Ctags can be updated from now on from sublime itself. Just right-click on the folder and click on Ctags: Rebuild Tags.

Thats all you need to do and now your sublime text 2 editor is powered up with tools making your development life much easier..:)Stay tuned for my next article explaining how to configure your dev machine to avoid checking in a piece of code thats not complaint with Coding standards/has some syntactical errors through GIT.
Category Items
Our journey with MEAN
Discover the power of MEAN stack - MongoDB, Express, AngularJS, and Node.js. Learn how these technologies form a dynamic foundation for building robust web applications.
5 min read
MEAN has been around in node.js landscape for over a year now and has continued to gain substantial traction in last 6 months with an active community sprouting around it. If you are new to MEAN, let me clarify its not a new framework to build evil web applications as the name might suggest, but is an acronym made up of the base technologies its built upon.
M-Mongo
E-Express
A-AngularJS
N-Node.js
Our journey with MEAN started with a project request that needed highly realtime elements and a very rich UI, at this point of time we had built couple of webapps using early versions of express and wanted to scout whats new out there and found MEAN; an excellent starting point for our app. One of the reasons we selected MEAN was for the perfect combination of technologies we wanted to use -- Mongo as a database, Angular as our front end framework and Express/Node to handle our server side code. One of the things that sustained our faith in MEAN was quick response from the MEAN community on github issues which also pushed us to contribute our fixes to mean core. The first Pull Request that got accepted was the simple "Forgot you password email" followed by code style changes to mean core, we found the responses on the issue really encouraging and was acknowledged by community by awarding MEAN Ninja of the month to our own Pratik Bothra.
Around the same time MEAN was changing and had a major refactoring around packages, similar to modules/plugins on your favorite framework, this also introduced MEAN cli that made it even more attractive to us. Talking to Lior (Founder of MEAN), we soon saw the vision around packages and had quite a few things which could be contributed from the app we were building. Our first package was comments, that allows developers to enable comments on models with little tweaks. To use the package just install it using mean-cli:
and follow the instructions on the example page & README file. The story continued and we soon followed it up with image-cropping package. This package allows developers to enable image cropping in their application in multiple ways both on client end & server end. Also, it saves the file to a destination directory as required. You can install it by:
There is tons of help in the README to setup cropping as per your taste.
MEAN Packages are growing every day and there are packages for admin dashboard, translation support, upload, sockets and many more, there are substancial improvements planned for MEAN CLI and mean core as well. So, don't stay back! If you are node.js developer looking for a rapid framework to build realtime, peformant applications checkout MEAN and join the community. As for us, our journey has been very rewarding and without a doubt will bring in more excitement and challenges in future.
Category Items
Lazy Builders in Drupal 8 - Caching FTW
Explore how lazy builders in Drupal 8 revolutionize caching, making it easier to manage complex content. Discover the performance benefits of this advanced caching strategy.
5 min read
Drupal caching layer has become more advanced with the advent of cache tags & contexts in Drupal 8. In Drupal 7, the core din't offer many options to cache content for authenticated users. Reverse proxies like Varnish, Nginx etc. could only benefit the anonymous users. Good news is Drupal 8 handle many painful caching scenarios ground up and have given developers / site builders array of options, making Drupal 8 first class option for all sort of performance requirements.
Lets look at the criteria for an un-cacheable content:
- Content that would have a very high cardinality e.g, a block that needs to display user info
- Blocks that need to display content with a very high invalidation rate. e.g, a block displaying current timestamp
In both of the cases above, we would have a mix of dynamic & static content. For simplicity consider a block rendering current timestamp like "The current timestamp is 1421318815". This rendered content consists of 2 parts:
- static/cacheable: "The current timestamp is"
- Dynamic: 1421318815
Drupal 8 rendering & caching system provides us with a way to cache static part of the block, leaving out the dynamic one to be uncached. It does so by using the concept of lazy builders. Lazy builders as the name suggests is very similar what a lazy loader does in Javascript. Lazy builders are replaced with unique placeholders to be processed later once the processing is complete for cached content. So, at any point in rendering, we can have n cached content + m placeholders. Once the processing for cached content is complete, Drupal 8 uses its render strategy(single flush) to process all the placeholders & replace them with actual content(fetching dynamic data). The placeholders can also be leveraged by the experimental module bigpipe to render the cached data & present it to the user, while keep processing placeholders in the background. These placeholders as processed, the result is injected into the HTML DOM via embedded AJAX requests.
Lets see how lazy builders actually work in Drupal 8. Taking the above example, I've create a simple module called as timestamp_generator. This module is responsible for providing a block that renders the text "The current timestamp is {{current_timestamp}}".
In the block plugin above, lets focus on the build array:
All we need to define a lazy builder is, add an index #lazy_builder to our render array.
#lazy_builder: The lazy builder argument must be an array of callback function & argument this callback function needs. In our case, we have created a service that can generate the current timestamp. Also, since it doesn't need any arguments, the second argument is an empty array.
#create_placeholder: This argument when set to TRUE, makes sure a placeholder is generated & placed while processing this render element.
#markup: This is the cacheable part of the block plugin. Since, the content is translatable, we have added a language cache context here. We can add any cache tag depending on the content being rendered here as well using $build['#cache']['tags'] = ['...'];
Lets take a quick look at our service implementation:
As we can see above the data returned from the service callback function is just the timestamp, which is the dynamic part of block content.
Lets see how Drupal renders it with its default single flush strategy. So, the content of the block before placeholder processing would look like as follows:
Once the placeholders are processed, it would change to:
The placeholder processing in Drupal 8 happens inside via Drupal\Core\Render\Placeholder\ChainedPlaceholderStrategy::processPlaceholders. Drupal 8 core also provides with an interface for defining any custom placeholder processing strategy as well Drupal\Core\Render\Placeholder\PlaceholderStrategyInterface. Bigpipe module implements this interface to provide its own placeholder processing strategy & is able to present users with cached content without waiting for the processing for dynamic ones.
With bigpipe enabled, the block would render something like the one shown in the gif below:
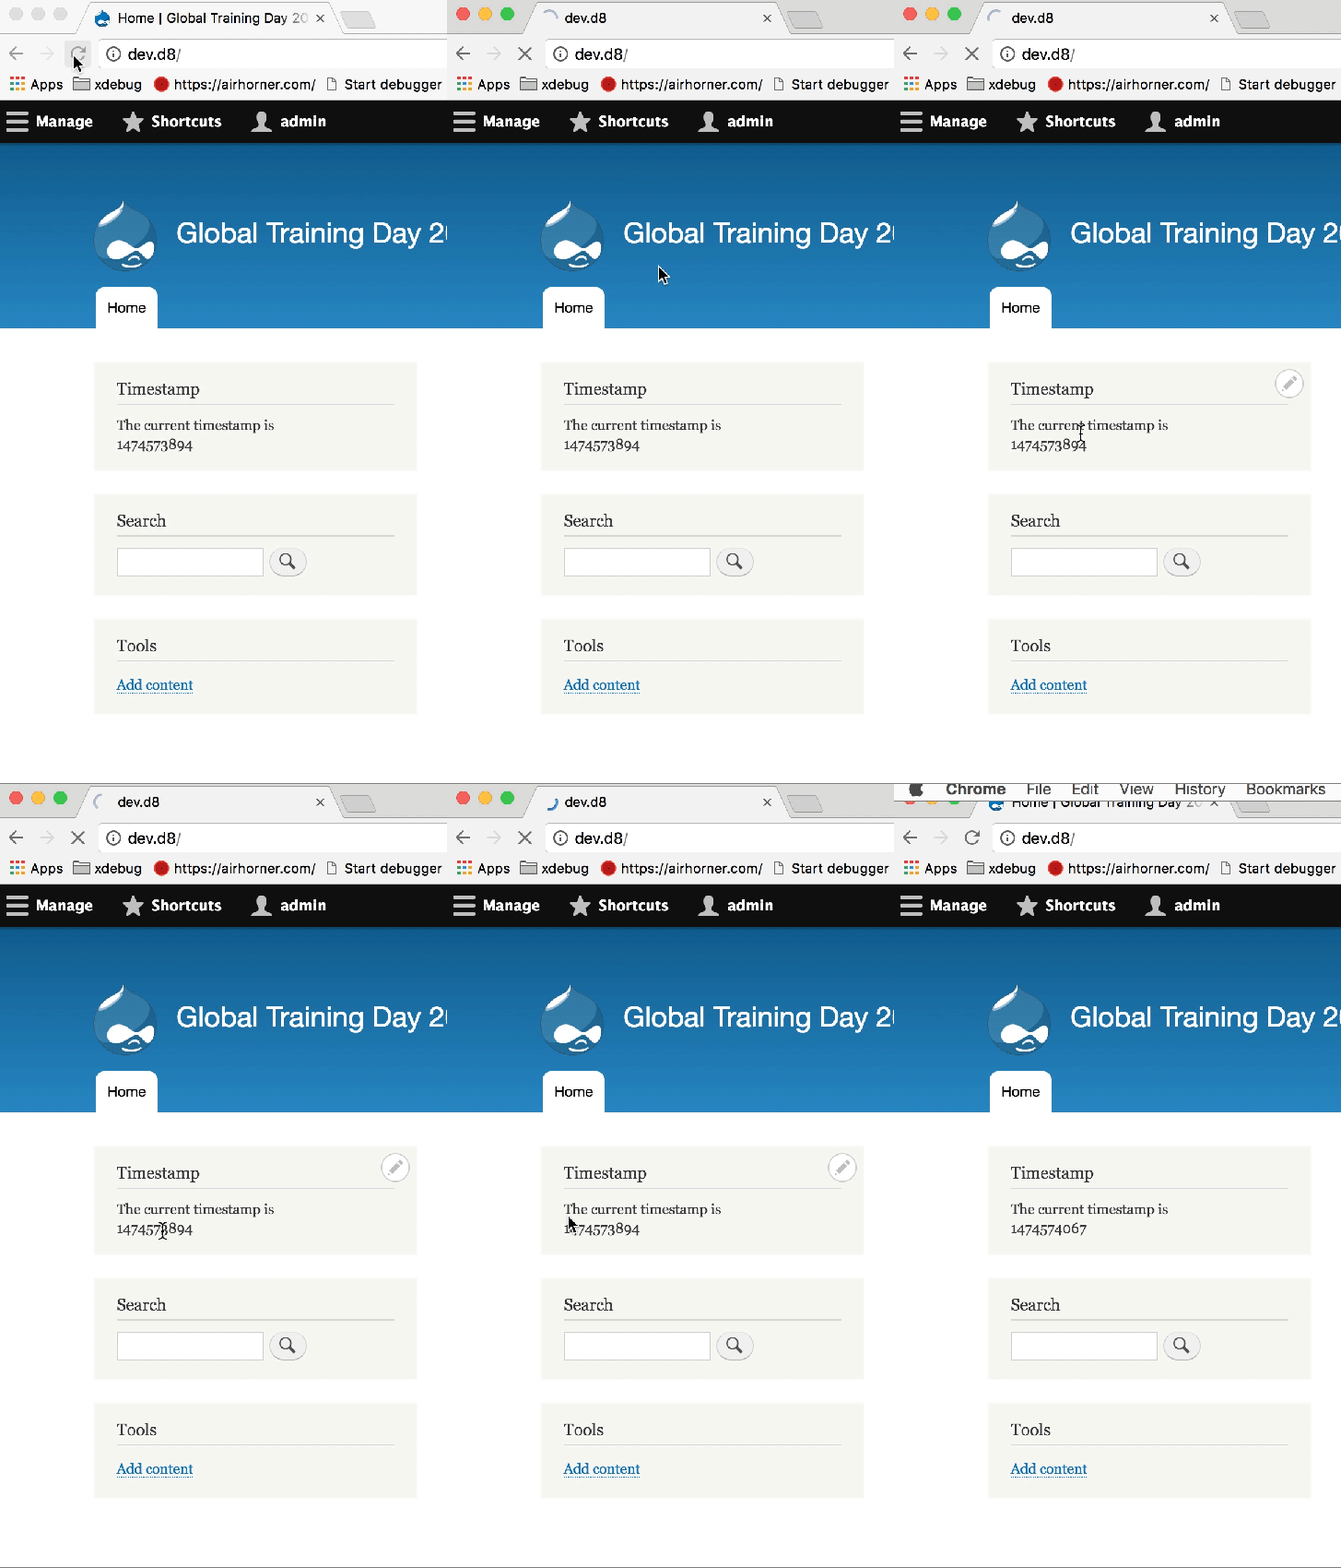
As you can see in this example, as soon as the cached part of the timestamp block "The current timestamp is" is ready, its presented to the end users without waiting for the timestamp value. Current timestamp loads when the lazy builders kick in. Lazy builders are not limited to blocks but can work with any render array element in Drupal 8, this means any piece of content being rendered can leverage lazy builders.
N.B. -- We use Bigpipe in the demo above to make the difference visible.
Category Items
Programmatically updating URL aliases using Batch API in Drupal 8
Updating Drupal URL aliases efficiently using the Batch API.
5 min read
Drupal has always had excellent support for human-friendly URL’s and SEO in general, from early on we have had the luxury of modules like pathauto offering options to update URL for specific entities, token support and bulk update of URLs. Though bulk update works for most cases, there are some situations where we have to update URLs programmatically, some of the use cases are:
- Multisite setup -- When your setup has many sites, its inconvenient to use bulk update UI to update aliases for each of your sites. Programmatically updating the aliases is a good choice and can be executed via the update hooks.
- Conditional Update -- When you wish to update aliases based on certain conditions.
In Drupal 8 Pathauto services.yml file we can see that there is a service named ‘pathauto.generator’ which is what we would need. The class for corresponding to this service, PathautoGenerator provides updateEntityAlias method which is what we would be using here:
Now all we need is to loop the entities through this function, these entities may be the user, taxonomy_term or node. We will be using entityQuery and entityTypeManager to load entities, similar to the code below
This works fine and could be used on a small site but considering the real world scenarios we generally perform this type of one-time operation in hook_update_N() and for larger sites, we may have memory issues, which we can resolve by involving batch API to run the updates in the batch.
Using Batch API in hook_update_n()
As the update process in itself a batch process, so we can’t just use batch_set() to execute our batch process for URL alias update, we need to break the task into smaller chunks and use the $sandbox variable which is passed by reference to update function to track the progress.
The whole process could be broken down into 4 steps:
- Collect number of nodes / entities we would be updating the URL for.
- Use the $sandbox to store information needed to track progress.
- Process nodes in groups of a certain number (say 20, in our case ).
- And finally setting the finished status based on progress.
The process of loading the entities will differ in case we are just updating a single entity type say nodes. In that case, we can use loadMultiple to load all the entities at once per single batch operation. That’s a kind of trade-off we have to do according to our requirements. The crucial part is using sandbox variable and splitting the job into chunks for batch processing.
Category Items
New Module - CSSgram recreating Instagram like filters for Drupal 8
Explore the power of the CSSgram module for Drupal 8, leveraging CSS filters to beautify your site's images. Get creative with easy image styling.
5 min read
CSSgram module supplements Drupal Image styling experience by making Instagram like filters available to your Drupal 8 site images, we do this with help of CSSgram library.
Beauty of this module is, it simply uses css to beautify your image.

Few CSSGram sample filters applied to an image.
How CSSGram Module works?
CSSGram module uses CSSGram Library for adding filter effects via CSS to the image fields. Module extends Field Formatter Settings to add image filter for that particular field. CSSGram extends field formatter settings and hence these filters can be applied on top of the existing available image formatters and image presets. Allowing you to use your desired image preset along with CSSGram filters.
Using CSSGram
- Download and enable CSSGram module (https://www.drupal.org/project/cssgram)
- Visit Manage Display of content type and for the desired image field, click on the setting link under format column.
- Select Filter option lets us choose from the available image filters. Just select the desired image filter and hit update button.

- Save the settings and visit the content display page.
Developer Support
Devs have the option to use these filters anywhere on the site by just attaching the ‘cssgram/cssgram’ library and then applying any of the available css filter class to the wrapper element.
Category Items
New Module - AddToCalendar Drupal Integration
Explore how the Add to Calendar module streamlines event export, making it easy for users to add events to iCalendar, Google Calendar, and more.
5 min read
Drupal sites with events functionality, often have to allow their users to export events in their personal calendars. On a recent Drupal 8 project we were asked to integrate 3rd party service Add to Calendar to their events and having found no formal integration of the widget with Drupal we developed and contributed this module. The widget provided by Add to calendar supports export of Dates / events to iCalender, Google Calendar, Outlook, Outlook Online and Yahoo Calendar.
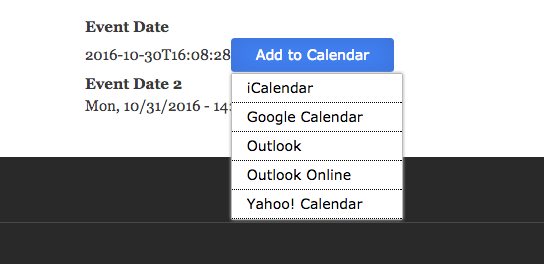
Why use Add To Calendar Service?
- Add to Calendar Module provides a widget to export events.
- With Add to Calendar Module, you can create event button on a page and allow guests to add this event to their calendar.
How Does Add to Calendar Module Works?
Add to Calendar Module provides third party field formatter settings for DateTime fields. Module internally uses services provided by http://addtocalendar.com to load free add to calendar button for event page on website and email. Clicking on this button, the event is exported to the corresponding website with proper information in the next tab where a user can add the event to their calendar. Besides, it provides a handful of configuration for a really flexible experience, Allowing you to use your datetime format along with Add to Calendar button.
Using Add to Calendar
- Download and enable Add to Calendar module (https://www.drupal.org/project/addtocalendar)
- The module has both D8 and a backported D7 versions.
- Adding Add to Calendar button to any datetime field would require enabling “Show Add to Calendar” checkbox present at format configurations on Manage Display page of the desired content type.
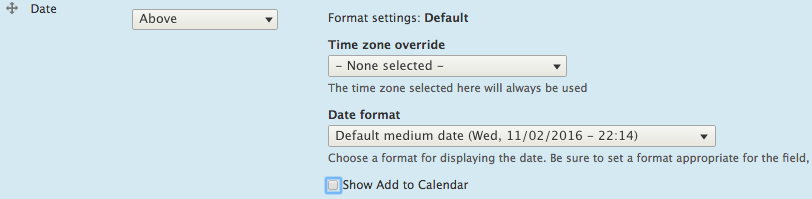
- Following configurations are available:
- Save the settings and visit content display page.
Developer Support
Devs have the option to add "Add to Calendar" button anywhere on the website by following below steps:
1. Include base library ('addtocalendar/base') for add to calendar basic functionality. Optionally, You may also one of the following style libraries for styling the display button:
- 'addtocalendar/blue'
- 'addtocalendar/glow_orange'
$variables['#attached']['library'][] = 'addtocalendar/base';
2. Place event data on the page as:
<span class="addtocalendar atc-style-blue">
<var class="atc_event">
<var class="atc_date_start">2016-05-04 12:00:00</var>
<var class="atc_date_end">2016-05-04 18:00:00</var>
<var class="atc_timezone">Europe/London</var>
<var class="atc_title">Star Wars Day Party</var>
<var class="atc_description">May the force be with you</var>
<var class="atc_location">Tatooine</var>
<var class="atc_organizer">Luke Skywalker</var>
<var class="atc_organizer_email">luke@starwars.com</var>
</var>
</span>
For further customization of this custom button visit: http://addtocalendar.com/ Event Data Options section.
3. This would create "Add to Calendar" button for your website.
Category Items
Implementing #autocomplete in Drupal 8 with Custom Callbacks
Explore the process of implementing #autocomplete in Drupal 8 with custom callbacks. Elevate your site's UX and interactivity effortlessly.
5 min read
Autocomplete on textfields like tags / user & node reference helps improve the UX and interactivity for your site visitors, In this blog post I'd like to cover how to implement autocomplete functionality in Drupal 8, including implementing a custom callback
Step 1: Assign autocomplete properties to textfield
As per Drupal Change records, #autocomplete_path has been replaced by #autocomplete_route_name and #autocomplete_parameters for autocomplete fields ( More details -- https://www.drupal.org/node/2070985).
The very first step is to assign appropriate properties to the textfield:
- '#autocomplete_route_name':
for passing route name of callback URL to be used by autocomplete Javascript Library. - '#autocomplete_route_parameters':
for passing array of arguments to be passed to autocomplete handler.
Thats all! for adding an #autocomplete callback to a textfield.
However, there might be cases where the routes provided by core might not suffice as we might different response in JSON or additional data. Lets take a look at how to write a autocomplete callback, we will be using using my_module.autocomplete route and will pass arguments: 'name' as field_name and 10 as count.
Step 2: Define autocomplete route
Now, add the 'my_module.autocomplete' route in my_module.routing.yml file as:
While Passing parameters to controller, use the same names in curly braces, which were used while defining the autocomplete_route_parameters. Defining _format as json is a good practise.
Step 3: Add Controller and return JSON response
Finally, we need to generate the JSON response for our field element. So, proceeding further we would be creating AutoCompleteController class file at my_module > src > Controller > AutocompleteController.php.
We would be extending ControllerBase class and would then define our handler method, which will return results. Parameters for the handler would be Request object and arguments (field_name and count) passed in routing.yml file. From the Request object, we would be getting the typed string from the URL. Besides, we do have other route parameters (field_name and Count) on the basis of which we can generate the results array.
An important point to be noticed here is, we need the results array to have data in 'value' and 'label' key-value pair as we have done above. Then finally we would be generating JsonResponse by creating new JsonResponse object and passing $results.
That's all we need to make autocomplete field working. Rebuild the cache and load the form page to see results.
Category Items
Securing Cookie for 3rd Party Identity Management in Drupal
Secure cookie handling ensures safe authentication and protects sensitive user data in Drupal.
5 min read
But what when we have a scenario where user’s information is being managed by a third party service and no user information is being saved on Drupal? And when the authentication is done via some other third party services? How can we manage cookie in this case to run our site session and also keep it secure?
One is way is to set and maintain cookie on our own. In this case, our user’s will be anonymous to Drupal. So, we keep session running based on cookies! The user information will be stored in cookie itself, which then can be validated when a request is made to Drupal.
We have a php function to set cookie called setCookie() , which we can use to create and destroy cookie. So, the flow will be that a user login request which is made to website is verified via a third party service and then we call setCookie function which sets the cookie containing user information. But, securing the cookie is must, so how do we do that?
For this, let’s refer to Bakery module to see how it does it. It contains functions for encrypting cookie, setting it and validating it.
To achieve this in Drupal 8, we will write a helper class let’s say “UserCookie.php” and place it in ‘{modulename}/src/Helper/’. Our cookie helper class will contain static methods for setting cookie and validating cookie. Static methods so that we will be able to call them from anywhere.
We will have to encrypt cookie before setting it so we will use openssl_encrypt() php function in following manner:
- String parameter in openssl_digest can be replaced with any string you feel like that can be used as key. You can keep simple keyword too.
- Key used should be same while decryption of data.
- Same initialization vector will be needed while decrypting the data, so to retrieve it back we append this along with cookie data string.
- We also add a signature which is generate used the same key used above. We will verify this key while validating cookie.
- Finally, we encode both signature and encrypted cookie data together.
For setting cookie:
Note: You can keep 'SOME_COOKIE_KEY' and 'SOME_DEFAULT_COOKIE_EXPIRE_TIME' in your settings.php. Settings::get() will fetch that for you.
Tip: You can also append and save expiration time of cookie in encrypted data itself so that you can also verify that at time of decryption. This will stop anyone from extending the session by setting cookie timing manually.
Congrats! We have successfully encrypted the user data and set it into a cookie.
Now let’s see how we can decrypt and validate the same cookie.
To decrypt cookie:
- We generate the same key using same string parameter given while encryption.
- Then we reverse base64 encoding as we need extract signature to verify it.
- We generate same signature again as we have used the same key which was used to creating signature while encryption. If doesn’t signatures doesn’t matches, validation fails!
- Else, we extract initialization vector from the encrypted data and use to decrypt the data return to be utilized.
We can verify cookie on requests made to website to maintain our session. You can implement function for expiring cookie for simulating user logout. We can also use decrypted user data out of cookie for serving user related pages.We are in an era where we see a lots of third party integrations being done in projects. In Drupal based projects, cookie management is done via Drupal itself to maintain session, whether it be a pure Drupal project or decoupled Drupal project,.

Category Items
Google Assistant Integration with Drupal
Integrating Google Assistant with Drupal to enable conversational user experiences.
5 min read
The Rise of Assistants
In last couple of years we have seen the rise of assistants, AI is enabling our lives more and more and with help of devices like Google Home and Amazon Echo, its now entering our living rooms and changing how we interact with technology. Though Assistants have been around for couple of years through android google home app, the UX is changing rapidly with home devices where now we are experiencing Conversational UI i.e. being able to talk to devices, no more typing/searching, you can now converse with your device and book a cab or play your favourite music. Though the verdict on home devices like Echo and Google home is pending, the underlying technology i.e. AI based assistants are here to stay.
In this post, we will explore Google Assistant Developer framework and how we can integrate it with Drupal.
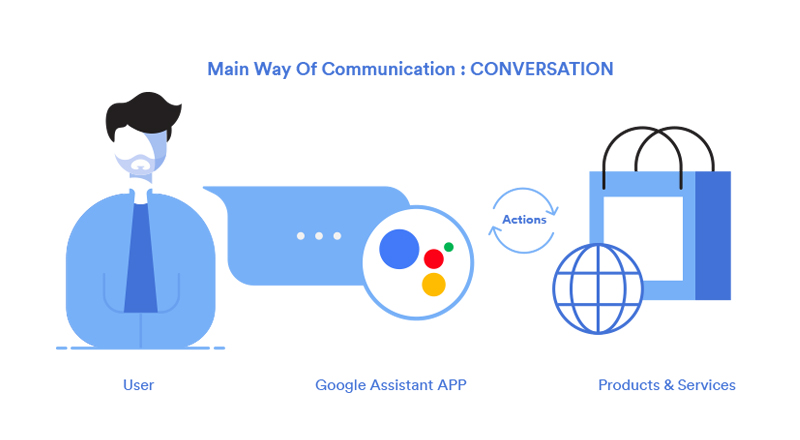
Google Assistant works with help of Apps that define actions which in turn invokes operations to be performed on our product and services. These apps are registered with Actions on Google, which basically is a platform comprising of Apps and hence connecting different products and services via Apps. Unlike traditional mobile or desktop apps, users interact with Assistant apps through a conversation, natural-sounding back and forth exchanges (voice or text) and not traditional Click and Touch paradigms.
The first step in the flow is understanding use requests through actions, so lets learn more about it.
How Action on Google works with the Assistant?
It is very important to understand how actually actions on Google work with the assistant to have an overview of the workflow. From the development perspective, it's crucial we understand the whole of the Google Assistant and Google Action model in total, so that extending the same becomes easier.
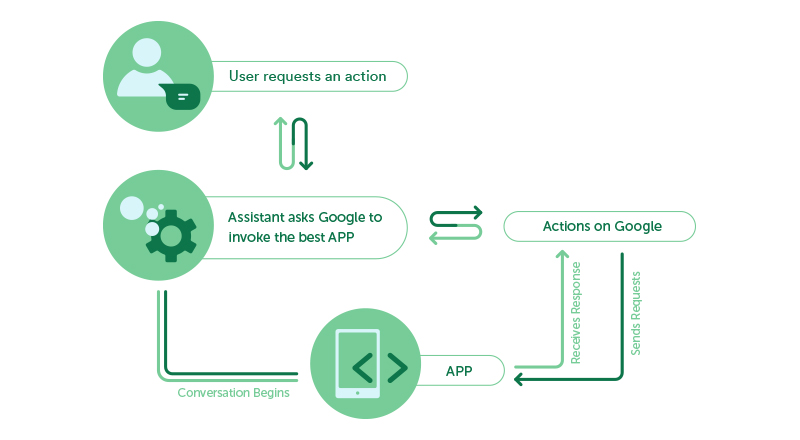
It all starts with User requesting an action, followed by Google Assistant invoking best corresponding APP using Actions on Google. Now, it's the duty of Actions on Google to contact APP by sending a request. The app must be prepared to handle the request, perform the corresponding action and send a valid response to the Actions on Google which is then passed to Google Assistant. Google Assistant renders the response in its UI and displays it to the user and conversation begins.
Lets build our own action, following tools are required:
- Ngrok - Local web server supporting HTTPS.
- Editor - Sublime/PHPStorm
- Google Pixel 2 - Just kidding! Although you can order 1 for me :p
- Bit of patience and 100% attention
STEP1: BUILD YOUR ACTION APP
Very first step now is building our Actions on Google APP. Google provides 3 ways to accomplish this:
- With Templates
- With Dialogflow
- With Actions SDK
Main purpose of this app would be matching user request with an action. For now, we would be going with Dialogflow (for beginner convenience). To develop with Dialogflow, we first need to create an Actions on Google developer project and a Dialogflow agent. Having a project allows us to access the developer console to manage and distribute our app.
- Go to the Actions on Google Developer Console.
- Click on Add Project, enter YourAppName for the project name, and click Create Project.
- In the Overview screen, click BUILD on the Dialogflow card and then CREATE ACTIONS ON Dialogflow to start building actions.
- The Dialogflow console appears with information automatically populated in an agent. Click Save to save the agent.
Post saving an agent, we start improving/developing our agent. We can consider this step as training of our newly created Agent via some training data set. These structured training data sets referred here are intents. An individual Intent comprises of query patterns that a user may ask to perform an action, events and actions associated with this particular intent which together define a purpose user want to fulfill. So, every task user wants Assistant to perform is actually mapped with an intent. Events and Actions can be considered as a definitive representation of the actual associated event and task that needs to be performed which will be used by our products and services to understand what the end user is asking for.
So, here we define all the intents that define our app. Let's start with creating an intent to do cache rebuild.
- Create a new intent with name CACHE-REBUILD.
- We need to add query patterns we can think of, that user might say to invoke this intent. (Query Patterns may content parameters too, we will cover this later.)
- Add event cache-rebuild.
- Save the intent.
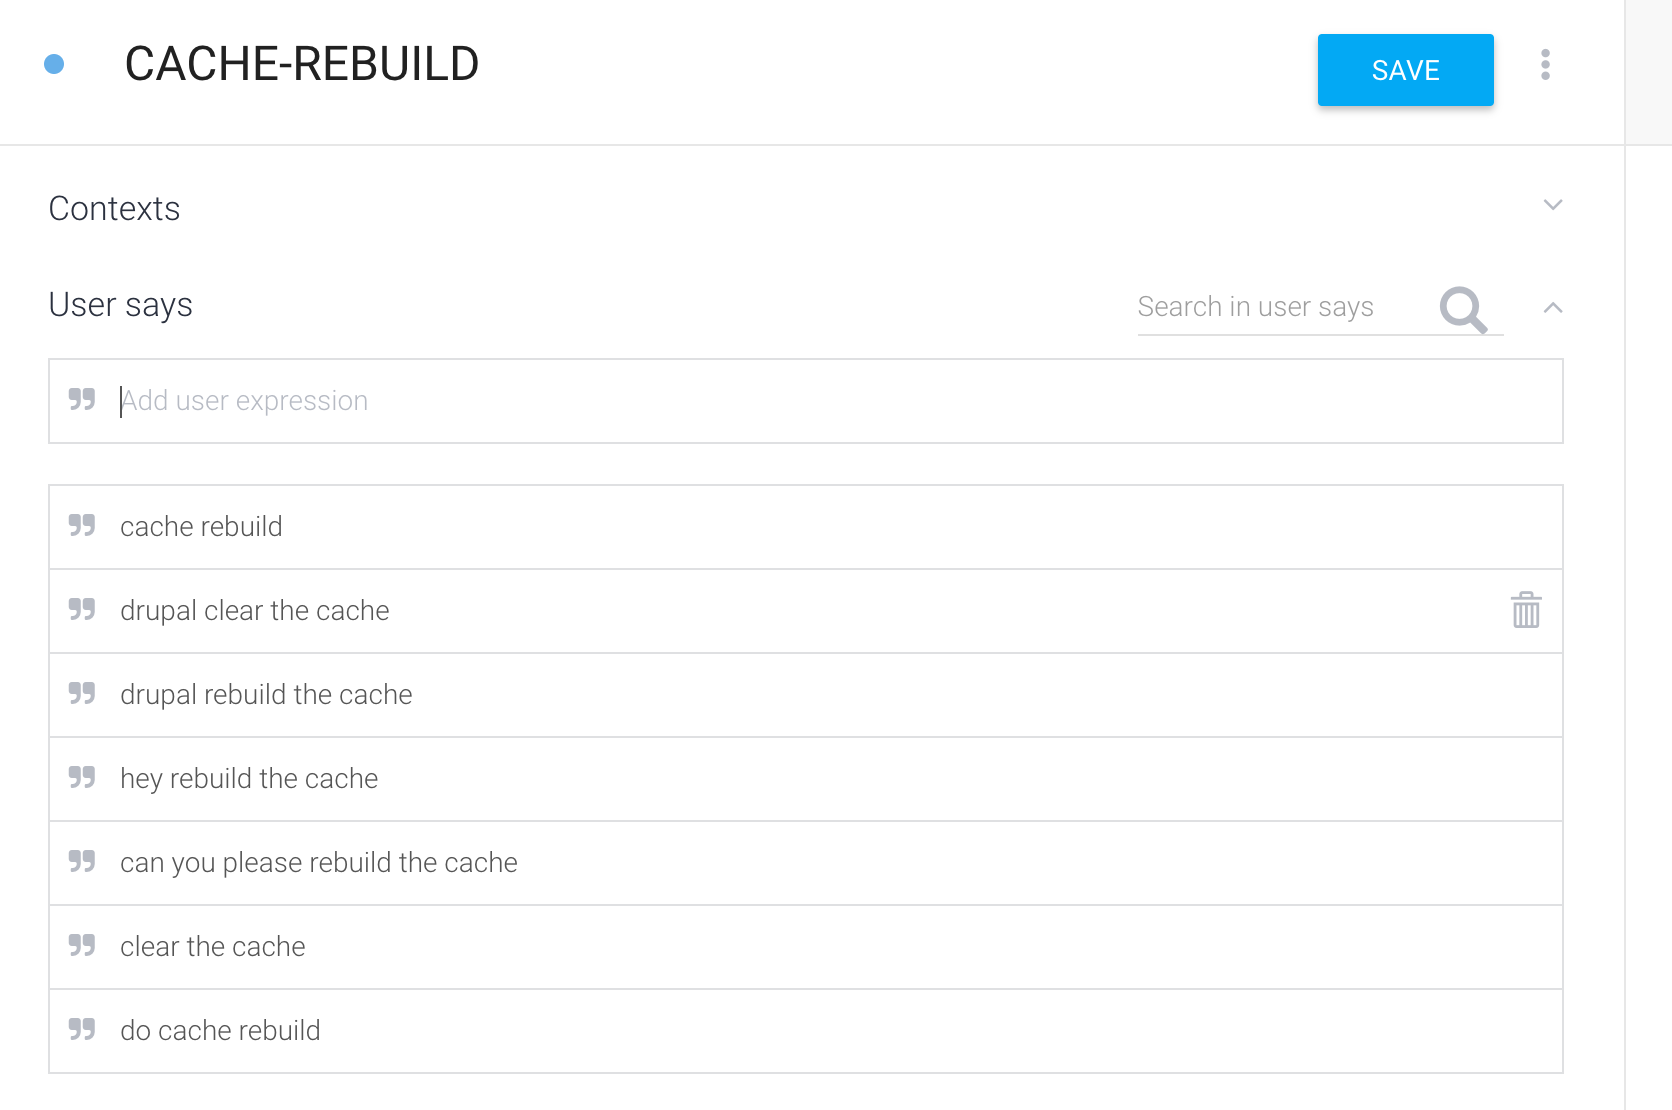
For now, this is enough to just understand the flow, we will focus on entities and other aspects later. To verify if the intent you have created gets invoked if user says “do cache rebuild”, use “Try it now” present in the right side of the Dialogflow window.
STEP2: BUILD FULFILLMENT
After we are done with defining action in dialogflow, we now need to prepare our product (Drupal App) to fulfill the user request. So, basically after understanding user request and matching that with an intent and action Actions on Google is now going to invoke our Drupal App in one or the other way . This is accomplished using WEBHOOKS. So, Google is now going to send a post request with all the details. Under Fulfillment tab, we configure our webhook. We need to ensure that our web service fulfills webhook requirements.
According to this, the web service must use HTTPS and the URL must be publicly accessible and hence we need to install NGROK. Ngrok exposes local web server to the internet.

After having a publicly accessible URL, we just need to add this URL under fulfillment tab. As this URL will receive post request and processing will be done thereafter, so we need to add that URL where we are gonna handle requests just like endpoints. (It may be like http://yourlocalsite.ngrok.io/google-assistant-request)
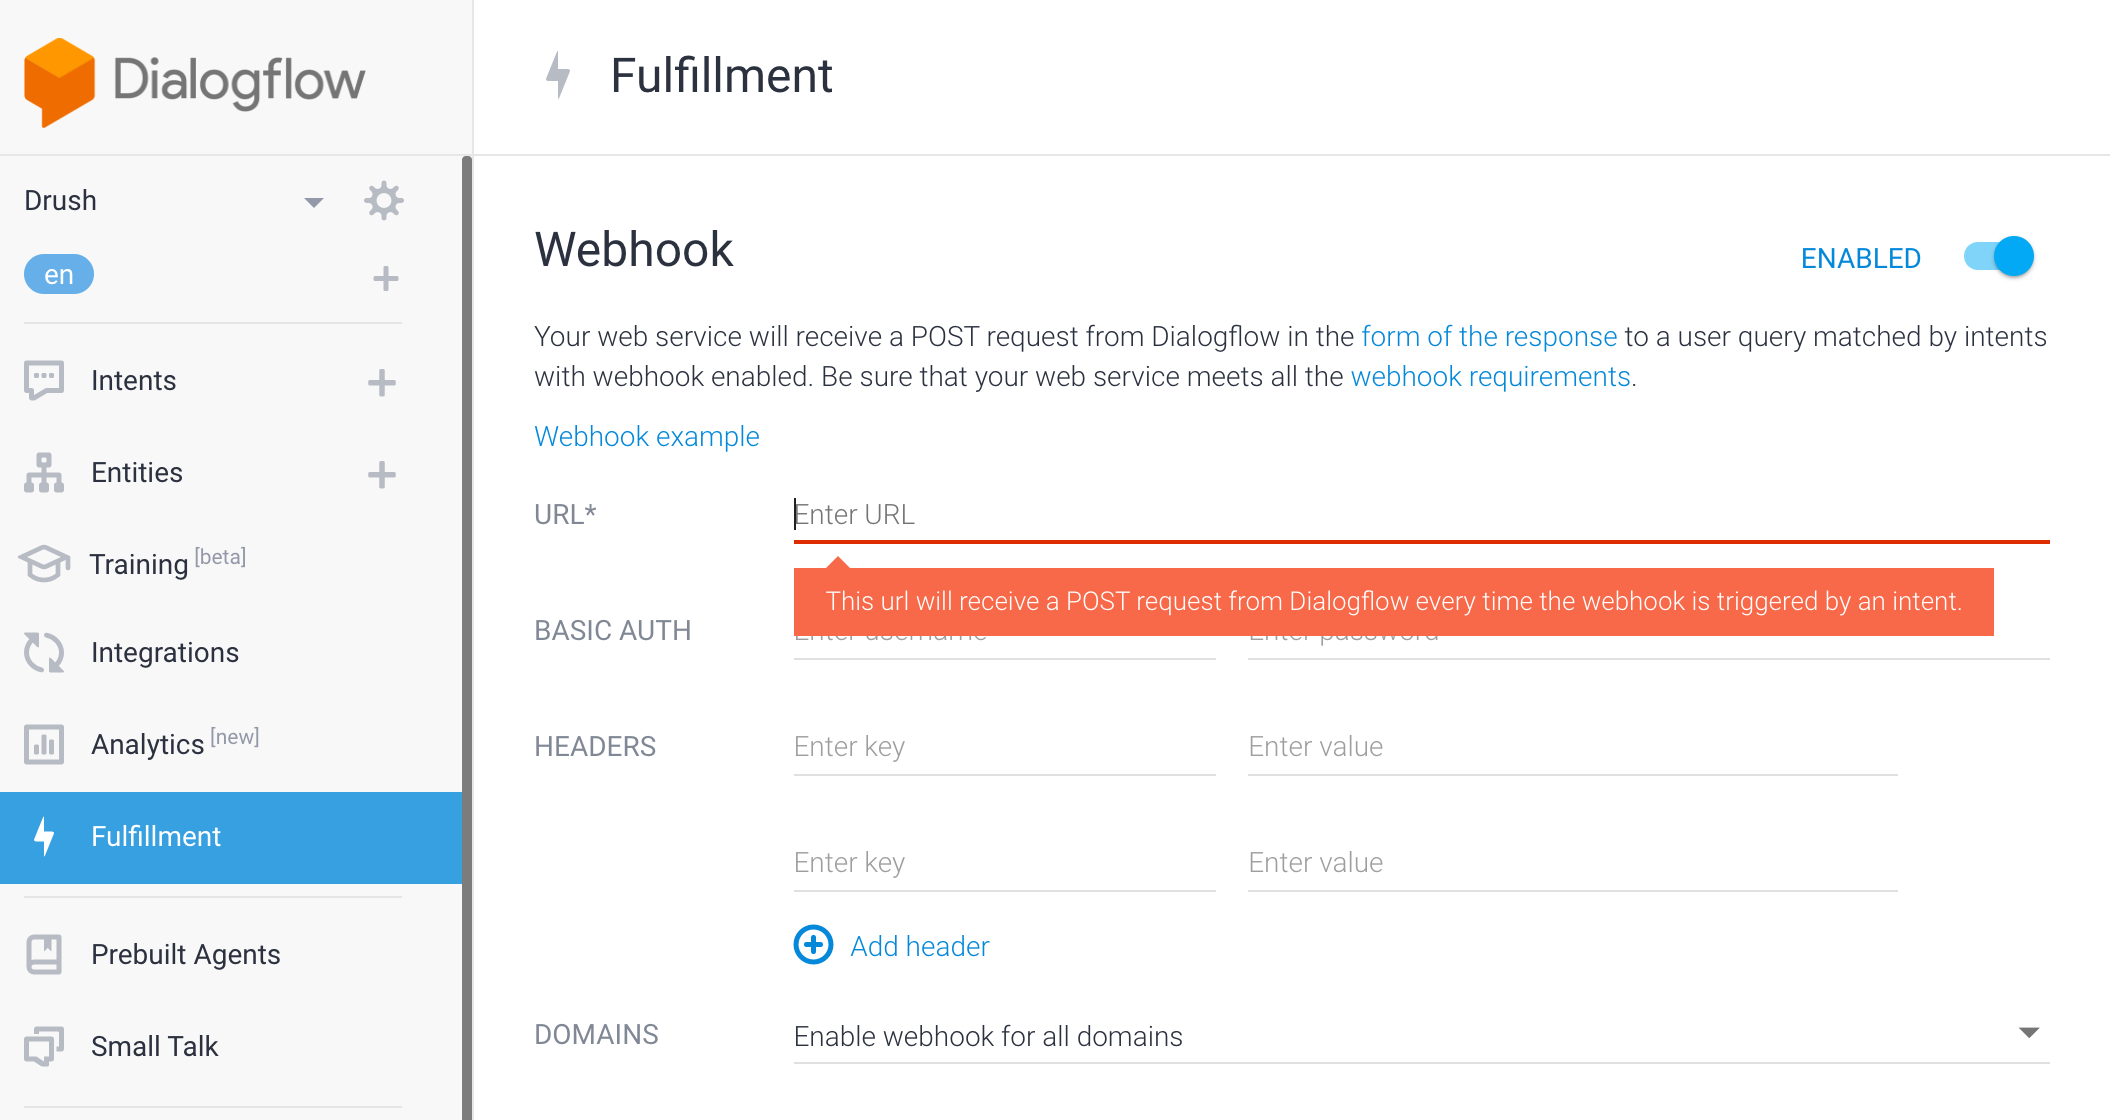
Now, we need to build corresponding fulfillment to process the intent.
OK! It seems simple we just need to create a custom module with a route and a controller to handle the request. Indeed it is simple, only important point is understanding the flow which we understood above.
So, why are we waiting? Let’s start.
Create a custom module and a routing file:
Now, let’s add the corresponding controller
Done! We are ready with a request handler to process the request that will be made by Google Assistant.
STEP3: DEPLOY FULFILLMENT AND TESTING THE APP
Part of the deployment has already been done, as we are developing on our local only. Now, we need to enable our custom module. Post that let's get back to dialogflow and establish the connection with app to test this. Earlier we had configured fulfillment URL details, ensure we have enabled webhook for all domains.

Let’s get back to intent that we build and enable webhook there too and save the intent.

Now, to test this we need to integrate it any of the device or live/sandbox app. Under Integrations tab, google provides several options for this too. Enable for Web Demo and open the URL in new tab, to test this:

Speak up and test your newly build APP and let Google Assistant do its work.
So, as seen in the screenshot, there can be 2 type of responses. First, where our server is not able to handle request properly and the second one where Drupal server sends a valid JSON response.
GREAT! Connection is now established, you can now add intents in Google Action APP and correspondingly handle that intent and action at Drupal End. This is just a taste, conversational UX and Assistant technology will definitely impact how we interact with technology and we believe Drupal has a great role to play as a robust backend.
Category Items
Experiencing DrupalCon Vienna
Experience the highs and lows of a newcomer's first DrupalCon talk, where fresh perspectives on design bring a positive change to the community.
5 min read
The calls for sessions for DrupalCon Vienna had just closed and all of us who had submitted their sessions were waiting, eager to find out about the result. It was just a usual day at the office and I get an email from the Drupal Association. I opened the mail and what I saw wanted to make me jump out of my chair! Yes, my selection for DrupalCon was confirmed and I was so excited! It was an unbelievable situation for me because it was quite unexpected, not that I was under confident about myself but to be a young member in the Drupal Community, and getting selected amongst so many talented and experienced people out there, is sure to make anyone feel surprised. With only an experience of 1.5 years of working with QED42 as a user experience designer, this seemed like a dream come true for me.
I’ve spoken publicly before, mostly in the context of design, but preparing for a Drupal conference was a whole new affair for me.
My excitement had not ceased but there was a slight fear building up, of talking in one of the biggest conferences. I had to prepare myself to speak in front of an audience that had a lot more experience in Drupal than I had.
Being a young designer, the whole idea of my talk was to put forward a fresh perspective on designing for Drupal.
I positively had a feeling that the selection of my session happened to get a fresh point of view from a person who was new to the Drupal community and as a designer could help contribute to bring a positive change to the Drupal world.
I wanted to put forward the smallest of the details of my experience - in a manner that could successfully communicate my opinions to the versatile audience - which could be anyone from a developer to a project manager.
I wrote down my thoughts and insights I encountered during the process of creating my slides. While preparing for the talk I realised that I had gained a good amount of information which would help me further in presenting my topic.
Understanding the main themes of the conference helped me shape the focus of my talk. Speaking for the first time in front of a technical audience at a conference can be intimidating where some audience members may have more knowledge than you about your subject. Preparation is crucial. I was also getting a helpful feedback while preparing, particularly about expanding the content to make it more relevant.
I had prepared myself for the best and the worst. It was about time that I began my presentation. The first few minutes of the talk were the toughest but as I went on sharing my knowledge I became less anxious. I realised that speaking at a conference is a great way to share knowledge and experience and it is quite surprising to see how much we can learn when researching our talk topics. It’s also a great opportunity to network with other professionals in our field, and make some great new friends.
It was a great relief to know that I did not screw up as bad as I thought I might, and maybe my talk helped someone. It was also very rewarding to get feedback from the audience and hear their thoughts on what they had to say.
The entire presentation felt like an out of body experience to me. It took a lot of time and effort to prepare and speak at this conference but it was worth it. And it is good to know that I’m a part of Drupal and I’m being able to participate in whatever way I can, to add to this amazing community.
Travelling alone this far, for the first time, I was scared. But knowing that I am a part of the Drupal community and connected to everybody around me through Drupal gave me a sense of belonging and lifted up my spirits. To my surprise I wasn’t feeling out of place because it felt like a family, our own Drupal family where our collective aim is to work for the betterment and growth of this community. My excitement was at it’s peak till the closing ceremony. And I’m now looking forward to more such opportunities to speak and share stories.

Category Items
36 Days of fun in 36 Days Of Type Challenge
QED42’s creative reflection on typography and visual design through the 36 Days of Type challenge.
5 min read
36 days of type is a project challenging visual artists to create a letter or number a day for 36 days, exploring different media and pushing the boundaries of creative expression. It also marks a great time for illustrators, typographers, and graphic designers to experiment with their craft and it also provides a platform to make a statement with one’s work.

This was our first time participating in the worldwide phenomenon of #36DaysOfType2017 - fourth edition, and we were more than excited to take up this challenge! Since it is an open challenge and the amount of experiment that we could do was infinite, it took some time to decide the theme that we would be choosing. We wanted to give this project an illustrative spin and also wanted to showcase India’s cultural extravaganza. That’s how we decided to illustrate the performing arts of India through letters and numbers. These performing arts include dance, music, theatre and martial arts practiced in all the states of India.
This series is meant to highlight India and the diverse manifestations of India’s cultural beauty. It also aims to identify even the art forms that many people are not aware of or the dying art forms of our country. The letters have been directly or indirectly represented as a form of dance, music, theatre or martial arts while the numbers have been represented as Indian classical musical instruments.
Why we took this challenge
We’ve been asked a few times - what was the reason behind taking up the 36 days of type challenge? Well, to describe it in a sentence, creative expression knows no bounds and we should not let any opportunity slip away that lets this creative energy expand.
However, we had more reasons to participate in this challenge. It requires everyone who is participating, to post something everyday. This helps us to be pragmatic, sensitive to time and maintain a design discipline. It is a challenge to express our creative thoughts being within certain limitations. Letters and numbers have a predefined structure and form, which defines a boundary of expression. Thus, this challenge is a great way to express with shapes, forms and constitutional limitations.
Since, we were showcasing performing arts of India, all the characters required extraordinary amount but time bound research which made us better in researching about a topic in a short span of time. All the ideas that we build in our head might go to waste if they are not transformed into a tangible form.
And in order to do so, we must present these ideas properly for the world to see our perspective. Attention to details is a concept well understood in design community but often overlooked and our objective is to strike a balance between the ideas and details.
Our experience
The development of this series involved an intensive research about the various performing art forms, studying their aspects and brainstorming sketches for the same. Some days we were successful in creating a great blend between letter form and the art form, others were a struggle, but we racked our talented brains until we were happy with our design.

We had a lot of fun playing around with the letters and numbers. We would give and take feedback from each other too, and learned a lot of new things in the process. Some of our favourite letters from the series are ‘B’ (Baul folk music from West Bengal), ‘K’ (Kathputli from Rajasthan), ’T’ (Theyyam, a colourful ritual dance of Kerala).
We enjoyed every minute of the journey and looking forward to doing it again!